vue封装echarts
liyoro2 人气:0场景
- 1、Echarts使用时,都需要写一堆的option,如果每个图表都要写一个,一个文件里面的代码量是很大的
- 2、不方便复用
需求
- 1、方便复用
- 2、展示类的图表,数据与业务、样式分离,只传数据就行
- 3、项目里需要用到的图表会有多个,实现少代码自动化导入,不需要一个个import
- 4、本人图表用在大屏数据可视化的情况比较多,采用的是等比缩放的方式,所以图表也能根据界面缩放自动缩放,不需要手动调用
- 5、图表可配置
代码总览
涉及的文件如下(具体参考代码):
|-- src
    |-- components
        |-- chart
            |-- index.vue    // 图表单文件组件,供界面调用
            |-- index.js    // 实现自动化导入options里的图表option
            |-- options    // 存放各种图表的option
                |-- bar    // 随便一例子
                    |-- index.js
    |-- views
        |-- chartTest    // 实例所在
            |-- index.vue
            |-- index.scss
            |-- index.js
|-- main.js    // 全局引入echarts图表
实现
components--chart--index.vue
这里定义了一个名为ChartView 的组件,开放了4个可配置的属性:宽度width,高度height, 是否自动调整大小autoResize(默认是), 图表的配置chartOption。
这里默认用Canvas 渲染图表了,也可以用SVG的,自选吧
具体代码如下
<template>
  <div class="chart">
    <div ref="chart" :style="{ height: height, width: width }" />
  </div>
</template>
<script>

// 引入 echarts 核心模块,核心模块提供了 echarts 使用必须要的接口。
import * as echarts from 'echarts/core'
// 引入柱状图图表,图表后缀都为 Chart
import {
  BarChart
} from 'echarts/charts'
// 引入提示框,标题,直角坐标系组件,组件后缀都为 Component
import {
  TitleComponent,
  TooltipComponent,
  GridComponent
} from 'echarts/components'
// 引入 Canvas 渲染器,注意引入 CanvasRenderer 或者 SVGRenderer 是必须的一步
import {
  CanvasRenderer
} from 'echarts/renderers'

// 注册必须的组件
echarts.use(
  [TitleComponent, TooltipComponent, GridComponent, BarChart, CanvasRenderer]
)

export default {
  name: 'ChartView',
  props: {
    width: {
      type: String,
      default: '100%'
    },
    height: {
      type: String,
      default: '350px'
    },
    autoResize: {
      type: Boolean,
      default: true
    },
    chartOption: {
      type: Object,
      required: true
    },
    type: {
      type: String,
      default: 'canvas'
    }
  },
  data() {
    return {
      chart: null
    }
  },
  watch: {
    chartOption: {
      deep: true,
      handler(newVal) {
        this.setOptions(newVal)
      }
    }
  },
  mounted() {
    this.initChart()
    if (this.autoResize) {
      window.addEventListener('resize', this.resizeHandler)
    }
  },
  beforeDestroy() {
    if (!this.chart) {
      return
    }
    if (this.autoResize) {
      window.removeEventListener('resize', this.resizeHandler)
    }
    this.chart.dispose()
    this.chart = null
  },
  methods: {
    resizeHandler() {
      this.chart.resize()
    },
    initChart() {
      this.chart = echarts.init(this.$refs.chart, '', {
        renderer: this.type
      })
      this.chart.setOption(this.chartOption)
      this.chart.on('click', this.handleClick)
    },
    handleClick(params) {
      this.$emit('click', params)
    },
    setOptions(option) {
      this.clearChart()
      this.resizeHandler()
      if (this.chart) {
        this.chart.setOption(option)
      }
    },
    refresh() {
      this.setOptions(this.chartOption)
    },
    clearChart() {
      this.chart && this.chart.clear()
    }
  }
}
</script>
components--chart--index.js
这里主要利用require.context,把options里面定义的图表遍历导入,这样就不需要在代码里一个个import了,特别是图表多的时候。
const modulesFiles = require.context('./options', true, /index.js$/)
let modules = {}
modulesFiles.keys().forEach(item => {
  modules = Object.assign({}, modules, modulesFiles(item).default)
})
export default modules
components--chart--options
这里展示下如何封装自己想要的图表
在Echarts官方示例上随便选了个示例

在options下新建一个bar目录,bar目录下新建一个index.js文件。(个人习惯而已,喜欢每个图表都独立文件夹存放。不喜欢这种方式的,可以不放目录,直接js文件,但是components--chart--index.js要对应修改下)
直接复制示例的option代码
index.js具体代码如下
const testBar = (data) => {
  const defaultConfig = {
    xAxis: {
      type: 'category',
      data: ['Mon', 'Tue', 'Wed', 'Thu', 'Fri', 'Sat', 'Sun']
    },
    yAxis: {
      type: 'value'
    },
    series: [{
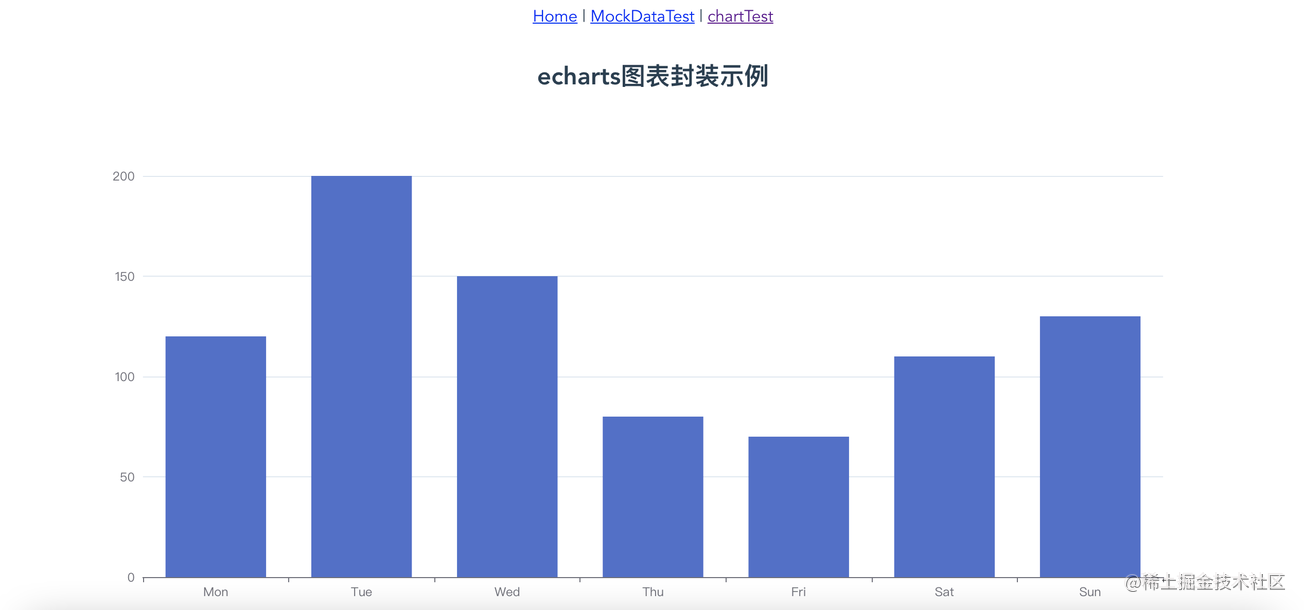
      data: [120, 200, 150, 80, 70, 110, 130],
      type: 'bar'
    }]
  }

  const opt = Object.assign({}, defaultConfig)
  return opt
}

export default {
  testBar
}
testBar方法是可以传参的,具体使用的时候,图表所需要配置的属性,如:data数据、图表颜色......等都可以作为参数传。
main.js
这里全局引入下封装的Echarts组件,方便界面调用。(至于单个引用的方式,就不必多说了)
具体代码如下:
import eChartFn from '@/components/chart/index.js'
import ChartPanel from '@/components/chart/index.vue'
Vue.component(ChartPanel.name, ChartPanel)
Vue.prototype.$eChartFn = eChartFn
chartTest
这里展示下如何调用封装的bar图表,主要代码如下
index.vue
<chart-view class="chart-content" :chart-option="chartOpt" :auto-resize="true" height="100%" />
index.js
export default {
  name: 'chartTestView',
  data() {
    return {
      chartOpt: {}
    }
  },
  mounted() {},
  created() {
    this.chartOpt = this.$eChartFn.testBar()
  },
  methods: {
  },
  watch: {}
}
效果如下

可以尝试拖动浏览器的大小,可以看到,图表也是随着浏览器的拖动自动缩放的。
代码
按代码总览的目录去代码里找着看就行了。
总结
Echarts用到的各种图表,基本上都可以在Echarts官方示例和Echarts可视化作品分享(已停服)上找到。
以上,封装了chart组件,按照上述方式,把图表的option配置和相关处理都放options文件夹下面,调用图表时传对应的option,也就几行代码的事情,算是比较方便了。
chart组件很方便复用的,直接就可以使用了。
补充
评论里说想动态修改option里面的属性,稍微做了个例子,动态修改pie图表的data和color属性,这个是直接生产就可以使用的例子了,直接参考代码就行了,不详细说了。想修改什么属性,直接传参就行。传具体参数可以,想修改的属性多了就把参数封装成一个json传也可以。懂得在封装的option里面灵活使用就行。
以下是新增的参考代码
|-- src
    |-- components
        |-- chart
            |-- options    // 存放各种图表的option
                |-- pie    // pie例子
                    |-- index.js
    |-- views
        |-- chartTest    // 实例所在
            |-- index.vue
            |-- index.scss
            |-- index.js
代码使用都是直接一行调用的
this.chartOpt2 = this.$eChartFn.getPieChart([100, 23, 43, 65], ['#36CBCB', '#FAD337', '#F2637B', '#975FE4'])
效果如下:

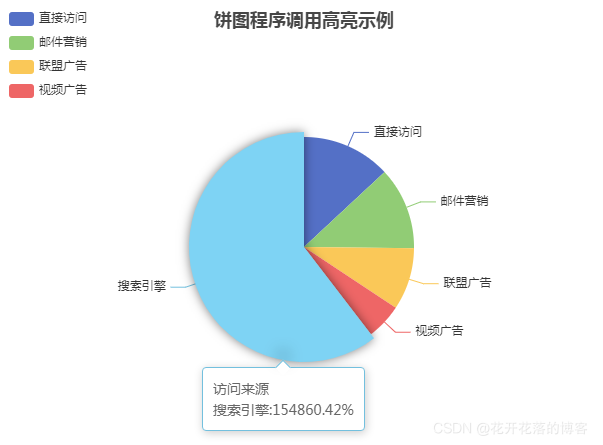
补充2:图表高亮轮询,dispatchAction使用
效果图

使用方法
加上:play-highlight="true"属性就行
<chart-view class="chart-content" :chart-option="chartOpt2" :auto-resize="true" :play-highlight="true" height="100%" />
复制代码
主要实现的代码在如下文件的playHighlightAction方法里面,参考的echarts 饼图调用高亮示例 dispatchAction(见文末)实现的。只是简单的高亮轮询,具体各种实现就自己看文档调样式了。
|-- src
    |-- components
        |-- chart
            |-- index.js    // 实现自动化导入options里的图表option
附:echarts 饼图调用高亮示例 dispatchAction
 <!-- 为ECharts准备一个具备大小(宽高)的Dom -->
    <div id="main" style="width: 600px;height:400px;"></div>
    <script type="text/javascript">
        var myChart = echarts.init(document.getElementById('main'));
        var app = {};
        option = {
            title:{
                text:'饼图程序调用高亮示例',
                left:'center'
            },
            tooltip:{
                trigger:'item',
                formatter:'{a}
{b}:{c}{d}%'
            },
            legend:{
                orient:'vertical', //图例列表的布局朝向。'horizontal''vertical'
                left:'left',
                data:['直接访问','邮件营销','联盟广告','视频广告','搜素引擎']
            },
            series:[
                {
                    name:'访问来源',
                    type:'pie',
                    radius:'55%',
                    center:['50%','60%'],
                    data:[
                        {value:335,name:'直接访问'},
                        {value:310,name:'邮件营销'},
                        {value:234,name:'联盟广告'},
                        {value:135,name:'视频广告'},
                        {value:1548,name:'搜索引擎'},
                    ],
                    emphasis:{
                        itemStyle:{
                            shadowBlur:10,
                            shadowOffsetX:0,
                            shadowColor:'rgba(0,0,0,0.5)'
                        }
                    }
                }
            ]
        };

        app.currentIndex = -1;
        setInterval(() => {
            var dataLen = option.series[0].data.length;
            //取消之前高亮的图形
            myChart.dispatchAction({
                type:'downplay',
                seriesIndex:0,
                dataIndex:app.currentIndex
            });
            app.currentIndex = (app.currentIndex + 1) % dataLen;
            //高亮当前图形
            myChart.dispatchAction({
                type:'highlight',
                seriesIndex:0,
                dataIndex:app.currentIndex
            });
            //显示tooltip
            myChart.dispatchAction({
                type:'showTip',
                seriesIndex:0,
                dataIndex:app.currentIndex
            })
        }, 1000);
        option && myChart.setOption(option);
    </script>

补充3:封装echarts地图,姐妹篇
总结
加载全部内容