autojs模仿QQ长按弹窗菜单实现示例详解二
牙叔教程 人气:0引言
上一节讲了列表和长按事件
弹窗菜单
由粗到细, 自顶向下的写代码
我们现在要修改的文件是showMenuWindow.js
function showMenuWindow(view) {
  let popMenuWindow = ui.inflateXml(
    view.getContext(),
    `
    <column>
    <button id="btn1" text="btn1" />
    </column>
    `,
    null
  );
  let mPopWindow = new PopupWindow(popMenuWindow, ViewGroup.LayoutParams.WRAP_CONTENT, ViewGroup.LayoutParams.WRAP_CONTENT, true);
  mPopWindow.setOutsideTouchable(true);
  mPopWindow.showAsDropDown(view);
}
module.exports = showMenuWindow;
我们先修改xml, QQ的弹窗由两部分组成
- 菜单列表
- 箭头
因此, xml如下
<column>
  <androidx.recyclerview.widget.RecyclerView id="recyclerView" padding="16" layout_width="match_parent" layout_height="match_parent">
  </androidx.recyclerview.widget.RecyclerView>
  <android.view.View id='arrow' ></android.view.View>
</column>
这给菜单我们用的也是recyclerView, 因此先设置他的adapter, 如果不会就看上一节课程;
function showMenuWindow(view) {
  let popMenuWindow = ui.inflateXml(
    ...
  );
  setPopMenuRecyclerViewAdapter(popMenuWindow.recyclerView, []);
  ...
}
设置Adapter的时候, 第一个参数我们是有的, 第二个参数是adapter要绑定的数据, 现在没有;
这给菜单数据应该有哪些属性呢?
- 菜单显示的文字
- 菜单点后的回调函数
因此, 数据大概是这样的
  menus: [
    {
      name: "复制",
      handle: () => {
        console.log("复制");
      },
    },
    {
      name: "分享",
      handle: () => {
        console.log("分享");
      },
    },
  ],
这种可配置的数据, 我们把它放到config.js中.
数据有了, 接下来我们进入setPopMenuRecyclerViewAdapter方法内部,
提醒一下, 我是复制黏贴的上一节课的setAdapter方法, 因此设置recyclerview的方法大差不差.
setPopMenuRecyclerViewAdapter.js
let definedClass = false;
const PopMenuRecyclerViewViewHolder = require("./PopMenuRecyclerViewViewHolder");
const PopMenuRecyclerViewAdapter = require("./PopMenuRecyclerViewAdapter");
const showMenuWindow = require("../showMenuWindow.js");
module.exports = async function (recyclerView, items) {
  if (!definedClass) {
    await $java.defineClass(PopMenuRecyclerViewViewHolder);
    await $java.defineClass(PopMenuRecyclerViewAdapter);
    definedClass = true;
  }
  var adapter = new PopMenuRecyclerViewAdapter(items);
  adapter.setLongClick(showMenuWindow);
  recyclerView.setAdapter(adapter);
};
基本上就是复制黏贴, 修改一下类名即可
PopMenuRecyclerViewAdapter.js中, 修改一下holderXml即可
PopMenuRecyclerViewViewHolder.js, bind需要修改
bind(item) {
  this.itemView.attr("text", item);
  this.item = item;
}
除了设置adapter, 菜单弹框还需要设置layoutManager, 这样我们可以控制水平方向上菜单的数量
const layoutManager = new androidx.recyclerview.widget.GridLayoutManager(this, 5);
grid.setLayoutManager(layoutManager);
先设置layoutManager, 再设置adapter
PopMenuRecyclerViewViewHolder.js, 需要修改一下bind方法, 他的item是对象, 文本是item.name
bind(item) {
  this.itemView.attr("text", item.name);
  this.item = item;
}
运行代码, 看看效果

菜单出来了, 接着写箭头, 菜单的xml是
<column>
  <androidx.recyclerview.widget.RecyclerView id="recyclerView" padding="16" layout_width="match_parent" layout_height="match_parent">
  </androidx.recyclerview.widget.RecyclerView>
  <android.view.View id='arrow' ></android.view.View>
</column>
下面那个View就是我们放箭头的地方
箭头
箭头可能指向上方, 也可能指向下方, 我们通过设置View的前景, 来展示箭头
arrowView.setForeground(drawable);
这里我们要写自己的drawable, 因此, 要继承
class TriangleDrawable extends android.graphics.drawable.Drawable {}
重写他的draw方法
draw(canvas) {
  canvas.drawPath(this.path, paint);
}
画笔创建一支就好, 因为没有发现要创建多支画笔的需求, 以后需要再改, 满足当下即可;
path肯定够是变的, 因为箭头有上下两个位置;
那么在这个TriangleDrawable类中, 我们要实现那些东西呢?
- 设置箭头方向 setDirection
- 目前想不到别的了
如何确认箭头方向?
假设列表有ABC三条数据, ABC依次排列, 在A的顶部, 如果有控件继续放置一条数据D的话,
那么我们就把弹框菜单放到A的顶部, 如果没有, 就放到A的底部
怎么判断是否有足够的空间放下D数据呢? 和那些东西有关?
- 被长按的view的顶部坐标
- 弹框菜单的高度
有这两个信息, 我们就可以判断箭头的方向了.
为了判断箭头方向, 我们新建一个文件, getArrowDirection.js, 文件夹名popMenuRecyclerView, 和箭头明显不合适, 因此我们新建文件夹popMenuArrow
被长按的view的顶部坐标
view.getTop()
弹框菜单的高度, 因为弹框还没有显示出来, 所以我们要预先测量他的高度
popWindow.getContentView().measure(View.MeasureSpec.UNSPECIFIED, View.MeasureSpec.UNSPECIFIED);
let popupWindowHeight = popWindow.getContentView().getMeasuredHeight()
判断箭头指向
  if (longClickedViewTop - popupWindowHeight < 0) {
    // 上面放不下了, 菜单在下面出现, 箭头指向上方
    return "up";
  } else {
    return "down";
  }
我们给箭头一个背景色, 先看当前的效果


可以看到箭头上下的效果已经出来了,
箭头View的挪动使用了addView和removeView
let arrowView = popMenuWindow.findView("arrow");
popMenuWindow.findView("root").removeView(arrowView);
popMenuWindow.findView("root").addView(arrowView, 0);
这里有个问题, 箭头的背景色为什么那么长, 是弹框菜单的两倍多.
这是因为GridLayoutManager第二个参数设置了5, 我们改为Math.min, 取最小值, 宽度问题就符合预期了
const layoutManager = new GridLayoutManager(view.getContext(), Math.min(popMenus.length, 5));
调整popwindow的位置
如果弹框菜单在长按控件的上方, 那么应该偏移多少?
Y轴偏移量 = 弹框菜单的高度 + 长按控件的高度
调用方法如下
    let offset = popMenuCalculateOffset(view, mPopWindow, arrowDirection);
    if (arrowDirection == "down") {
      console.log("箭头朝下");
      mPopWindow.showAsDropDown(view, offset.x, offset.y);
    }
我们新建一个文件 popMenuCalculateOffset.js
module.exports = function popMenuCalculateOffset(longClickedView, popWindow, arrowDirection) {
  let contentView = popWindow.getContentView();
  let width = View.MeasureSpec.makeMeasureSpec(0, View.MeasureSpec.UNSPECIFIED);
  let height = View.MeasureSpec.makeMeasureSpec(0, View.MeasureSpec.UNSPECIFIED);
  contentView.measure(width, height);
  popWindow.setBackgroundDrawable(new ColorDrawable(0));
  let contentViewHeight = contentView.getMeasuredHeight();
  let longClickedViewHeight = longClickedView.getHeight();
  console.log("contentViewHeight = " + contentViewHeight);
  if (arrowDirection == "down") {
    let y = contentViewHeight + longClickedViewHeight;
    return { x: 0, y: -y };
  } else {
    return { x: 0, y: 0 };
  }
};
获取高宽高以后, 我们的
    let offset = popMenuCalculateOffset(view, mPopWindow, arrowDirection);
    if (arrowDirection == "down") {
      console.log("箭头朝下");
      mPopWindow.showAsDropDown(view, offset.x, offset.y);
    } else {
      let arrowView = popMenuWindow.findView("arrow");
      popMenuWindow.findView("root").removeView(arrowView);
      popMenuWindow.findView("root").addView(arrowView, 0);
      mPopWindow.showAsDropDown(view, offset.x, offset.y);
    }
代码写了不少了, 看看效果, 及时排查bug
箭头朝上

箭头朝下

绘制箭头
我们用canvas画个三角形, 首先我们要继承类, 重写他的draw方法
class TriangleDrawable extends android.graphics.drawable.Drawable {}
单独写一个类文件 TriangleDrawable.js, 放到文件夹 popMenuArrow;
绘制箭头之前, 要知道箭头的宽高, 和箭头的中点;
- 箭头的宽高, 我们就用arrowView的高度;
- 箭头的中点, 我们指向被长按的控件 X 轴的中心
为了使类, 尽可能的比较纯, 我们传递的参数选择具体的数值, 而不是控件;
这里的纯指的是没有副作用, 以及可复用的程度
class TriangleDrawable extends android.graphics.drawable.Drawable {
  setHeight(height) {
    this.height = height;
  }
  setWidth(width) {
    this.width = width;
  }
  setDirection(direction) {
    this.direction = direction;
  }
  setColor(color) {
    this.color = Color.parse(color).value;
  }
  setLongClickedViewWidth(longClickedViewWidth) {
    this.longClickedViewWidth = longClickedViewWidth;
  }
  draw(canvas) {
    trianglePath.reset();
    if (this.direction == "down") {
      console.log("down");
      trianglePath.moveTo(this.width / 2, this.height);
      trianglePath.lineTo(this.width / 2 - this.height / 2, 0);
      trianglePath.lineTo(this.width / 2 + this.height / 2, 0);
    } else {
      trianglePath.moveTo(this.width / 2, 0);
      trianglePath.lineTo(this.width / 2 - this.height / 2, this.height);
      trianglePath.lineTo(this.width / 2 + this.height / 2, this.height);
    }
    trianglePath.close();
    canvas.drawPath(trianglePath, paint);
  }
}
module.exports = TriangleDrawable;
在popupWindow出现之前, 我们要把箭头绘制出来,
await setArrowForeground(arrow, arrowDirection, view);
mPopWindow.showAsDropDown(view, offset.x, offset.y);
使用onPreDraw, 在绘制之前, 我们可以获取到正确的宽高
  arrow.getViewTreeObserver().addOnPreDrawListener(
    new android.view.ViewTreeObserver.OnPreDrawListener({
      onPreDraw: function () {
        arrow.getViewTreeObserver().removeOnPreDrawListener(this);
        let arrowHeight = arrow.getHeight();
        let arrowWidth = arrow.getWidth();
        triangleDrawable.setWidth(arrowWidth);
        triangleDrawable.setHeight(arrowHeight);
        arrow.setForeground(triangleDrawable);
        return true;
      },
    })
  );
代码写了不少了, 先测试一下效果
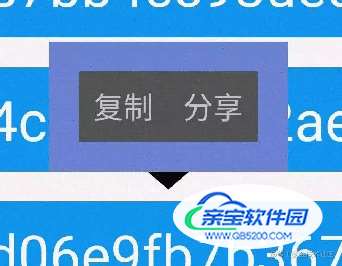
箭头朝上

箭头朝下
修改颜色和圆角
颜色这个就不多说了, 非常容易修改, 说下圆角
修改圆角是在这个文件中: showMenuWindow.js, 我们要给RecyclerView包裹一层card
<card cardCornerRadius="8dp" w='wrap_content'>
...
</card>

给弹框菜单添加点击事件
也就是给弹框菜单中的recyclerview添加点击事件
增加点击事件所在的文件是 popMenuRecyclerView/PopMenuRecyclerViewAdapter.js,
我们修改他的onCreateViewHolder
onCreateViewHolder(parent) {
  let testRecyclerViewViewHolder = new PopMenuRecyclerViewViewHolder(ui.inflateXml(parent.getContext(), holderXml, parent));
  testRecyclerViewViewHolder.itemView.setOnClickListener(() => {
    let item = this.data[testRecyclerViewViewHolder.getAdapterPosition()];
    item.handle();
    return true;
  });
  return testRecyclerViewViewHolder;
}
点击事件生效了, 还有个问题, 点击了之后,弹框菜单没有消失, 我们在这里又引用不到弹框实例, 怎么弄?
弹框菜单点击事件引用弹框实例
我们可以用全局对象, 挂载弹框的实例;
我们不选怎全局对象, 而是去能引用的地方引用实例;
在 showMenuWindow.js 这个文件中, 出现了popupWindow实例, 我们把这个实例作为参数, 传递给
setPopMenuRecyclerViewAdapter
setPopMenuRecyclerViewAdapter(mPopWindow, grid, popMenus);
setPopMenuRecyclerViewAdapter.js
module.exports = async function (mPopWindow, recyclerView, items) {
  const menuClick = (item, itemView) => {
    console.log(itemView);
    item.handle();
    mPopWindow.dismiss();
  };
  var adapter = new PopMenuRecyclerViewAdapter(items);
  adapter.setClick(menuClick);
  recyclerView.setAdapter(adapter);
};
我们在这个文件中给adapter设置了点击事件, 相应的要在 PopMenuRecyclerViewAdapter.js 文件中添加方法,
setClick
class PopMenuRecyclerViewAdapter extends androidx.recyclerview.widget.RecyclerView.Adapter {
  constructor(data) {
    super();
    this.data = data;
    this.click = () => {};
  }
  onCreateViewHolder(parent) {
    let testRecyclerViewViewHolder = new PopMenuRecyclerViewViewHolder(ui.inflateXml(parent.getContext(), holderXml, parent));
    testRecyclerViewViewHolder.itemView.setOnClickListener(() => {
      let item = this.data[testRecyclerViewViewHolder.getAdapterPosition()];
      this.click(item, testRecyclerViewViewHolder.itemView);
      return true;
    });
    return testRecyclerViewViewHolder;
  }
  ...
  setClick(click) {
    this.click = click;
  }
}
module.exports = PopMenuRecyclerViewAdapter;
到这里就模仿的差不多了, 差不多就行.
如果要增加多个菜单, 在config.js中修改配置即可

环境
设备: 小米11pro
Android版本: 12
Autojs版本: 9.3.11
名人名言
思路是最重要的, 其他的百度, bing, stackoverflow, github, 安卓文档, autojs文档, 最后才是群里问问 --- 牙叔教程
声明
部分内容来自网络 本教程仅用于学习, 禁止用于其他用途
加载全部内容
 爱之家商城
爱之家商城 氢松练
氢松练 Face甜美相机
 花汇通
花汇通 走路宝正式版
 天天运动有宝
 深圳plus
 热门免费小说