Java枚举类型与泛型使用解读
king_weng 人气:0一、枚举类型
1、使用枚举类型设置常量
以往设置常量,通常将常量放置在接口中,这样在程序中就可以直接使用,并且该常量不能被修改,因为在接口中定义常量时,该常量的修饰符为final与static。
常规定义常量的代码如下所示。
例:在接口中定义常量的常规方式
public interface Constants{
	public static final int Constants_A = 1;
	public static final int Constants_B = 12;
}
枚举类型出现后,逐渐取代了这种常量定义方式。
使用枚举类型定义常量的语法如下:
public enum Constants{
	Constants_A,
	Constants_B,
	Constants_C
}
例:
interface Constants { // 将常量放置在接口中
	public static final int Constants_A = 1;
	public static final int Constants_B = 12;
}

public class ConstantsTest {
	enum Constants2 { // 将常量放置在枚举类型中
		Constants_A, Constants_B
	}

	// 使用接口定义常量
	public static void doit(int c) { // 定义一个方法,这里的参数为int型
		switch (c) { // 根据常量的值做不同操作
			case Constants.Constants_A:
				System.out.println("doit() Constants_A");
				break;
			case Constants.Constants_B:
				System.out.println("doit() Constants_B");
				break;
		}
	}
	// 定义一个方法,这里的参数为枚举类型对象
	public static void doit2(Constants2 c) {
		switch (c) { // 根据枚举类型对象做不同操作
			case Constants_A:
				System.out.println("doit2() Constants_A");
				break;
			case Constants_B:
				System.out.println("doit2() Constants_B");
				break;
		}
	}

	public static void main(String[] args) {
		ConstantsTest.doit(Constants.Constants_A); // 使用接口中定义的常量
		ConstantsTest.doit2(Constants2.Constants_A); // 使用枚举类型中的常量
		ConstantsTest.doit2(Constants2.Constants_B); // 使用枚举类型中的常量
		ConstantsTest.doit(3);
		// ConstantsTest.doit2(3);	// 必须为枚举中定义的常量
	}
}
输出:

注:在上述代码中,当用户调用doit()方法时,即使编译器不接受在接口中定义的常量参数,也不会报错;但调用doit2()方法, 任意传递参数,编译器就会报错,因为这个方法只接受枚举类型的常量作为其参数。
枚举类型也可在类的内部进行定义,如:
public class ConstantsTest {
    enum Constants2{ /将常放在枚举类型中
        Constants A,
        Constants_ B
    }
}
这种形式类似于内部类形式,当编译该类时,除了ConstantsTest.class 外,还存在Constants-Test$1.class 与ConstantsTest$Constants2.class文件。
2、枚举类型常用方法
用户可以将一个枚举类型看作是-一个类,它继承于java.lang.Enum类,当定义-一个枚举类型时,每一个枚举类型成员都可以看作是枚举类型的一个实例,这些枚举类型成员都默认被final、public.static修饰,所以当使用枚举类型成员时直接使用枚举类型名称调用枚举类型成员即可。
枚举类型的常用方法如下所示

注:调用compareTo()方法返回的结果,正值代表方法中参数在调用该方法的枚举对象位置之前; 0代表两个互相比较的枚举成员的位置相同;负值代表方法中参数在调用该方法的枚举对象位置之后。
例:
import static java.lang.System.*;

public class EnumMethodTest {
	enum Constants2 { // 将常量放置在枚举类型中
		Constants_A, Constants_B
	}

	// 定义比较枚举类型方法,参数类型为枚举类型
	public static void compare(Constants2 c) {
		// 根据values()方法返回的数组做循环操作
		for (int i = 0; i < Constants2.values().length; i++) {
			// 将比较结果返回
			out.println(c + "与" + Constants2.values()[i] + "的比较结果为:"
					+ c.compareTo(Constants2.values()[i]));
		}
	}

	// 在主方法中调用compare()方法
	public static void main(String[] args) {
		compare(Constants2.valueOf("Constants_B"));
	}
}
输出:
![]()
3、枚举类型中的构造方法
在枚举类型中,可以添加构造方法,但是规定这个构造方法必须为private修饰符所修饰。
枚举类型定义的构造方法语法如下:
例:
import static java.lang.System.*;

public class EnumIndexTest {
	enum Constants2 { // 将常量放置在枚举类型中
		Constants_A("我是枚举成员A"), // 定义带参数的枚举类型成员
		Constants_B("我是枚举成员B"), Constants_C("我是枚举成员C"), Constants_D(3);
		private String description;
		private int i = 4;

		private Constants2() {
		}
		 // 定义参数为String型的构造方法
		private Constants2(String description) {
			this.description = description;
		}

		private Constants2(int i) { // 定义参数为整型的构造方法
			this.i = this.i + i;
		}

		public String getDescription() { // 获取description的值
			return description;
		}

		public int getI() { // 获取i的值
			return i;
		}
	}

	public static void main(String[] args) {
		for (int i = 0; i < Constants2.values().length; i++) {
			out.println(Constants2.values()[i] + "调用getDescription()方法为:"
					+ Constants2.values()[i].getDescription());
		}
		out.println(Constants2.valueOf("Constants_D") + "调用getI()方法为:"
				+ Constants2.valueOf("Constants_D").getI());
	}
}
输出:

注:在这里将枚举类型的构造方法设置为private修饰,以防止客户代码实例化一个枚举类型。
除了可以使用上例中所示的方式定义getDescription()方法获取枚举类型成员定义时的描述之外,还可以将这个getDescription()方法放置在接口中,使枚举类型实现该接口,然后使每个枚举类型实现接口中的方法。
例:
interface d{
	public String getDescriprion();
	public int getI();
}

public enum AnyEnum implements d{
	Constants_A{
		public String getDescriprion() {
			return("枚举A");
		}
		public int getI() {
			return i;
		}
	},
	Constants_B{
		public String getDescriprion() {
			return("枚举B");
		}
		public int getI() {
			return i;
		}
	};

	static int i = 5;
}
小结:
- 类型安全。
- 紧凑有效的数据定义。
- 可以和程序其他部分完美交互。
- 运行效率高。
二、泛型
在以往的类型转换时通常有两种类型,一种是向上转型操作,如Boolen转换为Object,另一种是向下转型操作,如Object转换为Float。
在这里向上转型一般是安全的,而如果进行向下转型操作时用错了类型,或者并没有执行该操作,就会出现异常,而泛型机制有效地解决了这一问题。
泛型机制语法如下:
类名<T>
1、泛型的常规用法
(1)定义泛型时声明多个类型
MutiOverClass<T1, T2>
MutiOverClass:泛型类名称
(2)定义泛型类型时声明数组类型
定义泛型时也可声明数组类型,但是要注意不可以使用泛型来建立数组的实例。
例:
public class ArrayClass<T> {
	private T[] array; // 定义泛型数组

	public void SetT(T[] array) { // 设置SetXXX()方法为成员数组赋值
		this.array = array;
	}

	public T[] getT() { // 获取成员数组
		return array;
	}

	public static void main(String[] args) {
		ArrayClass<String> a = new ArrayClass<String>();
		String[] array = { "成员1", "成员2", "成员3", "成员4", "成员5" };
		a.SetT(array); // 调用SetT()方法
		for (int i = 0; i < a.getT().length; i++) {
			System.out.println(a.getT()[i]); // 调用getT()方法返回数组中的值
		}
	}
}
输出:

(3)集合类声明容器的元素
可以使用K和V两个字符代表容器中的键值和与键值相对应的具体值。常用的被泛型化的集合类如下:

由于被泛型化的集合类已经是属于泛型,故不需要再定义泛型类,可直接使用如下所示语句实例化:
例:
public Map<K, V> m = new HashMap<K, V>();
例:
import java.util.*;

public class AnyClass {
	public static void main(String[] args) {
		// 定义ArrayList容器,设置容器内的值类型为Integer
		ArrayList<Integer> a = new ArrayList<Integer>();
		a.add(1); // 为容器添加新值
		for (int i = 0; i < a.size(); i++) {
			// 根据容器的长度循环显示容器内的值
			System.out.println("获取ArrayList容器的值:" + a.get(i));
		}
		// 定义HashMap容器,设置容器的键名与键值类型分别为Integer与String型
		Map<Integer, String> m = new HashMap<Integer, String>();
		for (int i = 0; i < 5; i++) {
			m.put(i, "成员" + i); // 为容器填充键名与键值
		}
		for (int i = 0; i < m.size(); i++) {
			 // 根据键名获取键值
			System.out.println("获取Map容器的值" + m.get(i));
		}
		// 定义Vector容器,使容器中的内容为String型
		Vector<String> v = new Vector<String>();
		for (int i = 0; i < 5; i++) {
			v.addElement("成员" + i); // 为Vector容器添加内容
		}
		for (int i = 0; i < v.size(); i++) {
			// 显示容器中的内容
			System.out.println("获取Vector容器的值" + v.get(i));
		}
	}
}
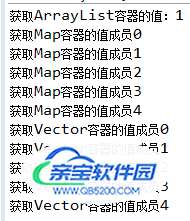
输出:

2、泛型的高级用法
(1)限制泛型可用类型
默认可以使用任何类型来实例化一个泛型类对象,但Java中也对泛型类实例的类型作了限制。语法如下:
class类名称<T extends anyClass>
其中,anyClass 指某个接口或类。
使用泛型限制后,泛型类的类型必须实现或继承了anyClass这个接口或类。无论anyClass是接口还是类,在进行泛型限制时都必须使用extends 关键字。
例:
import java.util.ArrayList;
import java.util.LinkedList;
import java.util.List;
public class LimitClass<T extends List>{
	public static void mian(String[] args) {
		// 可实例化已经实现List接口的类
		LimitClass<ArrayList> l1 = new LimitClass<ArrayList>();
		LimitClass<LinkedList> l2 = new LimitClass<LinkedList>();
		// 错误,因为HashMap没实现List()接口
		// LimitClass<HashMap> l3 = new LimitClass<HashMap>();
	}
}
(2)使用类型通配符
在泛型机制中,提供了类型通配符,其主要作用是在创建一个泛型类对象时限制这个泛型类的类型实现或继承某个接口或类的子类。要声明这样一个对象可以使用“?”通配符来表示,同时使用extends关键字来对泛型加以限制。
使用泛型类型通配符的语法如下:
泛型类名称<? extends List> anll;
其中,<? extends List>表示类型未知,当需要使用该泛型对象时,可以单独实例化。
例:
A<? extends List> a = null;
a = new A<ArrayList>();
a = new A<LinkedList>();
除了可以实例化一个限制泛型类型的实例之外,还可以将该实例放置在方法的参数中。
例:
public void doSomething(A<? extends List> a){}如果使用A<?>这种形式实例化泛型类对象,则默认表示可以将A指定为实例化Object及以下的子类类型。
例:
List<String> 11=new ArrayList<String>();	//实例化一个ArrayList对象
I1.add("成员"):	    // 在集合中添加内容
List<?> 12=11;			 // 使用通配符
List<?> l3=new Linkedl ist<Integer>();
System.out.rintn(2.g(0);  // 获取集合中第一个值
在上例中,List<?>类型的对象可以接受String类型的ArrayList集合,也可以接受Integer类型的LinkedList集合。
也许有的读者会有疑问,List<?> 12=11语句与List 12=11存在何种本质区别?
这里需要注意的是,使用通配符声明的名称实例化的对象不能对其加入新的信息,只能获取或删除。
例:
l1.set(0,“成员改变");	// 没有使用通配符的对象调用set()方法
// 2.set(0,“成员改变");  // 使用通配符的对象调用set()方法,不能被调用
// 3.set(0, 1);
l2.get(0);              // 可以使用12的实例获取集合中的值
12.remove(0);           // 根据键名删除集合中的值
注:泛型类型限制除了可以向下限制之外,还可以进行向上限制,只要在定义时使用super 关键字即可。例如,“A<? super List> a=nll;"这样定义后,对象a只接受List接口或上层父类类型,如”a=new A<Objec>;"
(3)继承泛型类与实现泛型接口
定义为泛型的类和接口也可被继承与实现。
例:
public class ExtendClass<T1>{
    class SubClass<T1.T2,T3> extends ExtendClass<T1>{
}
如果在SubClass类继承ExtendClass类时保留父类的泛型类型,需要在继承时指明,如果没有指明,直接使用extends ExtendsClass语句进行继承操作,则SubClass类中的T1、T2和T3都会自动变为Object,所以在一般情况下都将父类的泛型类型保留。
定义的泛型接口也可以被实现。
例:
Interface i<T1>{
}
class SubClass2 <T1,T2,T3> implements i<T1>{
}
小结:
- 泛型的类型参数只能是类类型,不可以是简单类型,如A<int>这种泛型定义就是错误的。
- 泛型的类型个数可以是多个。
- 可以使用extends 关键字限制泛型的类型。
- 可以使用通配符限制泛型的类型。
总结
以上为个人经验,希望能给大家一个参考,也希望大家多多支持。
加载全部内容