vue选项卡Tabs组件实现示例详解
gnip 人气:0概述
前端项目中,多数页面涉及到选项卡切换,包括路由切换,指令v-if等,本质上其实和选项卡切换思想差不多,如果是个简单的选项卡,还是很简单的,我们也不需要什么组件库的组件,自己也能几行代码写出来,但是涉及到动画,尺寸计算,拖拽的功能的时候,多数情况下,自己写还是要花点时间的,组件库就提供了现成的,拿来改改样式就行,为了对这个组件更加深入的理解,这里自己实现一个带拖拽,过渡的tabs组件。
效果图

实现过程
组件分析
- 组件包含两部分:Tabs组件和TabPane组件,参考绝大多数组件库的习惯
- 组件主要分为需要点击的tab栏和下面对应的内容块
- 我们需要对内容区和选项卡点击区分别加上过渡动画,提升用户体验
- 最后需要加上拖拽调整选项卡顺序的功能
所需的前置知识
- 熟悉vue内置transition组件
- 深入掌握vue父子组件通信,除开emit和props,还需要掌握inject,emit和props,还需要掌握inject,emit和props,还需要掌握inject,parent,vnode,渲染函数等等,这些业务开发中用的不多,但是组件库里面比较常见。
- 了解dom中位置计算和尺寸的基本计算
- 熟悉html5新增拖拽相关事件
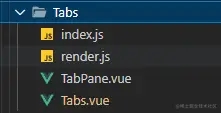
项目组件文件夹

Tabs.vue
<template>
  <div class="gnip-tab">
    <div class="gnip-tab-nav">
      <div
        v-for="(item, index) in tabNavList"
        @click.stop="handleTabNavClick(item, index)"
        :class="['tab-nav-item', item.name == activeName ? 'active' : '']"
        ref="tabNavItemRefs"
        @drop="handleDrop(item, $event, index)"
        @dragstart="handelDragstart(item, $event, index)"
        @dragover="handleDragOver(item, $event, index)"
        draggable="true"
      >
        <span v-if="item.text">{{ item.text }}</span>
        <render v-if="item.renderFun" :renderFn="item.renderFun"></render>
      </div>
    </div>
    <!-- 滚动滑块 -->
    <div
      class="tab-nav-track"
      :style="{
        background: showTrackBg ? '#e5e7eb' : '',
      }"
    >
      <span
        class="track-line"
        :style="{ width: trackLineWidht + 'px', left: left + 'px' }"
      ></span>
    </div>
    <div class="tab-content-wrap">
      <slot></slot>
    </div>
  </div>
</template>
<script>
// render组件,label为render函数的时候进行渲染
import Render from "./render";
export default {
  props: {
    // v-model的那项
    value: {
      type: String,
    },
    // 是否显示滑块背景
    showTrackBg: {
      type: Boolean,
      default: false,
    },
  },
  components: {
    Render,
  },
  data() {
    return {
      // tab数组
      tabNavList: [],
      // 当前活跃项
      activeName: "",
      // 滑块的宽度
      trackLineWidht: 0,
      // 当前活跃索引
      currentIndex: 0,
      // 滑块偏移量
      left: 0,
      // 拖拽开始的哪项
      dragOriginItemIndex: null,
      // 拖拽活跃项的索引
      dragStartIndex: null,
    };
  },
  mounted() {
    this.init();
  },
  methods: {
    // 初始化
    init() {
      // 默认当前活跃项为外部v-model的值
      this.activeName = this.value;
      // 页面渲染任务之后计算滑块偏移量和宽度
      this.$nextTick(() => {
        this.currentIndex = this.$children.findIndex(
          (component) => component.name == this.value
        );
        this.computedTrackWidth();
      });
    },
    // 设置tab点击栏
    setTabBar(tabsPaneInstance) {
      // tab的描述信息可以是字符串也可以是render函数
      const label = tabsPaneInstance.label,
        type = typeof label;
      // 添加到数组项中,根据添加条件渲染
      this.tabNavList.push({
        text: type == "function" ? "" : label,
        renderFun: type == "function" ? label : "",
        name: tabsPaneInstance.name,
      });
    },
    handleTabNavClick(item, index) {
      if (item.name == this.activeName) return;
      // 更新当前活跃项
      this.activeName = item.name;
      // 活跃项的索引
      this.currentIndex = index;
      // 计算滑块的偏移量和宽度
      this.computedTrackWidth();
    },
    // 计算滑块的偏移量和宽度
    computedTrackWidth() {
      // 插槽子组件的索引集合
      const tabNavItemRefsList = this.$refs.tabNavItemRefs;
      // 导航tab项的宽度
      const scrollWidth = tabNavItemRefsList[this.currentIndex].scrollWidth;
      // 滑块的宽度为scrollWidth
      this.trackLineWidht = scrollWidth;
      // 定位的偏移量为offsetLeft
      this.left = tabNavItemRefsList[this.currentIndex].offsetLeft;
    },
    /*
    关于拖拽请参考MDN文档: https://developer.mozilla.org/zh-CN/docs/Web/API/DragEvent,实现拖拽需要清楚关于拖拽相关的几个事件
    */
    // 开始拖拽
    handelDragstart(item, event, index) {
      // 说明是拖拽的当前活跃的哪一项,记录这一项的索引位置
      if (item.name == this.activeName) {
        this.dragStartIndex = index;
      }
      this.dragOriginItemIndex = index;
    },
    // 推拽进入目标区域
    handleDragOver(item, event) {
      // 阻止默认事件
      event.preventDefault();
    },
    //拖拽进入有效item
    handleDrop(item, event, index) {
      event.preventDefault();
      // 说明拖动的位置是变了的
      if (this.dragOriginItemIndex != index) {
        // 交换数据,重新渲染生成tab栏
        this.swap(this.dragOriginItemIndex, index);
        // 重新计算滑块的偏移量
        if (this.dragStartIndex !== null) {
          this.currentIndex = index;
          // 记住,数据更新为异步操作,因此我们这里需要用到nextTick,将计算任务放到渲染任务完成之后执行,避免计算不准确
          this.$nextTick(() => {
            this.computedTrackWidth();
            this.dragStartIndex = null;
          });
        } else {
          // 不是点击拖拽当前活跃项,也要重新计算滑块跨度和位置,因为每个tab项的宽度不一致,因此,每次拖拽都需要重新计算
          this.$nextTick(() => {
            this.computedTrackWidth();
          });
        }
        // 这里还可以根据需要,发布一个拖拽完成事件
      }
    },
    // 交换tab数据项
    swap(start, end) {
      let startItem = this.tabNavList[start];
      let endItem = this.tabNavList[end];
      // 由于直接通过索引修改数组,无法触发响应式,因此需要$set
      this.$set(this.tabNavList, start, endItem);
      this.$set(this.tabNavList, end, startItem);
    },
  },
};
</script>
<style lang="less">
.gnip-tab {
  .gnip-tab-nav {
    display: flex;
    position: relative;
    .tab-nav-item {
      padding: 0 20px;
      cursor: pointer;
      line-height: 2;
    }
  }
  .tab-nav-item.active {
    color: #2d8cf0;
  }
  .tab-nav-track {
    width: 100%;
    position: relative;
    height: 2px;
    .track-line {
      height: 2px;
      background-color: #2d8cf0;
      position: absolute;
      transition: left 0.35s;
    }
  }
}
</style>
TabPane.vue
<template>
  <div class="gnip-tabs-pane">
    <transition :name="paneTransitionName">
      <div class="tab-pane-content" v-show="$parent.activeName == name">
        <slot name="default"></slot>
      </div>
    </transition>
  </div>
</template>
<script>
export default {
  props: {
    // tab项的文本或者render函数
    label: {
      type: [String, Function],
    },
    // 每项标识
    name: {
      type: String,
    },
    // 是否禁用当前项
    disabled: {
      type: Boolean,
      default: false,
    },
  },
  data() {
    return {
      paneTransitionName: "enter-right",
    };
  },
  created() {
    // 统一tab的数据给父组件进行处理和渲染
    this.$parent.setTabBar(this);
  },
};
</script>
<style lang="less">
.gnip-tabs-pane {
  overflow-x: hidden;
  .enter-right-enter-active {
    transition: transform 0.35s;
  }
  .enter-right-enter {
    transform: translateX(100%);
  }
  .enter-right-to {
    transform: translateX(0);
  }
}
</style>
render.js
主要用于将函数通过转化为render函数形式的组件(前提未提供模板)
export default {
  name: "RenderCell",
  props: {
    renderFn: Function,
  },
  render(h) {
    return this.renderFn(h);
  },
};
index.js
按需导出组件
import TabPane from "./TabPane.vue";
export { Tabs, TabPane };
使用
App.vue
<template>
  <div class="app">
    <div class="aline">
        <Tabs v-model="tabName" show-track-bg>
          <TabPane label="首页" name="name1">首页</TabPane>
          <TabPane label="图书详情页" name="name2" disabled>图书详情页</TabPane>
          <TabPane label="个人主页" name="name3">个人主页</TabPane>
          <TabPane :label="labelRender" name="name4">购物车</TabPane>
        </Tabs>
      </div>
    </div>
  </div>
</template>
<script>
import { Tabs, TabPane } from "@/components/Tabs";
export default {
  components: { Tabs, TabPane },
  data() {
    return {
      tabName: "name1",
      labelRender(h) {
        return h("div", "购物车");
      },
    };
  },
};
</script>
<style lang="less">
* {
  margin: 0;
  padding: 0;
}
.app {
  padding: 20px;
  button {
    padding: 10px;
    background-color: #008c8c;
    color: #fff;
    margin: 20px 0;
  }
  .container {
    .operate {
      text-align: center;
    }
    .aline {
      width: 50%;
    }
    h2 {
      font-weight: bold;
      font-size: 20px;
    }
    .aline {
      &:nth-child(1) {
        margin-right: 20px;
      }
    }
    display: flex;
    justify-content: space-between;
  }
}
.aline {
  display: flex;
  justify-content: center;
}
.item {
  margin: 40px;
  img {
    width: 250px;
    height: 200px;
  }
  ul {
    margin: 0 auto;
    li {
      border: 1px solid red;
      height: 200px;
      width: 250px;
    }
  }
}
</style>
总结
通过上述组件的实现,对于HTML5拖拽事件的应用更加熟悉,关于拖拽请参考MDN文档: developer.mozilla.org/zh-CN/docs/…
加载全部内容