node addon 流程
小小晴_ 人气:0背景介绍
为什么要写 node addon
试想这样一种场景:我们想在 js 层实现某个业务场景,但是这套业务逻辑已经有存在的 C++ 版本了,这个时候我们有两个选择
- 重新实现一套在 JS 版本的业务场景
- 使用
node addon桥接C++版本代码
对比以上两种方案,显然,使用 addon 不用去写过重的业务逻辑,是一种成本更低的方案
node addon 是什么
node addon,即为node插件 / 扩展,插件是用C++编写的动态链接共享对象。- 动态链接共享对象,即动态链接库
- 链接库:库文件的二进制版本,即将库文件进行编译、打包操作后得到二进制文件,无法独立运行,必须等待其他程序调用才会被载入内存中。
- 静态链接:无论缺失的地址位于其他目标文件还是链接库,链接库都会逐个找到各目标文件中缺失的地址。采用此链接方式生成的可执行文件,可以独立载入内存运行。
- 动态链接:链接器先从所有目标文件中找到部分缺失的地址,然后将所有目标文件组织成一个可执行文件。这样生成的可执行文件,仍缺失部分函数和变量地址,待文件执行时,需连同所有的链接库文件一起载入内存,再由链接器完成剩余的地址修复工作,才能正常执行
- 静态链接库:在生成可执行文件之前完成所有链接操作,使用的库文件是静态链接库,后缀名 .a .lib
- 动态链接库:将部分链接操作推迟到程序执行时才进行,使用的库文件是动态链接库,后缀名:.so .dll .dylib
- 插件提供了
JavaScript和C/C++库之间的接口。 require函数可以将插件加载为普通的Node.js模块。- 通俗点来讲,是一个能够桥接
c++和js的中间转换层
可通过 NODE-API、NAN、或者使用底层 v8 库来实现【官方建议使用 NODE-API】
node-api:构建原生插件的 api,独立于 JS 运行时,此 API 是跨 Node.js 版本稳定的应用程序二进制接口,它旨在将插件与底层 JavaScript 引擎中的更改隔离开来,并允许为一个主要版本编译的模块nan(Native Abstractions for Node.js):是一个Node.js原生模块抽象接口集。它提供了一套API- 底层
V8:就是我们熟悉的Chrome V8
addon 实现方式的变迁
Chrome V8 API
1、是啥:即使用 Node 自身各种 API 以及 Chrome V8 的 API
2、存在的问题
这些写好的代码只能在特定的 Node 版本下编译,因为其中各种 API、函数声明等的变化会很大,举个例子
Handle<Value> Echo(const Arguments& args);    // 0.10.x
void Echo(FunctionCallbackInfo<value>& args); // 6.x
NAN 时代
1、是啥:
Native Abstractions for Node.js,即Node.js原生模块抽象接口集- 代码只需要随着
NAN的升级做改变,它会帮我们兼容各个版本

2、存在的问题
- 一次写好的代码在不用版本的
Node.js下也需要重新编译,如果版本不符合,Node.js就无法正常载入一个C++扩展- NAN 的封装方式是使用了一堆宏,在不同的 Node 版本下使用不同的宏变量、函数等,所以针对用户使用不同的 Node 版本,是需要进行重新编译的
符合 ABI 的 N-API
1、是啥
- 自从 2017 年 Node.js v8.0.0 发布之后,Node.js 推出了全新的用于开发 C++ 原生模块的接口-> N-API
- 与 NAN 相比,它把 Node.js 的所有底层数据结构全部黑盒化,抽象成 N-API 中的接口;不同版本的 Node.js 使用同样的接口,这些接口稳定且 ABI 化。只要 ABI 版本号一致,编译好的 C++ 扩展就可以直接使用,而不需要重新编译
- ABI 化:(Application Binary Interface)应用程序二进制接口;可以理解为一种约定,是 API 的编译版本;ABI 允许编译好的目标代码在使用兼容 ABI 的系统中无需改动就能运行;一套完整的 ABI 可以让程序在所有支持该 ABI 的系统上运行,无需对程序进行修改
- API:(Application programming interface),应用编程接口
- 主要收益:消除了 Nodejs 版本之间的差异
2、N-API 的使用姿势
- 提供头文件 node_api.h
- 使用文档:nodejs.org/api/n-api.h…
3、node-addon-api 是啥?
- 可以理解为是对 N-API 更进一步的封装,更加便于我们开发
- 举个例子
// N-API
#include <assert.h>
#include <node_api.h>
static napi_value Method(napi_env env, napi_callback_info info) {
  napi_status status;
  napi_value world;
  status = napi_create_string_utf8(env, "world", 5, &world);
  assert(status == napi_ok);
  return world;
}

#define DECLARE_NAPI_METHOD(name, func)                                        \
  { name, 0, func, 0, 0, 0, napi_default, 0 }

static napi_value Init(napi_env env, napi_value exports) {
  napi_status status;
  napi_property_descriptor desc = DECLARE_NAPI_METHOD("hello", Method);
  status = napi_define_properties(env, exports, 1, &desc);
  assert(status == napi_ok);
  return exports;
}

NAPI_MODULE(NODE_GYP_MODULE_NAME, Init)


// node-addon-api
#include <napi.h>

Napi::String Method(const Napi::CallbackInfo& info) {
  Napi::Env env = info.Env();
  return Napi::String::New(env, "world");
}

Napi::Object Init(Napi::Env env, Napi::Object exports) {
  exports.Set(Napi::String::New(env, "hello"),
              Napi::Function::New(env, Method));
  return exports;
}

NODE_API_MODULE(hello, Init)
编码阶段
如何写出正确的 addon 逻辑
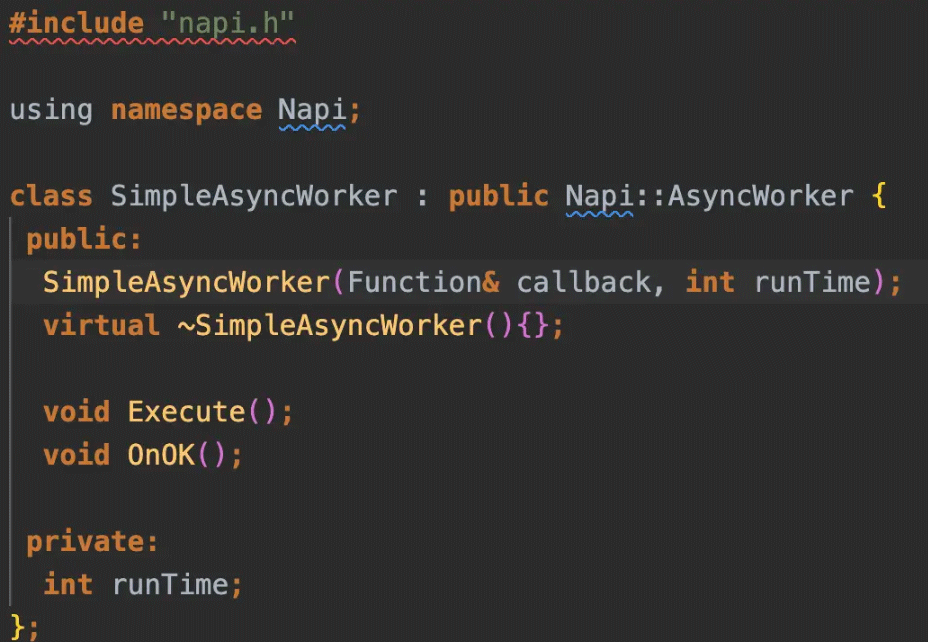
- demo.h

demo.cc

1、熟悉 C++ 基础语法
宏的定义:#define 是定义一个宏的指令(预编译指令),它用来将一个标识符定义为一个字符串,该标识符被称为宏,被定义的字符串被称为替换文本,
- 简单的宏定义和带参数的宏定义
- 当宏出现在一个文件中时,在该文件后续出现的所有宏都将被替换为 《替换文本》
- 常用于条件编译情况下,比如版本号的不同而编译不同的逻辑
// 简单的宏定义
#define PI 1415926  // 宏名 字符串

// 带参数的宏定义
#define A(x) x   // 宏名(参数表) 宏体
- 类
- 公有继承、私有继承、保护继承
- 公有继承:继承父类 public 和 protected 的方法和变量,不能访问 private
- 私有继承:继承父类的 public 和 protected 的方法和变量作为私有成员,不能被该类的子类再次访问
- 保护继承:继承父类 public 和 protected 成员作为保护成员
- 公有、私有、受保护的成员
- public:可被子类继承或在类外内访问
- private:仅限类内部使用,不可被继承和访问
- protected: 可被子类继承,但不能在类外访问
- 公有继承、私有继承、保护继承
// test.h
class Test : public B {  // private || protected
	public:
  private:
  protected:
  	int pro = 1;
}
// 类外
#include "test.h"
Test test;   // 实例化 Test 类
std::cout << test.pro << std::endl; // error -> 不可在类外被访问- 构造函数和析构函数
- 构造函数:类的构造函数是类的一种特殊的成员函数,它会在每次创建类的新对象时执行。类似于 JS 中的 constructor; 可自己实现,也可使用编译器生成的默认构造函数,即与类名相同的函数;
- 析构函数:类的析构函数是类的一种特殊的成员函数,它会在每次删除所创建的对象时执行。析构函数的名称与类的名称是完全相同的,只是在前面加了个波浪号(~)作为前缀,它不会返回任何值,也不能带有任何参数。析构函数有助于在跳出程序(比如关闭文件、释放内存等)前释放资源。
- 虚函数、纯虚函数是啥
- virtual:虚函数关键字,子类可选择自己实现或使用父类原有方法
- = 0:纯虚函数关键字,子类必须自己实现,如果不实现,编译阶段将会报错
- override:是一个覆盖虚函数的标识符
2、熟悉 addon 语法
1、如何让 js require?无后缀情况下的 .js -> .json -> .node
- 在 js 中,使用 commonJs 语法即可让该模块被其他模块 require,addon 中则也是类似的想法
- 在 addon 中,提供了 NODE_API_MODULE 宏方法,用这个方法即可实现外部 require 效果,方法接收两个参数,即模块名字和导出的方法
- 具体实现?
Napi::Object InitAll(Napi::Env env, Napi::Object exports) {
  return Link::Init(env, exports);
}
NODE_API_MODULE(link, InitAll);
2、定义一个类以及注册方法
- 在 js 中的效果即为 class A { //.... }
Napi::Object Link::Init(Napi::Env env, Napi::Object exports) {
  Napi::Function func =
      DefineClass(
    			env, "Demo",
          {
            InstanceMethod("add", &Demo::Add),
          }
  	);

  auto constructor = Napi::Persistent(func);
  constructor.SuppressDestruct();

  exports.Set("Demo", func);
  return exports;
}
3、函数的接收参数
- 在 addon 中
- 接收多个参数:
- 定义好每个参数的类型接收
- 统一在 CallbackInfo 中接收:github.com/nodejs/node…
- 接收一个对象
- 也是从 info[0] 中去拿到这个对象,然后用 object.Get(key) 方法拿到对应的参数
// 1、定义好参数接收
Napi::Object Link::Init(Napi::Env env, Napi::Object exports) {}

// 2、在 CallbackInfo 中接收
Napi::Value Link::TagSync(const Napi::CallbackInfo &info) {
  string bizId = info[0].As<Napi::String>();
  auto tags = info[1].As<Napi::Array>();
}
ApplicationInfo applicationInfo = ParseValueAsApplicationInfo(info[0]);
kwai::link::ApplicationInfo ParseValueAsApplicationInfo(Napi::Value value) {
kwai::link::ApplicationInfo applicationInfo;
auto object = value.As<Napi::Object>();
applicationInfo.app_id = GetObjectValueAsInt32(object, "appId");
return applicationInfo;
}
int32_t GetObjectValueAsInt32(Napi::Object object, std::string keyName) {
if (object.Get(keyName).IsNumber()) {
return object.Get(keyName).ToNumber().Int32Value();
}
return 0;
}4、函数的返回值
- 类型约束:在函数前约束,类型可写 addon 类型或者原生 C++ 类型
- 和 js 一样,写个 return 就可以了
5、env
- 是什么
- 可以理解为是 node addon 运行时的请求环境
- Env 对象通常由 Node.js 运行时或 node-addon-api 基础结构创建和传递
- 怎么用:github.com/nodejs/node…
- 类型声明:Napi::Env
- 取值:info.Env()
- 为什么需要构建这个环境
3、熟悉业务逻辑
有了上面两个知识储备后,下一步我们就要根据实际的业务场景,去写 addon 逻辑了
如何向外暴露方法
这个例子可结合上面的 demo.cc 和 demo.h 来一起看
Value runSimpleAsyncWorker(const CallbackInfo& info) {
  int runTime = info[0].As<Number>();
  Function callback = info[1].As<Function>();
  SimpleAsyncWorker* asyncWorker = new SimpleAsyncWorker(callback, runTime);
  asyncWorker->Queue();
  std::string msg =
      "SimpleAsyncWorker for " + std::to_string(runTime) + " seconds queued.";
  return String::New(info.Env(), msg.c_str());
};

Object Init(Env env, Object exports) {
  exports["runSimpleAsyncWorker"] = Function::New(
      env, runSimpleAsyncWorker, std::string("runSimpleAsyncWorker"));
  return exports;
}

NODE_API_MODULE(addon, Init)
编译阶段
编译流程
使用 node-gyp 来构建,最终产出 .node 文件
1、第一步安装所需依赖
npm i node-gyp -g
2、第二步配置 binding.gyp
{
    "targets": [
            {
                "target_name": "demo",
                "cflags!": [ "-fno-exceptions" ],
                "cflags_cc!": [
                        "-Wc++11-extensions"
                ],
                "sources": [
        "./src/simple_async_worker.cc",
                        "./src/addon.cc",
                ],
                "include_dirs": [
                        "<!@(node -p \"require('node-addon-api').include\")",
                        "./",
                ],
                'defines': [ 'NAPI_DISABLE_CPP_EXCEPTIONS' ],
                "conditions": [
                        [
                                'OS=="mac"',
                                {
                                        "link_settings": {
                    "libraries": [
                        # 可引入一个静态库
                    ]
                                        },
                                        "xcode_settings": {
                                                "OTHER_CFLAGS": [ "-std=c++17", "-fexceptions", ],
                                        },
                                        'defines': [
                                                'MACOS',
                                        ],
                                        "cflags_cc": [
                                                "-std=c++17"
                                        ]
                                }
                        ],
                ]
        },
],
}
3、执行 node-gyp rebuild 命令即可生成 require 方法可引入的 .node 文件
结语
根据以上步骤,可实现一个极为简单的 node addon 扩展,但是在实际开发过程中,会面临更多的问题解决,欢迎讨论~
加载全部内容