springboot整合netty框架实现站内信
起风哥 人气:0代码用到的组件介绍
ChannelInitializer 见名知意,就是channel 初始化器,当每个客户端创建连接时这里面的代码都会执行一遍。由于,连接建立之后,这个channel就会常驻内存,所以这里就有个值得思考的问题:
问题:哪些实例可以声明成单例,或者交给spring管理?因为如果每个连接都创建这么一大堆对象,可以想像1万个连接,这里会多占用多少内存出来?
这个问题也不难回答,没有中间态,线程安全的类是可以声明成单例的,所以我们顺着这个方向大概就可以知道哪些是可以作为单例进行声明得。授人以鱼不如授人以渔。
SimpleChannelInboundHandler 这个类是个入站消息处理类,它对资源得释放传递等做了抽取,同时提供了个channelRead0抽象方法给子类实现,并且将消息进行泛型化,让你可以更专注于你得业务逻辑处理。可以看它得父类,我们可以知道,它定义了很多时机得切入点,比如添加后操作,注册后操作,异常后处理,或者某些事件后处理。我们可以利用这些不同得时机做一些定制化得处理。
HttpServerCodec 这个东西没什么好说了,它很复杂,但是也就是个http协议得编解码器,这个不介绍了。
ChunkedWriteHandler 因为netty下是io多路复用得,所以你一定不会想让你得一个http请求被分割成多次被处理,这样会出问题,所以当你得消息过大时,使用这个类处理器就可以让你得大数据量请求可以被一次异步进行处理
HttpObjectAggregator 由于HttpServerCodec无法处理post请求中得body参数,所以还得使用这个编解码器进行处理。
WebSocketServerProtocolHandler 它也是继承至入站处理器,应该说功能核SimpleChannelInboundHandler类似,但是为什么又要做这个区分呢?原因也不复杂,看它得说明我们可以知道,入站消息被分为了控制帧和普通消息两种类型,控制帧说得是比如客户端发起关闭连接,心跳请求等等得处理在这个类被处理了,所以如果需要自定义得心跳处理,可以继承这个类。而文本类或者其它二进制类型得入站消息就可以继承至SimpleChannelInboundHandler处理。
websocket连接过程
- Websocket一开始的握手需要借助HTTP的GET请求完成。
- TCP连接成功后,浏览器通过HTTP协议向服务器传送WebSocket支持的版本号等信息。
- 服务器收到客户端的握手请求后,同样采用HTTP协议返回数据。
- 当收到了连接成功的消息后,通过TCP通道进行传输通信。
请求报文
Sec-WebSocket-Version: 13
Sec-WebSocket-Key: fHXEZ1icd2ZsBWB8+GqoXg==
Connection: Upgrade
Upgrade: websocket
Host: localhost:9090
- Upgrade:websocket / Connection: Upgrade :参数值表明这是
WebSocket类型请求(这个是Websocket的核心,告诉Apache、Nginx等服务器,发起的是Websocket协议)。 - Sec-WebSocket-Key :是一个
Base64编码的值,是由浏览器随机生成的,提供基本的防护,防止恶意或者无意的连接。 - Sec_WebSocket-Protocol :是一个用户定义的字符串,用来区分同URL下,不同的服务所需要的协议。可以不传
- Sec-WebSocket-Version :表示 WebSocket 的版本,默认13
响应报文
upgrade: websocket
connection: upgrade
sec-websocket-accept: yvrH9uLtxFSIDyS2ZwrnPKuiPvs=
- 首先,
101状态码表示服务器已经理解了客户端的请求,并将通过Upgrade消息头通知客户端采用不同的协议来完成这个请求; - 然后,
Sec-WebSocket-Accept这个则是经过服务器确认,并且加密过后的Sec-WebSocket-Key; - 最后,
Sec-WebSocket-Protocol则是表示最终使用的协议,可以没有
websocket的握手请求的消息类型是FullHttpRequest,所以我们可以定义一个channelHander专门处理握手请求得一些定制化操作,比如认证操作,认证通过后,将用户未读消息数带回去。并将用户和对应得channel信息进行映射保存起来,后续通过mq推送得消息要发给谁获取channel进行推送消息。
由于是站内信形式得,所以我们可以屏蔽客户端主动向服务端发起的消息,空处理就可以了。如果需要处理再顶一个ChannelHandler 消息类型为 TextWebSocketFrame的SimpleChannelInboundHandler <TextWebSocketFrame>在channelRead0方法中去处理即可。所以我们这里面主要的两段逻辑很简单就是第一个做认证,并保存对应的用户和channel关系,第二个,从mq订阅消息,将消息发送给对应用户的channel。但是这里面也有一些值得思考的问题。
问题:
1、怎么防止一个用户使用一个token对服务器无限个连接?
答:channel中存了个AttributeMap我们可以将对应的属性设置给channel,每个channel连接进来的时候我们先判断下对应的token是不是已经连接过了即可。如果已经连接过了直接返回不让连接了。
2、需求上用户账号如果可以同一时间多地登入,或者多端登入,如何处理?
答:我们可以通过存储一个map <userId,List<channel>>的结构,这样就支持一个账号多端登入都能收到消息了。
3、用户不在线,消息如何持久化。
答:我们作为一个消息分发器,为了高性能,所以我们不做连接数据库的操作,所以我们可以选择的时机是在客户端将消息发送到mq前将消息先持久化起来,这样作为消息分发的服务端,就可以做到只管分发,不管存储,用户没在线,就直接丢弃。
4、消息服务多节点,会产生什么问题?如何解决?
答:如果服务多节点,就会产生一个问题,就是客户端连接进来了只会连接在一个节点上,那么此时,哪个节点拿到mq消息就成了问题,所以此处我们可以使用广播的形式将消息广播给所有节点,
在节点上判断如果这个用户消息在我这里我就推给他,不在我这里我就直接丢弃就好了。
5、在微服务下,消息服务并非只有处理站内信,那么在springboot下我们开了两个端口,这两个端口该如何暴露给网关?
答:我的做法是将两个端口作为两个不同的服务注册给网关即可。我这边用nacos,详情可以查看后续的代码
创建springboot项目,引入maven包
<dependency>
    <groupId>io.netty</groupId>
    <artifactId>netty-all</artifactId>
    <version>4.1.42.Final</version>
</dependency>
创建WebSocketChannelInitializer
常量
public interface ServerConst {
    String SERVICE_NAME = "netty-notice";
    int DEFAULT_PORT=9090;
}
@Slf4j
public class WebSocketChannelInitializer extends ChannelInitializer<SocketChannel> {
private FullHttpRequestHandler paramsHandler;
private TextWebSocketFrameHandler textHandler;
public WebSocketChannelInitializer(FullHttpRequestHandler paramsHandler,
TextWebSocketFrameHandler textHandler){
this.paramsHandler=paramsHandler;
this.textHandler=textHandler;
}
@Override
protected void initChannel(SocketChannel ch) throws Exception {
log.info("连接初始化");
//http编解码
ch.pipeline().addLast(new HttpServerCodec());
//大数据量读写
ch.pipeline().addLast(new ChunkedWriteHandler());
//http消息聚合
ch.pipeline().addLast(new HttpObjectAggregator(65536));
//连接升级处理
ch.pipeline().addLast(paramsHandler);
//协议配置
ch.pipeline().addLast(new WebSocketServerProtocolHandler("/"+ServerConst.SERVICE_NAME+"/ws"));
//ch.pipeline().addLast(new IdleStateHandler(30, 60, 120));
//消息处理,业务逻辑
ch.pipeline().addLast(textHandler);
}
}定义TextWebSocketFrameHandler,这个可以声明为bean
@Slf4j
@Component
@ChannelHandler.Sharable
public class TextWebSocketFrameHandler extends SimpleChannelInboundHandler<TextWebSocketFrame> {
    @Override
    public void exceptionCaught(ChannelHandlerContext ctx, Throwable cause) throws Exception {
        cause.printStackTrace();
        AttributeKey<String> utKey = AttributeKey.valueOf(UserChannelContext.USER_TOKEN);
        Attribute<String> ut = ctx.channel().attr(utKey);
        UserChannelContext.remove(ut.get(), ctx.channel());
        ctx.channel().close();
    }
    @Override
    public void channelInactive(ChannelHandlerContext ctx) throws Exception {
        //正常流程下不存在问题,但是无法处理硬件层面问题导致连接断开等,连接断开时移除channel
        AttributeKey<String> utKey = AttributeKey.valueOf(UserChannelContext.USER_TOKEN);
        Attribute<String> ut = ctx.channel().attr(utKey);
        UserChannelContext.remove(ut.get(),ctx.channel());
    }
    @Override
    protected void channelRead0(ChannelHandlerContext channelHandlerContext,
        TextWebSocketFrame textWebSocketFrame) throws Exception {
        //todo 如果有长耗时业务逻辑处理,建议将数据打包到另一个线程处理?
    }
}
自定义控制帧处理CustomWebSocketServerProtocolHandler
/**
 * @Description todo 控制帧处理,关闭帧,ping帧,pong帧,暂时未处理
 * @Author 姚仲杰#80998699
 * @Date 2022/12/6 11:33
 */
public class CustomWebSocketServerProtocolHandler extends WebSocketServerProtocolHandler {
    public CustomWebSocketServerProtocolHandler(String websocketPath) {
        super(websocketPath);
    }
    public CustomWebSocketServerProtocolHandler(String websocketPath, boolean checkStartsWith) {
        super(websocketPath, checkStartsWith);
    }
    public CustomWebSocketServerProtocolHandler(String websocketPath, String subprotocols) {
        super(websocketPath, subprotocols);
    }
    public CustomWebSocketServerProtocolHandler(String websocketPath, String subprotocols,
        boolean allowExtensions) {
        super(websocketPath, subprotocols, allowExtensions);
    }
    public CustomWebSocketServerProtocolHandler(String websocketPath, String subprotocols,
        boolean allowExtensions, int maxFrameSize) {
        super(websocketPath, subprotocols, allowExtensions, maxFrameSize);
    }
    public CustomWebSocketServerProtocolHandler(String websocketPath, String subprotocols,
        boolean allowExtensions, int maxFrameSize, boolean allowMaskMismatch) {
        super(websocketPath, subprotocols, allowExtensions, maxFrameSize, allowMaskMismatch);
    }
    public CustomWebSocketServerProtocolHandler(String websocketPath, String subprotocols,
        boolean allowExtensions, int maxFrameSize, boolean allowMaskMismatch,
        boolean checkStartsWith) {
        super(websocketPath, subprotocols, allowExtensions, maxFrameSize, allowMaskMismatch,
            checkStartsWith);
    }
    public CustomWebSocketServerProtocolHandler(String websocketPath, String subprotocols,
        boolean allowExtensions, int maxFrameSize, boolean allowMaskMismatch,
        boolean checkStartsWith,
        boolean dropPongFrames) {
        super(websocketPath, subprotocols, allowExtensions, maxFrameSize, allowMaskMismatch,
            checkStartsWith, dropPongFrames);
    }
    @Override
    protected void decode(ChannelHandlerContext ctx, WebSocketFrame frame, List<Object> out)
        throws Exception {
        super.decode(ctx, frame, out);
    }
}
定义第一个请求的处理器,也就是握手连接升级等等,我们可以在这里做认证等等的处理,这个也可以做为bean
@Slf4j
@Component
@ChannelHandler.Sharable
public class FullHttpRequestHandler extends SimpleChannelInboundHandler<FullHttpRequest> {
    @Autowired
    private RedisClient redisClient;
    @Override
    protected void channelRead0(ChannelHandlerContext ctx, FullHttpRequest request) throws Exception {
        String uri = request.uri();
        log.info("连接请求uri:{}",uri);
        Map<CharSequence, CharSequence> queryMap = UrlBuilder.ofHttp(uri).getQuery().getQueryMap();
        String ut = (String) queryMap.get("ut");
        //todo 此处进行认证操作
        if (!StringUtils.isEmpty(ut)){
            UserInfo userInfo = redisClient.get(String.format(CommonCacheConst.USER_UT_KEY, ut),UserInfo.class);
            if (userInfo!=null) {
                //认证通过将channel缓存起来,便于服务端推送消息
                //todo 推送有多少未读消息
                //一个ut只能建立一个连接,避免连接被占满
                if (UserChannelContext.isConnected(ut)){
                    log.info("ut={}未认证,连接失败!!!",ut);
                    FullHttpResponse response = new DefaultFullHttpResponse(
                        HTTP_1_1, HttpResponseStatus.FORBIDDEN, Unpooled.wrappedBuffer("多次连接".getBytes()));
                    ctx.channel().writeAndFlush(response).addListener(ChannelFutureListener.CLOSE);
                    return;
                }
                String userCode = userInfo.getUserCode();
                AttributeKey<String> userIdKey = AttributeKey.valueOf(UserChannelContext.USER_KEY);
                ctx.channel().attr(userIdKey).setIfAbsent(userCode);
                AttributeKey<String> userTokenKey = AttributeKey.valueOf(UserChannelContext.USER_TOKEN);
                ctx.channel().attr(userTokenKey).setIfAbsent(ut);
                log.info("用户{}连接成功!!!",userCode);
                UserChannelContext.put(userCode,ut, ctx.channel());
            }else{
                log.info("ut={}未认证,连接失败!!!",ut);
                FullHttpResponse response = new DefaultFullHttpResponse(
                    HTTP_1_1, HttpResponseStatus.UNAUTHORIZED, Unpooled.wrappedBuffer("未认证".getBytes()));
                ctx.channel().writeAndFlush(response).addListener(ChannelFutureListener.CLOSE);
                return;
            }
        }else{
            log.info("连接参数不正确ut不存在");
            FullHttpResponse response = new DefaultFullHttpResponse(
                HTTP_1_1, HttpResponseStatus.BAD_REQUEST, Unpooled.wrappedBuffer("参数不正确".getBytes()));
            ctx.channel().writeAndFlush(response).addListener(ChannelFutureListener.CLOSE);
            return;
        }
        request.setUri(URLUtil.getPath(uri));
        ctx.fireChannelRead(request.retain());
    }
    @Override
    public void exceptionCaught(ChannelHandlerContext ctx, Throwable cause) throws Exception {
        ctx.close();
    }
}
在定义个用户上下文
public class UserChannelContext {
    public final static String USER_KEY="userCode";
    public final static String USER_TOKEN="ut";
    private static ConcurrentHashMap<String, List<Channel>> userChannelMap = new ConcurrentHashMap<>();
    private static ConcurrentHashMap<String, String> utConnectMap = new ConcurrentHashMap<>();
    public static boolean isConnected(String ut){
        return utConnectMap.containsKey(ut);
    }
    public static synchronized void put(String userCode,String ut, Channel channel) {
        utConnectMap.put(ut,ut);
        List<Channel> channels = get(userCode);
        if (channels!=null){
            channels.add(channel);
        }else{
            List<Channel> list = new ArrayList<>();
            list.add(channel);
            userChannelMap.put(userCode, list);
        }
    }
    public static List<Channel> get(String userCode) {
        return userChannelMap.get(userCode);
    }
    public static synchronized void remove(String ut,Channel channel){
        utConnectMap.remove(ut);
        AttributeKey<String> userCodeKey = AttributeKey.valueOf(USER_KEY);
        if (channel.hasAttr(userCodeKey)) {
            Attribute<String> userCode = channel.attr(userCodeKey);
            if (userCode!=null&&!StringUtils.isEmpty(userCode.get())){
                List<Channel> channels = userChannelMap.get(userCode.get());
                for (Channel cn : channels) {
                    if (cn.equals(channel)){
                        channels.remove(cn);
                        break;
                    }
                }
            }
        }
    }
}
将这个端口也注册为一个服务给nacos注册中心
@Component
public class NacosServiceRegister implements ApplicationContextAware, InitializingBean {
    private ApplicationContext context;
    private NacosRegistration nacosRegistration;
    @Autowired
    private NacosServiceRegistry registry;
    @Value("${netty.server.port:9090}")
    private int port;
    @Autowired
    NacosDiscoveryProperties properties;
    @Override
    public void afterPropertiesSet() throws Exception {
        NacosDiscoveryProperties nacosDiscoveryProperties = new NacosDiscoveryProperties();
        BeanUtils.copyProperties(properties, nacosDiscoveryProperties);
        nacosDiscoveryProperties.setService(ServerConst.SERVICE_NAME);
        nacosDiscoveryProperties.setPort(this.port);
        NacosRegistration nacosRegistration = new NacosRegistration(nacosDiscoveryProperties,
            context);
        this.nacosRegistration = nacosRegistration;
    }
    public void register() {
        this.registry.register(this.nacosRegistration);
    }
    public void deregister() {
        this.registry.deregister(this.nacosRegistration);
    }
    @Override
    public void setApplicationContext(ApplicationContext applicationContext) throws BeansException {
        this.context = applicationContext;
    }
}
给服务设置启动类
@Slf4j
@Component
public class NettyRunner implements ApplicationRunner {
    @Value("${netty.server.port:9090}")
    private int port;
    private FullHttpRequestHandler paramsHandler;
    private TextWebSocketFrameHandler textHandler;
    private EventLoopGroup bossGroup;
    private EventLoopGroup workerGroup;
    @Autowired
    NacosServiceRegister nacosServiceRegister;
    @Override
    public void run(ApplicationArguments args) throws Exception {
        this.start();
        nacosServiceRegister.register();
    }
    //养成好习惯,标注下作为bean示例化的构造函数,当然也可以不写
    @Autowired
    public NettyRunner(FullHttpRequestHandler paramsHandler,
        TextWebSocketFrameHandler textHandler) {
        this.paramsHandler=paramsHandler;
        this.textHandler=textHandler;
    }
    public void start() throws Exception {
        this.bossGroup = new NioEventLoopGroup(1);
        this.workerGroup = new NioEventLoopGroup();
        ServerBootstrap sb = new ServerBootstrap();
        //tcp连接队列长度
        sb.option(ChannelOption.SO_BACKLOG, 1024);
        //设置线程池,连接线程池和工作线程池
        sb.group(bossGroup,workerGroup)
            //这里怎么判断使用epoll还是kqueue?
            .channel(NioServerSocketChannel.class)
            //服务地址于端口号设置
            .localAddress(this.port)
            //channel初始化操作
            .childHandler(new WebSocketChannelInitializer(paramsHandler,textHandler));
        sb.bind().sync();
        log.info("Netty started on port(s):{}", this.port);
    }
    @PreDestroy
    private void destroy() throws InterruptedException {
        if (ObjectUtil.isNotNull(this.bossGroup)) {
            this.bossGroup.shutdownGracefully().sync();
        }
        if (ObjectUtil.isNotNull(this.workerGroup)) {
            this.workerGroup.shutdownGracefully().sync();
        }
        nacosServiceRegister.deregister();
    }
}
定义mq消息监听器用户接收消息然后分发给特定用户
常量
public interface QueueConst {
    String NOTICE_DIRECT_QUEUE = "notice_direct_queue";
    String NOTICE_DIRECT_EXCHANGE = "notice_direct_exchange";
    String NOTICE_DIRECT_BIND_KEY = "notice_direct_bind_key";
}
@Configuration
public class QueueConfiguration {
@Bean
public Queue noticeQueue() {
return new Queue(QueueConst.NOTICE_DIRECT_QUEUE);
}
@Bean
public DirectExchange noticeDirectExchange() {
return new DirectExchange(QueueConst.NOTICE_DIRECT_EXCHANGE);
}
@Bean
public Binding noticeDirectBinding() {
return BindingBuilder.bind(noticeQueue()).to(noticeDirectExchange()).with(QueueConst.NOTICE_DIRECT_BIND_KEY);
}
}@Component
public class NoticeReceiver {
private static ObjectMapper MAPPER = new ObjectMapper();
@RabbitListener(queues = QueueConst.NOTICE_DIRECT_QUEUE)
@RabbitHandler
public void receiveTopic(Message message) throws Exception {
String receiveMsg = new String(message.getBody());
message.getMessageProperties().getReceivedUserId();
ChannelMessage channelMessage=JSONUtil.toBean(receiveMsg,ChannelMessage.class);
//todo 将消息存库,此处采用另一个方案,直接由消息发送方进行存储,这里只做分发
//save
//todo 获取对应用户的channel列表,并推送消息给用户
List<Channel> channels = UserChannelContext.get(channelMessage.getUserId());
for (Channel channel : channels) {
if (channel!=null){
//todo 发送消息
channel.writeAndFlush(new TextWebSocketFrame(MAPPER.writeValueAsString(channelMessage.getData())));
}
}
//todo 补充:如果用户不在线则直接放弃;
//todo 补充:无论如何消息消费后需要返回ack
}
public static void main(String[] args) {
ChannelMessage message=new ChannelMessage();
message.setUserId("YG0000049");
message.setData("Hello world");
System.out.println(JSONUtil.toJsonStr(message));
}
}channelMessage
@Data
@Accessors
public class ChannelMessage<T> implements Serializable {
    private String userId;
    private T data;
}
用户登入成功后,会将ut存在对应的redis中,所以我们在认证的时候是去redis中直接取ut进行比对即可,登入模块我就不贴了
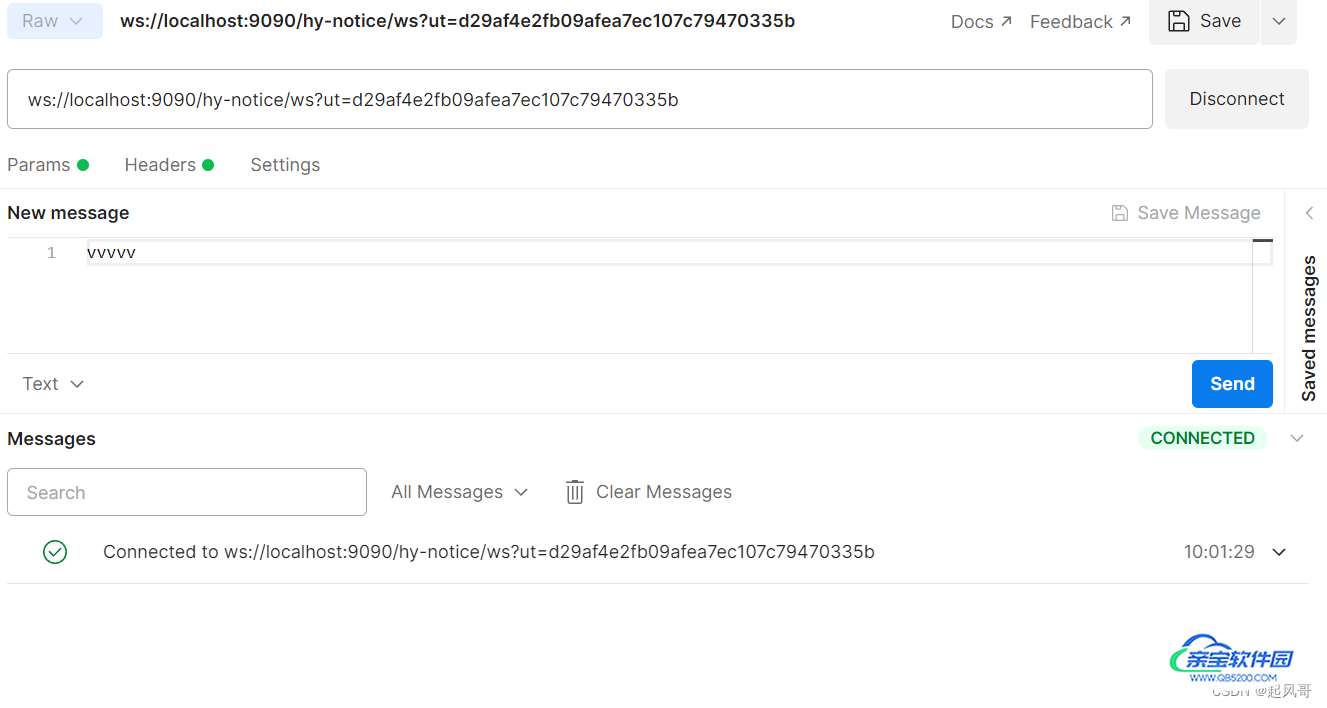
直接启动springboot项目打开postman,进行连接
可以看到连接成功
后台日志

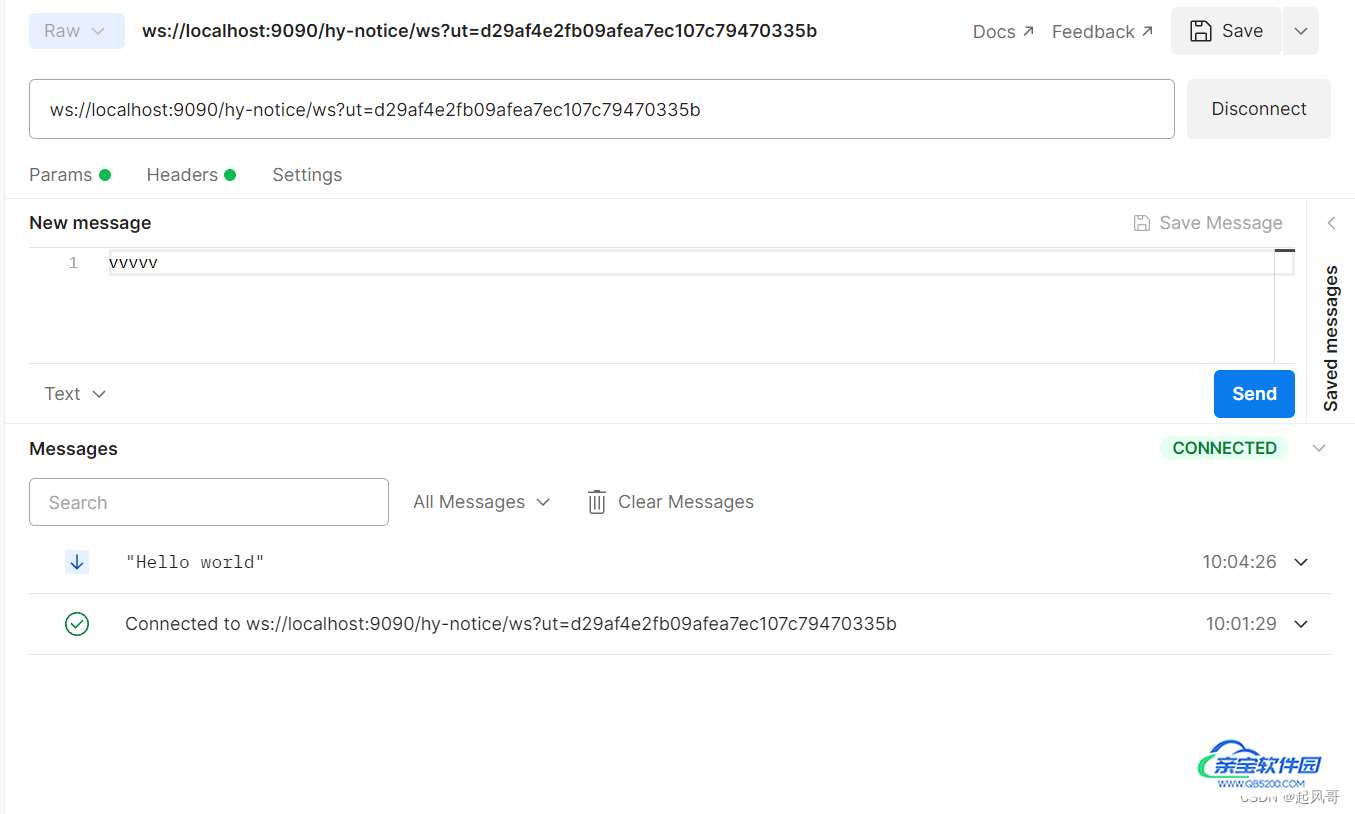
接着我们打开rabbitmq控制台,直接发送一条信息,信息的生成实例在NoticeReceiver 中执行main函数即可
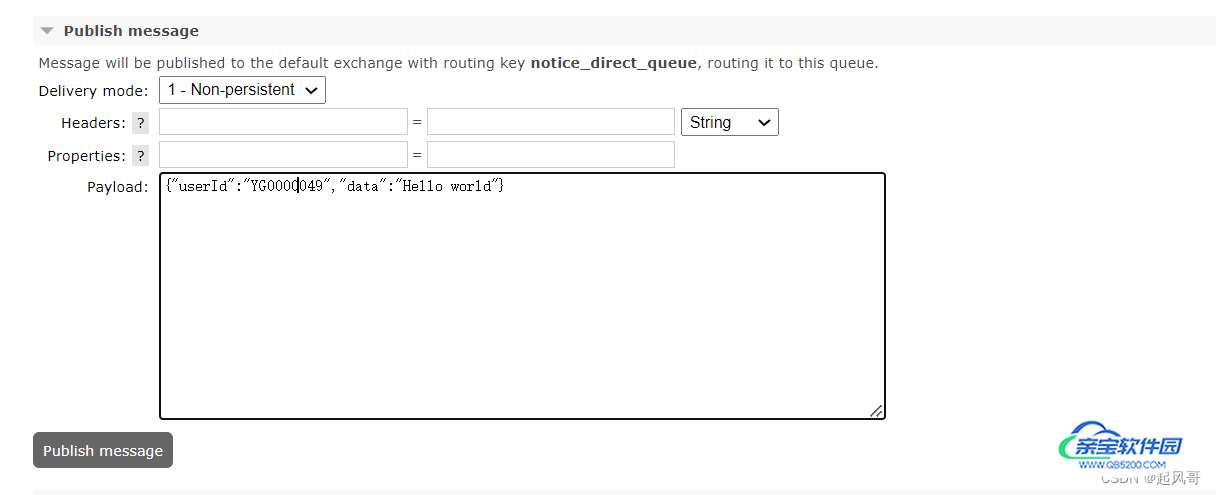
点击发布我们可以看到消息已经到postman中
剩下的事情就是将服务部署上线配置nginx转发规则即可
map $http_upgrade $connection_upgrade {
default keep-alive;
'websocket' upgrade;
}server{
location /websocket/{
proxy_pass http://xxx/;
proxy_http_version 1.1;
proxy_set_header Upgrade $http_upgrade;
proxy_set_header Connection $connection_upgrade;
proxy_connect_timeout 60s;
proxy_read_timeout 7200s;
proxy_send_timeout 60s;
proxy_set_header X-Real-IP $remote_addr;
proxy_set_header X-Forwarded-For $proxy_add_x_forwarded_for;
}
}
加载全部内容