spring MVC登录功能
橘式 人气:0spring-MVC实现简单的登录功能,供大家参考,具体内容如下
今天我学习了spring-MVC实现简单的登录功能,本篇博客就讲解如何使用spring-MVC实现简单的登录功能
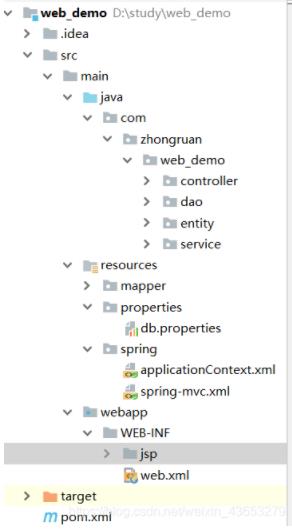
首先,我们得记得spring-MVC是通过三个层次和Spring对项目进行调用,本次我构建的简单登录程序主要构筑如下

在entity下建立User类对数据进行管理`
public class User {
    private Integer id;
    private String username;
    private String password;

    public Integer getId() {
        return id;
    }

    public void setId(Integer id) {
        this.id = id;
    }

    public String getUsername() {
        return username;
    }

    public void setUsername(String username) {
        this.username = username;
    }

    public String getPassword() {
        return password;
    }

    public void setPassword(String password) {
        this.password = password;
    }

    @Override
    public String toString() {
        return "User{" +
                "id=" + id +
                ", username='" + username + '\'' +
                ", password='" + password + '\'' +
                '}';
    }
}
然后在再在dao层设计接口
import com.zhongruan.web_demo.entity.User;
import org.apache.ibatis.annotations.Param;
import org.springframework.web.bind.annotation.RequestParam;

import java.util.List;

public interface IUserDao {

    List<User> getUsers();

    User getUserByName(@Param("name") String username);

    User getUserById2(String username);

    int updateUser(User user);

    int addUser(User user);

    int deleteUser(User user);
}
然后我们在mapper包下写.xml配置文件对接口类中的方法进行实现
<?xml version="1.0" encoding="UTF-8" ?>
<!DOCTYPE mapper PUBLIC "-//mybatis.org//DTD Mapper 3.0//EN" "http://mybatis.org/dtd/mybatis-3-mapper.dtd" >
<mapper namespace="com.zhongruan.web_demo.dao.IUserDao">
    <select id="getUserByName" resultType="User">
        select * from tb_user where username = #{name}
    </select>
</mapper>
然后本次简单的实现登录功能所以不使用业务层而直接使用控制层对dao层直接调用,controller层的类定义如下
import com.zhongruan.web_demo.dao.IUserDao;
import com.zhongruan.web_demo.entity.User;
import org.springframework.beans.factory.annotation.Autowired;
import org.springframework.stereotype.Controller;
import org.springframework.ui.Model;
import org.springframework.web.bind.annotation.RequestMapping;
import org.springframework.web.bind.annotation.RequestParam;
import org.springframework.web.bind.annotation.ResponseBody;

import javax.servlet.http.HttpServletRequest;
import javax.servlet.http.HttpSession;

@Controller
public class UserController {
    @Autowired
    IUserDao userDao;
    @RequestMapping("/demo")
    public String toDemo(Model model) {
        model.addAttribute("users", userDao.getUsers());
        return "user-list";
    }

    @RequestMapping("/logintest")
    public String Logintest(Model model,User user, @RequestParam("username") String name,
                            @RequestParam("password") String password)
    {
        User user1 = userDao.getUserByName(name);
        if (user1 == null) {
            model.addAttribute("msg", "不存在该用户");
            return "index";
        }
        if (!user.getPassword().equals(password)) {
            model.addAttribute("msg", "账号或密码错误");
            return "index";
        }
        return "index";
    }

    @RequestMapping("/returnmenu")
    public String returnmenu(){
        return "index";
    }

}
这里详细标签的使用读者可以自行百度,最后是jsp页面的实现
<%@ page contentType="text/html;charset=UTF-8" %>
<%@ include file="/WEB-INF/jsp/taglibs.jsp" %>

<html>
<head>
    <title>${basePath}</title>
</head>
<body>
<form style="width: 300px;margin: 200px auto 0;" method="post" action="${basePath}/logintest">
    账号:<input type="text" name="username" value="${user.username}">
    <br>
    密码:<input type="password" name="password" value="${user.password}">
    <br>
    <input type="submit" value="登录">
    <br>
    <span style="color: red;">${msg}</span>
</form>
</body>
</html>
index.jsp文件可以自行设计,无太大影响。其余配置文件如下
spring-MVC.xml
<?xml version="1.0" encoding="UTF-8"?>
<beans xmlns="http://www.springframework.org/schema/beans"
       xmlns:xsi="http://www.w3.org/2001/XMLSchema-instance"
       xmlns:context="http://www.springframework.org/schema/context"
       xsi:schemaLocation="http://www.springframework.org/schema/beans
      http://www.springframework.org/schema/beans/spring-beans.xsd
      http://www.springframework.org/schema/context
      http://www.springframework.org/schema/context/spring-context.xsd
      ">

    <!-- 1.注解扫描位置-->
    <context:component-scan base-package="com.zhongruan.web_demo.controller" />

    <!-- 2.配置映射处理和适配器-->
    <bean class="org.springframework.web.servlet.mvc.method.annotation.RequestMappingHandlerMapping"/>
    <bean class="org.springframework.web.servlet.mvc.method.annotation.RequestMappingHandlerAdapter"/>

    <!-- 3.视图的解析器-->
    <bean class="org.springframework.web.servlet.view.InternalResourceViewResolver">
        <property name="prefix" value="/WEB-INF/jsp/" />
        <property name="suffix" value=".jsp" />
    </bean>
</beans>
applicationContext.xml
<?xml version="1.0" encoding="UTF-8"?>
<beans xmlns="http://www.springframework.org/schema/beans"
       xmlns:xsi="http://www.w3.org/2001/XMLSchema-instance"
       xmlns:context="http://www.springframework.org/schema/context"
       xmlns:aop="http://www.springframework.org/schema/aop"
       xmlns:tx="http://www.springframework.org/schema/tx"
       xsi:schemaLocation="http://www.springframework.org/schema/beans
        http://www.springframework.org/schema/beans/spring-beans.xsd
        http://www.springframework.org/schema/context
        http://www.springframework.org/schema/context/spring-context.xsd
        http://www.springframework.org/schema/tx
        http://www.springframework.org/schema/tx/spring-tx.xsd">
    <!-- 1.配置数据库相关参数properties的属性:${url} -->
    <context:property-placeholder location="classpath:properties/db.properties"/>

    <!-- 2.配置数据源 -->
    <bean id="dataSource" class="com.mchange.v2.c3p0.ComboPooledDataSource">
        <property name="driverClass" value="${jdbc.driver}"/>
        <property name="jdbcUrl" value="${jdbc.url}"/>
        <property name="user" value="${jdbc.username}"/>
        <property name="password" value="${jdbc.password}"/>
        <property name="maxPoolSize" value="30"/>
        <property name="minPoolSize" value="2"/>
    </bean>

    <!-- 3.配置SqlSessionFactory对象 -->
    <bean id="sqlSessionFactory" class="org.mybatis.spring.SqlSessionFactoryBean">
        <!-- 注入数据库连接池 -->
        <property name="dataSource" ref="dataSource"/>
        <!-- 扫描bean包 使用别名 -->
        <property name="typeAliasesPackage" value="com.zhongruan.web_demo"/>

        <!--配置加载映射文件 UserMapper.xml-->
        <property name="mapperLocations" value="classpath:mapper/*.xml"/>

        <!--配置mybatis配置文件位置-->
<!--        <property name="configLocation" value="classpath:mybatis/SqlMapConfig.xml"/>-->

    </bean>

    <!-- 自动生成dao,mapper-->
    <!-- 4.配置扫描Dao接口包,动态实现Dao接口,注入到spring容器中 -->
    <bean class="org.mybatis.spring.mapper.MapperScannerConfigurer">
        <!-- 给出需要扫描Dao接口包 -->
        <property name="basePackage" value="com.zhongruan.web_demo.dao"/>
        <!-- 注入sqlSessionFactory -->
        <property name="sqlSessionFactoryBeanName" value="sqlSessionFactory"/>
    </bean>

    <!--自动扫描-->
    <context:component-scan base-package="com.zhongruan.web_demo"/>


    <!-- 配置事务-->
    <!-- 5.配置事务管理器 -->
    <bean id="transactionManager" class="org.springframework.jdbc.datasource.DataSourceTransactionManager">
        <property name="dataSource" ref="dataSource"/>
    </bean>
    <!-- 6.开启事务注解-->
    <tx:annotation-driven/>

</beans>
web.xml
<?xml version="1.0" encoding="UTF-8"?>
<web-app xmlns:xsi="http://www.w3.org/2001/XMLSchema-instance"
         xmlns="http://xmlns.jcp.org/xml/ns/javaee"
         xsi:schemaLocation="http://xmlns.jcp.org/xml/ns/javaee http://xmlns.jcp.org/xml/ns/javaee/web-app_3_1.xsd"
         version="3.1">

    <!-- 配置加载类路径的配置文件 -->
    <context-param>
        <param-name>contextConfigLocation</param-name>
        <param-value>classpath*:spring/applicationContext.xml</param-value>
    </context-param>

    <!-- 配置监听器 -->
    <listener>
        <listener-class>org.springframework.web.context.ContextLoaderListener</listener-class>
    </listener>
    <listener>
        <listener-class>org.springframework.web.context.request.RequestContextListener</listener-class>
    </listener>

    <!-- 解决中文乱码过滤器 -->
    <filter>
        <filter-name>characterEncodingFilter</filter-name>
        <filter-class>org.springframework.web.filter.CharacterEncodingFilter</filter-class>
        <init-param>
            <param-name>encoding</param-name>
            <param-value>UTF-8</param-value>
        </init-param>
    </filter>
    <filter-mapping>
        <filter-name>characterEncodingFilter</filter-name>
        <url-pattern>/*</url-pattern>
    </filter-mapping>

    <!-- 前端控制器(加载classpath:spring-mvc.xml 服务器启动创建servlet) -->
    <servlet>
        <servlet-name>dispatcherServlet</servlet-name>
        <servlet-class>org.springframework.web.servlet.DispatcherServlet</servlet-class>
        <!-- 配置初始化参数,创建完DispatcherServlet对象,加载springmvc.xml配置文件 -->
        <init-param>
            <param-name>contextConfigLocation</param-name>
            <param-value>classpath:spring/spring-mvc.xml</param-value>
        </init-param>
        <!-- 服务器启动的时候,让DispatcherServlet对象创建 -->
        <load-on-startup>1</load-on-startup>
    </servlet>
    <servlet-mapping>
        <servlet-name>dispatcherServlet</servlet-name>
        <url-pattern>/</url-pattern>
    </servlet-mapping>
</web-app>
db.properties
jdbc.driver=com.mysql.jdbc.Driver
jdbc.url=jdbc:mysql://localhost:3306/people_manage
jdbc.username=root
jdbc.password=123456
//其中数据以本地库为主,以上为我的数据库,记得进行修改
以上就是我构建的简单登录程序,希望能帮到读者,多谢阅读。
希望对大家的学习有所帮助,也希望大家多多支持。
加载全部内容