SpringMVC上传下载文件
凌冰_ 人气:0一、SpringMVC专门提供了CommonsMultipartResolver组件用于文件上传:
(1)maxUploadSize 文件最大限制,单位是byte
(2)maxInMemorySize 低于这个大小的文件暂存内存中
(3)defaultEncoding 默认编码utf-8
必须在spring-mvc.xml文件
<!-- (2)配置 MultipartResolver 实现文件上传
                  注意:id="multipartResolver"是固定写法
       -->
       <bean id="multipartResolver" class="org.springframework.web.multipart.commons.CommonsMultipartResolver">
         <!-- 字符编码 -->
        <property name="defaultEncoding" value="utf-8"/>
        <!-- max size 10M -->
        <property name="maxUploadSize" value="10485760000"/>
        <!--内存中最大 4K  -->
        <property name="maxInMemorySize" value="4096"/>
       </bean>
二、SpringMVC文件上传引入jar包

必须在配置Pom.xml文件
<!-- fileupload start -->
        <dependency>
            <groupId>commons-fileupload</groupId>
            <artifactId>commons-fileupload</artifactId>
            <version>1.3.1</version>
        </dependency>

        <dependency>
            <groupId>commons-io</groupId>
            <artifactId>commons-io</artifactId>
            <version>2.4</version>
        </dependency>

        <!-- end -->
三、实现【单个文件】上传
(1)JSP页面必须放在WEB-INF下 upload1.jsp 必须添加enctype="multipart/form-data"
<body>
    <div style="margin: 0 auto; margin-top: 100px; background:snow">
        <form method="post" action="upload1.html" name="form1"
            enctype="multipart/form-data">
            <p>
                  照片:<input type="file" name="imagefile">
                <input type="submit" value="上传" name="button1"> <br>
            </p>
        </form>
    </div>
(2) 写控制类 UploadController.java
@Controller
public class UploadController {

    @RequestMapping("upload1")
    public String getUpload(@RequestParam("imagefile") MultipartFile imagefile,
            HttpServletRequest request) {
        // 获取上传的服务器路径
        String pathString = request.getSession().getServletContext().getRealPath("/upload/");
        // 获取文件
        String fileName = imagefile.getOriginalFilename();

        System.out.println(fileName);

        // 判断上传的路径是否存在
        File file = new File(pathString);
        if (!file.exists()) {
            file.mkdirs();
        }

        System.out.println("上传路径=" + pathString +"/"+ fileName);
        // 文件不存在
        File targetFile = new File(pathString +"/"+ fileName);
        if (!targetFile.exists()) {
            try {
                targetFile.createNewFile();
            } catch (IOException e) {
                // TODO Auto-generated catch block
                e.printStackTrace();
            }
        }

        try {
            // 上传
            imagefile.transferTo(targetFile);
        } catch (IllegalStateException e) {
            // TODO Auto-generated catch block
            e.printStackTrace();
        } catch (IOException e) {
            // TODO Auto-generated catch block
            e.printStackTrace();
        }

        //注意:/springmvc5/WEB-INF/jsp/http:/localhost:8888/springmvc5/upload/1.gif.jsp
        //返回文件,必须是重定向文件
        return "redirect:http://localhost:8888/springmvc5/upload/" + fileName;

    } }
(3)效果

选择图片路径:

单击上传:

四、实现【多个文件】上传
(1)JSP页面(必须放在WEB-INF下) upload2.jsp 必须添加enctype="multipart/form-data"
<body>
    <div style="margin: 0 auto; margin-top: 100px; background:snow">
        <form method="post" action="upload2.html" name="form1"
            enctype="multipart/form-data">
            <p>
                  照片1:<input type="file" name="imagefile1"><p/>
                  照片2:<input type="file" name="imagefile2"><p/>
                <input type="submit" value="上传" name="button1"> <br>
            </p>
        </form>
    </div>
</body>
(2) 写控制类 UploadController.java
@RequestMapping("upload2")
    public String getUpload2(HttpServletRequest request) {

        // 多文件上传
        MultipartHttpServletRequest multipartRequest = (MultipartHttpServletRequest) request;
        // 获得多个文件
        Map<String, MultipartFile> map = multipartRequest.getFileMap();

        // 获取上传的服务器路径
        String pathString = request.getSession().getServletContext().getRealPath("/upload/");
        // 判断上传的路径是否存在
        File file1 = new File(pathString);
        if (!file1.exists()) {
            file1.mkdirs();
        }

        // 获取文件
        List<String> list = new ArrayList<String>();

        // 遍历数据
        for (MultipartFile file : map.values()) {
            String fileName = file.getOriginalFilename();
            System.out.println("上传路径=" + pathString +"/"+ fileName);
            // 文件不存在
            File targetFile = new File(pathString  +"/"+ fileName);
            if (!targetFile.exists()) {
                try {
                    targetFile.createNewFile();
                } catch (IOException e) {
                    // TODO Auto-generated catch block
                    e.printStackTrace();
                }
            }

            try {
                // 上传
                file.transferTo(targetFile);

                // 保存路径
                list.add("http://localhost:8888/springmvc5/upload/" + fileName);
            } catch (IllegalStateException e) {
                // TODO Auto-generated catch block
                e.printStackTrace();
            } catch (IOException e) {
                // TODO Auto-generated catch block
                e.printStackTrace();
            }

        }
        // 保存每个上传的路径
        request.setAttribute("files", list);

        return "showUpload";   //跳转到showUpload.jsp页面哦!

    }
注意:return "showUpload";是具体显示的页面;必须配置视图解析器在spring-mvc.xml文件中
<!--(1) spring 视图解析器 -->
<bean class="org.springframework.web.servlet.view.InternalResourceViewResolver"
p:prefix="/WEB-INF/jsp/"  p:suffix=".jsp"></bean>
(3)JSP页面: showUpload.jsp
<div style="margin: 0 auto; margin-top: 100px; background:snow">
      <%
        List<String> list =(List<String>) request.getAttribute("files");

        for(String str:list){

       %>
          <a href="<%=str%>" rel="external nofollow" ><img src="<%=str%>" alt=""/></a>

       <%} %>
</div>
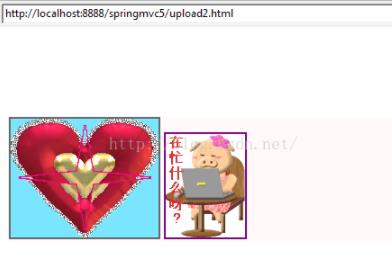
(4)效果

单击上传:

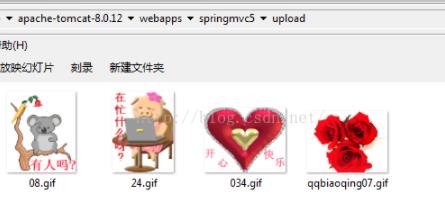
查看上传到服务器的图片

五、下载图片
(1)JSP页面 login.jsp
<a href="download.html?fileName=08.gif" >下载图片</a><p/>
(2)控制类DownController
@Controller
public class DownController {

    @RequestMapping("/download")
    public String download(@RequestParam String fileName,
            HttpServletRequest request, HttpServletResponse response) {

        // 设置响应编码
        response.setContentType("text/html;charset=utf-8");

        // 设置请求编码
        try {
            request.setCharacterEncoding("utf-8");
        } catch (UnsupportedEncodingException e) {
            // TODO Auto-generated catch block
            e.printStackTrace();
        }

        // 字节流
        BufferedInputStream bis=null;
        BufferedOutputStream bos=null;

        // 获取服务器的路径
        String path = request.getSession().getServletContext().getRealPath("/upload/");

        // 下载的路径
        String downPath = path +"/"+ fileName;

        try {
            // 文件大小
            long fileSize = new File(downPath).length();

            //设置内容类型
            response.setContentType("application/x-msdownload");
            //设置头信息
            response.setHeader("Content-disposition", "attachment; filename="+new String(fileName.getBytes("utf-8"),"ISO8859-1"));
            response.setHeader("Content-Length",String.valueOf(fileSize));
            //字节流
            bis = new BufferedInputStream(new FileInputStream(downPath));
            bos= new BufferedOutputStream(response.getOutputStream());
            //字节数组
            byte[] by = new byte[2048];

            //
            int length=0;

            //读取
            while((length=bis.read(by,0,by.length))!=-1){
                //写入
                bos.write(by, 0, length);

            }

        } catch (Exception e) {
            // TODO: handle exception
            e.printStackTrace();
        }finally{
            //关闭连接
             if(bis!=null){
                 try {
                    bis.close();
                } catch (IOException e) {
                    // TODO Auto-generated catch block
                    e.printStackTrace();
                }
             }
             if(bos!=null){
                 try {
                     bos.close();
                 } catch (IOException e) {
                     // TODO Auto-generated catch block
                     e.printStackTrace();
                 }
             }
        }

        return null;

    }
}
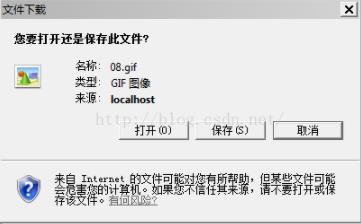
(3)效果

保存或打开如下:

加载全部内容