Vue openLayers
船长在船上 人气:3openlayers介绍
OpenLayers是一个用于开发WebGIS客户端的JavaScript包。OpenLayers 支持的地图来源包括Google Maps、Yahoo、 Map、微软Virtual Earth 等,用户还可以用简单的图片地图作为背景图,与其他的图层在OpenLayers 中进行叠加,在这一方面OpenLayers提供了非常多的选择。OpenLayers采用面向对象方式开发。
OpenLayers 是一个专为Web GIS 客户端开发提供的JavaScript 类库包,用于实现标准格式发布的地图数据访问。
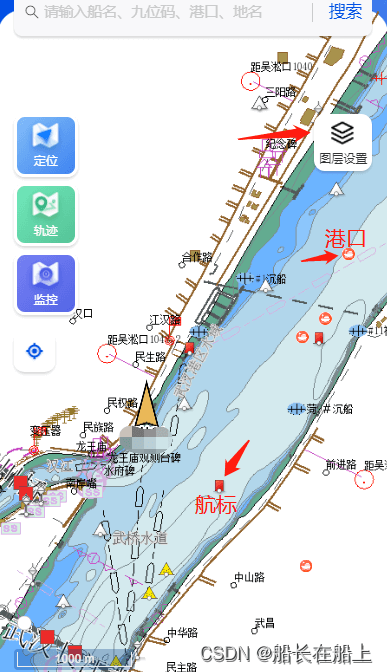
本篇文章介绍图层设置航标、港口码头、锚地停泊区数据的获取,以及以天地图作为底图添加到上航道图层上面;点击图层可以选择控制图层数据隐藏显示以及数据的处理。
技术应用:vue + vant-ui + openlayers
一、实现效果预览


二、代码实现
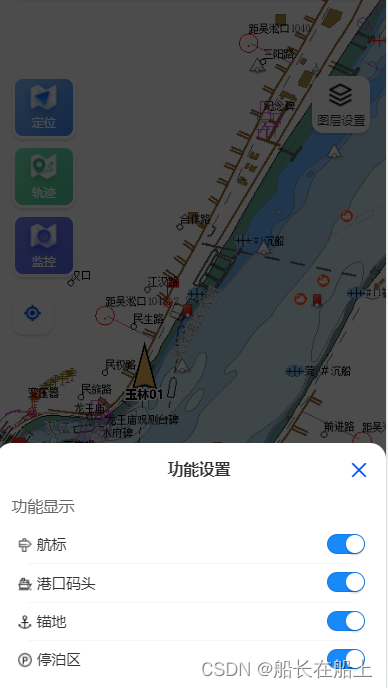
1.图层设置:
<div class="coupon" @click="handleLayer">
              <img src="../../assets/img/layerIcon.png"/>
              <div class=" fontSize22 color3">图层设置</div>
</div>
<!-- 图层切换 -->
<van-popup v-model="showTabLayer" round position="bottom" :style="{width:'100%'}" closeable class="shipPopup">
        <div class=" color3 fontSize30 pl30 pt30 text-center fw600">功能设置</div>
        <div class=" color6 fontSize30 pl30 pt30">功能显示</div>
        <van-cell-group :border="0" class="mt20 pl30 pr30 mb20">
          <van-cell :title="item.title" :icon="item.icon" class="optionsCell" v-for="(item,index) in shipLayerList" :key="index">
            <template #default>
              <van-switch v-model="item.checked" size="18px" @change="handleChange(item)"/>
            </template>
          </van-cell>
        </van-cell-group>
</van-popup>
.coupon{
    position:absolute;
    right:30px;
    top:200px;
    z-index:111;
    background: #fff;
    text-align: center;
    display: flex;
    flex-direction: column;
    align-items: center;
    box-shadow: 0px 3px 5px 0px rgba(0,0,0,0.15);
    border-radius: .28rem;
    padding:0px 10px 10px;
    img{
      display: block;
      width: 70px;
      height: 70px;
    }
  }
handleLayer(){
      	this.showTabLayer = !this.showTabLayer;
},
2.data定义图层显示列表数据shipLayerList:
shipLayerList:[
        {title:"航标",checked:true,icon:require("../../assets/img/hb.png"),name:"beaconsVectorLayer"},
        {title:"港口码头",checked:true,icon:require("../../assets/img/gk.png"),name:"portVectorLayer"},
        {title:"锚地",checked:true,icon:require("../../assets/img/md.png"),name:"anchorageVectorLayer"},
        {title:"停泊区",checked:true,icon:require("../../assets/img/tbq.png"),name:"zoneVectorLayer"}
]
3.mounted加载数据:
mounted(){
	this.initMap(); //加载地图,默认加载航道图层
    //this.getAllShip();//船舶数据图层数据
    this.getBeaconsData();//航标图层数据
    this.getPortData();//港口图层数据
}
这里主要讲航标、港口图层,其他的图层方法和数据获取类似。
let arr = this.map.getView().calculateExtent(this.map.getSize());//获取左下角和右上角经纬度
这里的方法是为了解决数据太多,要利用页面的对角经纬度显示获取可视区域的数据。后台根据传递的四个点的参数来获取数据。
4.methods中定义:
初始化方法
initMap(){
	//监听地图滑动,动态显示图层
	this.map.addEventListener("moveend", this.showView);
}
5.动态显示图层方法
    showView() {
      this.positionVector = true;
      this.map.removeLayer(this.positionVectorLayer);
      let zoom = this.map.getView().getZoom();
      console.log(zoom,"缩放")
      this.map.getLayers().getArray().forEach((item) => {
          // 航标
          if (item.get("name") == "beaconsVectorLayer") {
            this.shipLayerList.forEach((data) => {
              if (data.name == "beaconsVectorLayer" && !data.checked) {
                return;
              } else if (data.name == "beaconsVectorLayer" && data.checked) {
                if (zoom>13) {
                  item.setVisible(true);
                  this.getBeaconsData();
                } else {
                  item.setVisible(false);
                }
              }
            });
          }
          if (item.get("name") == "portVectorLayer") {
            // 港口
            this.shipLayerList.forEach((data) => {
              if (data.name == "portVectorLayer" && !data.checked) {
                return;
              } else if (data.name == "portVectorLayer" && data.checked) {
                if (zoom>13) {
                  item.setVisible(true);
                  this.getPortData();
                } else {
                  this.shopPopup = false;
                  item.setVisible(false);
                }
              }
            });
          }
        });
    },
6.手动调整图层,点击图层显示切换
    handleChange() {
      // this.showTabLayer = false;
      let zoom = this.map.getView().getZoom();
      var beaconsVectorLayer;
      var portVectorLayer;
      this.map.getLayers().getArray().forEach((data) => {
          // 航标
          if (data.get("name") == "beaconsVectorLayer") {
            beaconsVectorLayer = data;
          }
          // 港口
          if (data.get("name") == "portVectorLayer") {
            portVectorLayer = data;
          }
      });
      this.shipLayerList.forEach((item) => {
        if (item.name == "beaconsVectorLayer" && !item.checked) {
          beaconsVectorLayer.setVisible(false);
        } else if (item.name == "beaconsVectorLayer" && item.checked) {
          if (zoom > 13) {
            this.getBeaconsData();
            beaconsVectorLayer.setVisible(true);
          }
        } else if (item.name == "portVectorLayer" && !item.checked) {
          portVectorLayer.setVisible(false);
        } else if (item.name == "portVectorLayer" && item.checked) {
          if (zoom > 13) {
            this.getPortData();
            portVectorLayer.setVisible(true);
          }
        }
      });
    },
7.获取航标数据,获取港口数据是一样的操作,参照航标数据方法获取
    getBeaconsData(){
      let arr = this.map.getView().calculateExtent(this.map.getSize());//获取左下角和右上角经纬度
      let params = {
        leftLongitude: arr[0],
        leftLatitude: arr[1],
        rightLongitude: arr[2],
        rightLatitude: arr[3],
      }
      this.beaconsFeatures = [];
      this.beaconsMarker = [];
      homePageBeaconsData(params).then(res=>{
        if(res.code == 200){
          if(res.data.length > 0){
              this.beaconsFeatures = res.data;
              //定义是否存在,如果存在删除图层,防止图层数据重复
              if(this.beaconsVector){
                this.map.removeLayer(this.beaconsVectorLayer);
              }
              //添加需要的数据信息
              this.beaconsFeatures.map((item, index) => {
                  this.beaconsMarker.push(
                      new Feature({
                        geometry: new Point([item.longitude, item.latitude], "XY"),
                        name:item.name,
                        beaconsIcon:item.beaconsIcon,
                        beaconsType:item.beaconsType,
                        index: index
                      })
                  );
              });
              let beaconsIconStyles = [];
              //图标样式添加
              this.beaconsMarker.forEach(item => {
                    beaconsIconStyles.push(
                        new Style({
                          image: new Icon({
                            src: decodeURI(item.values_.beaconsIcon),
                            // scale: 0.6 * (this.zoom -13),
                            scale: 0.6
                          }),
                          //设置图标下方文字显示
                          // text: new Text({
                          //   text:item.values_.name,
                          //   font:"12px Microsoft YaHei",
                          //   offsetY:10,
                          //   textAlign:"center",
                          //   fill: new Fill({
                          //     color:"#000",
                          //   }),
                          //   stroke: new Stroke({
                          //     color:"#fff",
                          //     width: 3
                          //   })
                          // })
                        })
                    );
              });
              let beaconsVectorSource = new SourceVec({
                features: this.beaconsMarker
              });
              this.beaconsVectorLayer = new LayerVec({
                name: "beaconsVectorLayer",//设置图层名字,方便获取到该图层
                source: beaconsVectorSource,
                //样式
                style: (feature)=> {
                  let iconStyle = beaconsIconStyles[feature.values_.index];
                  return [iconStyle];
                },
                zIndex: 10
              });
              //图层添加到地图上
              this.map.addLayer(this.beaconsVectorLayer);
              this.beaconsVector = true;
          }
        }
      })
    },
8.beforeDestroy中记得移除监听
beforeDestroy(){
	this.map.removeEventListener("moveend", this.showView);
}
加载全部内容