SpringCloud服务
_时光煮雨 人气:0相关推荐
上一章:Eureka注册中心
前言

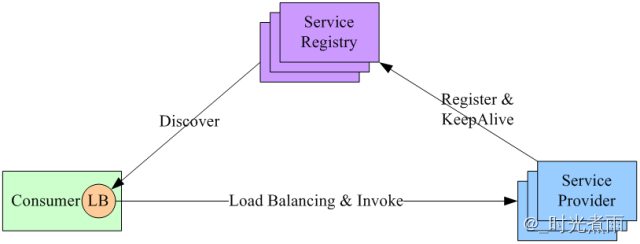
上一章中,我们介绍了Eureka注册中心及集群的搭建,这一节将介绍服务的发现和调用。注意,这个时候我们只有注册中心,并没有引入其他的组件,所以需要使用SpringCloud原生态的服务发现和调用的方式实现,循序渐进的带你走入微服务的世界。
上篇文章我们已经创建好了注册中心,这次我们需要创建一个服务提供者(provider)和一个服务消费者(consumer)两个项目。
一、服务提供者
- 新建Maven项目provider
- 引入项目依赖
    <parent>
        <groupId>com.cxy965</groupId>
        <artifactId>parent</artifactId>
        <version>1.0-SNAPSHOT</version>
        <relativePath>../parent/pom.xml</relativePath>
    </parent>
    <dependencies>
        <dependency>
            <groupId>org.springframework.boot</groupId>
            <artifactId>spring-boot-starter-web</artifactId>
        </dependency>
        <dependency>
            <groupId>org.springframework.cloud</groupId>
            <artifactId>spring-cloud-starter-netflix-eureka-client</artifactId>
        </dependency>
    </dependencies>
新建配置文件application.yml
server:
port: 8002
spring:
application:
name: provider
eureka:
client:
service-url:
defaultZone: http://localhost:8001/eureka/
fetch-registry: true
创建启动类和服务接口,为了简便,暂时将服务接口放在了启动类,实际项目中,最好还是要放在controller中。
@EnableEurekaClient
@SpringBootApplication
@RestController
public class ProviderApplication {
    public static void main(String[] args) {
        SpringApplication.run(ProviderApplication.class, args);
    }
    @GetMapping("/hello")
    public String hello(String name) {
       return "Hello "+name;
    }
}
启动验证一下,可以正常返回。

二、服务消费者
- 参考provider项目创建consumer项目
- 修改配置文件中的端口和应用名称为8003、consumer
- 创建启动类和服务消费代码
@EnableEurekaClient
@SpringBootApplication
@RestController
public class ConsumerApplication {
    public static void main(String[] args) {
        SpringApplication.run(ConsumerApplication.class, args);
    }
    @Bean
    RestTemplate restTemplate() {
        return new RestTemplate();
    }
    @Autowired
    DiscoveryClient discoveryClient;
    @Autowired
    RestTemplate restTemplate;
    @GetMapping("/hello")
    public String hello(String name) {
        List<ServiceInstance> list = discoveryClient.getInstances("provider");
        ServiceInstance instance = list.get(0);
        String host = instance.getHost();
        int port = instance.getPort();
        String returnInfo = restTemplate.getForObject("http://" + host + ":" + port + "/hello?name={1}", String.class, name);
        return returnInfo;
    }
}
启动验证一下

可以看到,我们调用8003消费者服务,消费者服务又调用了8002服务提供者的接口,并正确返回了结果。
总结
我们来分析一下消费者代码,我们先创建了一个RestTemplate Bean实例,然后注入进来,同时注入discoveryClient对象。
在接口中,通过discoveryClient.getInstances("provider")方法获取注册到注册中心中的所有provider服务信息ServiceInstance集合,ServiceInstance其实是一个接口,真正的实现类是EurekaServiceInstance,通过查看EurekaServiceInstance的源码,我们发现它里面包含了注册中心中各服务的丰富的详细信息(如主机地址、端口号、实例id,应用名称、应用组名称等)。
我们先拿到第一个服务提供者的的ip和端口(集群部署情况下,可能会有多个实例),然后通过调用restTemplate.getForObject()方法进行接口的调用并获取返回信息。
这样就通过原生态的方式实现了服务的发现和调用。

拿到第一个实例进行接口的调用,显然没有达到部署多服务实例的目的,下一篇文章将带你实现一个自定义的负载均衡器,一起期待吧!
加载全部内容