Android开发Spi机制
Pika 人气:3Spi机制介绍
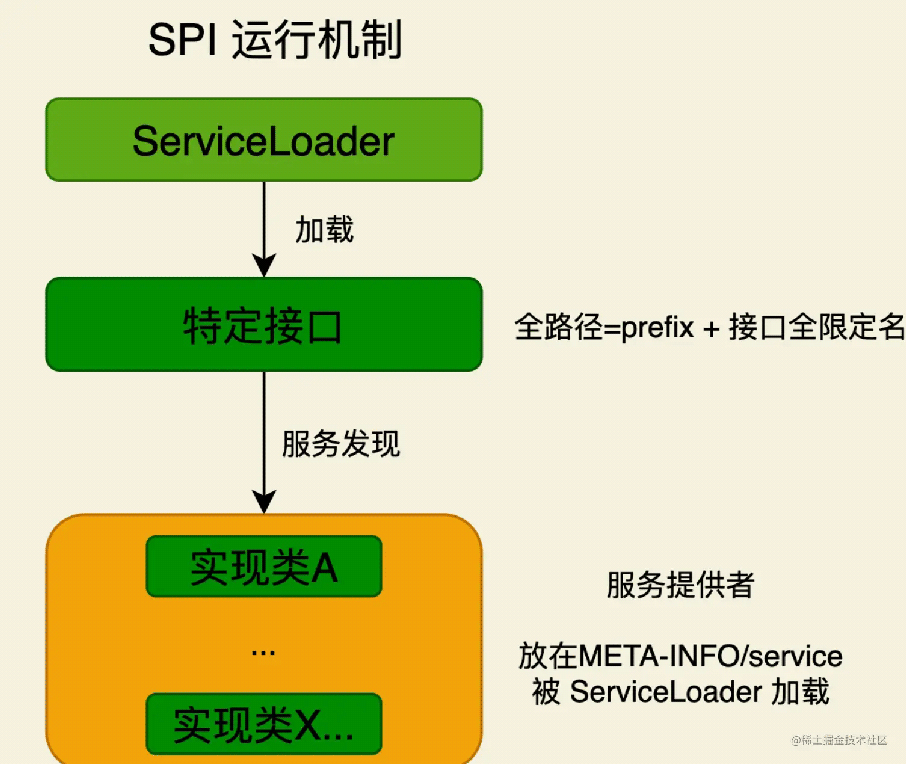
SPI 全称是 Service Provider Interface,是一种将服务接口与服务实现分离以达到解耦、可以提升程序可扩展性的机制。嘿嘿,看到这个概念很多人肯定是一头雾水了,没事,我们直接就可以简单理解为是一种反射机制,即我们不需要知道具体的实现方,只要定义好接口,我们就能够在运行时找到一个实现接口的类,我们具体看一下官方定义。

举个例子
加入我是一个库设计者,我希望把一个接口暴露给使用者实现具体的逻辑,那么我肯定不能够写死实现类对吧,不然我们怎么扩展嘛!比如我们有以下接口
package com.example.newtestproject
interface TestSpi {
    fun getSpi();
}
如果我在使用的过程中,想不关心具体的实现类/又或者想兼容多个实现,那么怎么办呢?(比如日常开发的gradle,如果我想兼容多个agp版本在自己库的运行,一个个写死肯定是一个非常糟糕的实现,如果出了新版本,那么我们还要更改代码),我们能不能只定义一个规范,即上面的TestSpi就可以不关心以后的扩展呢?很简单,我们只需要在resource/META-INF/services目录下定义一个以该接口为名称的文件,文件内容是具体的接口实现类即可,如图

内容是实现类的全名称,假如我们有以下实现类
class TheTestSpi:TestSpi {
    override fun getSpi() {
        Log.i("hello","i am the interface implementation from TheTestSpi")
    }
}
那么文件只需要写入com.example.newtestproject.TheTestSpi即可。
在我们想要用到TestSpi的功能的时候,就可以通过以下方式进行使用,从而不用关心具体的实现,达到了解耦合的目的
// spi test
val load = ServiceLoader.load(TestSpi::class.java)
load.forEach {
    it.getSpi()
    if(it is TheTestSpi){
        Log.i("hello","theTestSpi")
    }
}
ServiceLoader.load
从上面我们可以看到,最关键的是调用了ServiceLoader.load方法,这个就是Spi具体的实现了,本质是什么呢?相信都能够猜到了,其实就是反射,我们来跟一下源代码
public static <S> ServiceLoader<S> load(Class<S> service) {
    // 获取了一个当前类的classloader,做好了准备
    ClassLoader cl = Thread.currentThread().getContextClassLoader();
    return ServiceLoader.load(service, cl);
}
紧接着就会调用到
private boolean hasNextService() {
    if (nextName != null) {
        return true;
    }
    if (configs == null) {
        try {
            String fullName = PREFIX + service.getName();
            if (loader == null)
                configs = ClassLoader.getSystemResources(fullName);
            else
                configs = loader.getResources(fullName);
        } catch (IOException x) {
            fail(service, "Error locating configuration files", x);
        }
    }
    while ((pending == null) || !pending.hasNext()) {
        if (!configs.hasMoreElements()) {
            return false;
        }
        pending = parse(service, configs.nextElement());
    }
    nextName = pending.next();
    return true;
}
我们可以看到,执行的时候有这么一句String fullName = PREFIX + service.getName();,很容易想到,如果我们要反射的话,是不是需要类全称,PREFIX 其实就是
private static final String PREFIX = "META-INF/services/";
可以看到,之所以我们需要在resource下定一个文件路径是META-INF/services,是因为在ServiceLoader中定义好了,所以ServiceLoader会按照约定的路径,去该文件夹下查找service.getName()(TestSpi)的实现类,最后通过
private S nextService() {
    if (!hasNextService())
        throw new NoSuchElementException();
    String cn = nextName;
    nextName = null;
    Class<?> c = null;
    try {
        c = Class.forName(cn, false, loader);
    } catch (ClassNotFoundException x) {
        fail(service,
             // Android-changed: Let the ServiceConfigurationError have a cause.
             "Provider " + cn + " not found", x);
             // "Provider " + cn + " not found");
    }
    .....
Class.forName(cn, false, loader) 去进行了类查找操作,因为我们通过foreach去遍历,其实就是通过迭代器去获取了每个实例,所以才能够调用到了实现类TheTestSpi的getSpi() 方法。
在Android中的应用
SPI机制在很多库的设计上都有应用,比如Coroutine(kotlin协程库)就有用到,比如我们经常用到的 MainCoroutineDispatcher,如果我们希望一个任务运行在主线程,在Android就可以通过handler的方式去向主线程post一个消息,那如果在其他环境呢?
kotlin不仅仅是想在android的世界立足,还有很多比如如果在native环境呢?在服务器环境呢?多平台环境呢(如KMM),那就不一定有Handler这个概念对不对!但是都有一个主线程的概念,所以Coroutine把这部分就通过SPI的方式去实现了,如

定义了这个接口 MainDispatcherFactory::class.java 用于给具体环境的主线程实现类进行实现,具体的实现类就是
internal class AndroidDispatcherFactory : MainDispatcherFactory {
    override fun createDispatcher(allFactories: List<MainDispatcherFactory>) =
        HandlerContext(Looper.getMainLooper().asHandler(async = true))
    override fun hintOnError(): String? = "For tests Dispatchers.setMain from kotlinx-coroutines-test module can be used"
    override val loadPriority: Int
        get() = Int.MAX_VALUE / 2
}
可以看到,在Android中就通过了Handler去实现,最后我们可以在源码中看到,SPI相关的注册信息

总结
通过SPI技术去实现的解耦合工作的出色工程还有很多很多,比如我们用的APT,还有didi开源的Booster,都有用到这方面的知识。
加载全部内容