vue pinia 全局状态管理
Melody_lw 人气:4与vuex的区别
去除了 mutation 选项。省去了复杂的disptach和commit流程,直接通过模块实例调用实例的actions中的方法即可触发对应action;在组件中直接可以通过模块实例的$patch修改store状态或者通过action来间接修改store状态。响应式数据原理是proxy,使得数据的增加或者删除字段都具备响应式。
安装
yarn add pinia
引入pinia
在main.ts中注册pinia插件
import {createPinia} from 'pinia'    // vue3
// import {PiniaVuePlugin} from 'pinia' // vue2

const app=createApp(App)
app.use(createPinia())
app.mount('#app')
创建状态目录
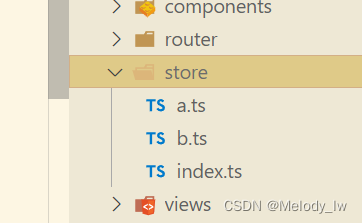
在src下创建文件夹store,在store下创建文件index.ts,a.ts,b.ts。a.ts和b.ts分别是管理某个状态的模块,index.ts用来整合这些模块。

pinia模块组成
state、actions、getters。
创建pinia模块
对应选项的含义看代码注释。
1.在a.js编写如下代码
import {defineStore} from "pinia"

export default defineStore('a',{    // a是模块的命名空间,不能和其他模块的一样
    state:()=>({         // state是一个函数,函数返回值为管理的状态
        x:0,
        y:0,
    }),
 })
2.在b.ts编写如下代码
import {defineStore} from "pinia"

export default defineStore('b',{
    state:()=>({
        name:'b',
        age:18,
    }),
    actions:{
        print(msg:string){     // 同步action
            console.log(msg)
         },
        async setAge(newAge:number){       // 异步action
            // 模拟接口
            const setAgeReq=<T>(age:T)=>new Promise<T>((rel)=>{
                setTimeout(()=>{rel(age)},1000)
            })

            const age=await setAgeReq(newAge)
            // 在action中通过实例来直接修改状态
            this.age=age
            // 在action中也可以通过实例直接调用其他action
            // this.print('age is be updated success')
        }
    },
    getters:{
        // 和vuex的getters一样,返回一个值就行了。和computed一样具有缓存机制
        userInfo():string{
            return `name:${this.name} age:${this.age}`
        }
    },


})
3.在index.ts中整合所有模块
import a from "./a"
import b from "./b"

export {
   a,b
}
在组件中使用该状态机
pinia的api基本都在该案例中,注释和代码都很容易理解,相信小伙伴们都看的懂。如果不是很明白,可以看下一章节的api讲解,看懂的可以跳过api讲解章节。
<script setup lang='ts'>
// 引入pinia模块
import {a as useA ,b as useB} from "./store"
import {storeToRefs} from "pinia"

// 模块是一个函数,函数的返回值是模块的实例
const storeA=useA()
const storeB=useB()

/* 通过$patch直接修改store状态,$patch方法接收一个函数,函数的参数是该模块的状态
在这个函数中我们可以直接修改store状态*/
const addx=()=>{storeA.$patch((s)=>{s.x++})}
const addy=()=>{storeA.$patch((s)=>{s.y++})}
// 如果要解构使用状态需要使用该api进行转换,否则不具备响应式
const {x,y}=storeToRefs(useA())

// 通过action间接修改store状态
const setAge=()=>{
 // 异步action返回promise。原理也很简单,async函数的返回值是promise
 storeB.setAge(20).then(()=>{console.log('age is be updated success')})
}

// 通过 $subscribe监听状态的变更
storeB.$subscribe((c,s)=>{  // state变化时回调。有变化信息和状态两个参数
//    console.log(c)
//    console.log(s)
},{
	detached:false,  // 在组件卸载时是否继续监听
	deep:true,  // 是否深度监听
	flush:'post',  // post:组件更新后执行;sync:始终同步触发;pre:组件更新前执行
})

// 通过$onAction监听action的调用
storeB.$onAction((c)=>{   // 当调用action时回调
    // console.log(c)
    // c.after(()=>{console.log('after caller')})  //after的回调在该函数中最后执行
    // console.log('action')
},false)   // 为true时,组件卸载时也监听该行为

// 通过$reset重置对应模块的状态
const reSetAge=()=>{
   storeB.$reset()
}

</script>

<template>
	<h3>模块a</h3>
	<p>({{storeA.x}},{{storeA.y}})</p>
	<button @click="addx">x++</button>
	<button @click="addy">y++</button>
	<h3>模块b</h3>
	<p>用户信息:{{storeB.userInfo}}</p>
	<button @click="setAge">setAge</button>
	<button @click="reSetAge">reSetAge</button>

</template>
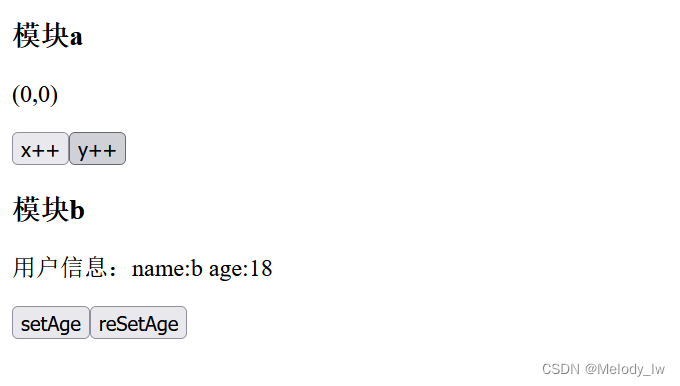
运行结果:

pinia模块实例中的api讲解
1.获取模块实例
// 引入模块
import {a as useA ,b as useB} from "./store"

// 模块是一个函数,函数的返回值是模块的实例
const storeA=useA()
const storeB=useB()
2.提供实例修改对应模块的状态
i:直接修改
/* 通过$patch直接修改store状态,$patch方法接收一个函数,函数的参数是该模块的状态
在这个函数中我们可以直接修改store状态*/
const addx=()=>{storeA.$patch((s)=>{s.x++})}
const addy=()=>{storeA.$patch((s)=>{s.y++})}
ii:间接修改
import {storeToRefs} from "pinia"
// 如果要解构使用状态需要使用该api进行转换,否则不具备响应式
const {x,y}=storeToRefs(useA())
3.状态的解构使用
import {storeToRefs} from "pinia"
// 如果要解构使用状态需要使用该api进行转换,否则不具备响应式
const {x,y}=storeToRefs(useA())
4.监听状态的变更
// 通过 $subscribe监听状态的变更
storeB.$subscribe((c,s)=>{  // state变化时回调。有变化信息和状态两个参数
//    console.log(c)
//    console.log(s)
},{
detached:false,  // 在组件卸载时是否继续监听
deep:true,  // 是否深度监听
flush:'post',  // post:组件更新后执行   ,sync:始终同步触发     ,pre:组件更新前执行
})
5.监听action的触发
// 通过$onAction监听action的调用
storeB.$onAction((c)=>{   // 当调用action时回调
    // console.log(c)
    // c.after(()=>{console.log('after caller')})  //after的回调在该函数中最后执行
    // console.log('action')
},false)   // 为true时,组件卸载时也监听该行为
6.重置状态
// 通过$reset重置对应模块的状态
const reSetAge=()=>{
   storeB.$reset()
}
7.注册插件
import {createPinia} from 'pinia'
// plugin是一个函数
createPinia().use(Plugin)
状态持久化
这里需要使用到注册插件的功能。首先在src/plugins/pinia/persistence.ts中编写如下代码
import {PiniaPluginContext} from 'pinia'
import {toRaw } from 'vue'

// 封装pinia持久化插件。执行时机:store初始化时,执行次数是模块的次数
export default function(type:'localStorage' | 'sessionStorage'){

    return (ctx:PiniaPluginContext)=>{
       //    console.log(ctx)
   // const {app,options,pinia,store}=ctx
   /*
      app:vue应用 ;options:导出pinia模块的选项
      pinia:pinia app ; store:pinia的store实例
   */
   const store= ctx.store    // 每次执行时的store是关于那个模块的store
   const storeWay=type==='localStorage'?localStorage:sessionStorage
   // console.log(store)
   store.$subscribe(()=>{
      // console.log(toRaw(store.$state))

      storeWay.setItem('pinia_'+store.$id,JSON.stringify(toRaw(store.$state)))
   },{deep:true})

    // return的值为store初始状态。pinia处理过了,如果为retrun为null使用模块的初始值,
    return JSON.parse(storeWay.getItem('pinia_'+store.$id) as any)
    }
}
然后在mian.js编写如下代码即可。此时刷新浏览器刷新时,状态是可以保持的,不会被重置。
import { createApp} from 'vue'
import App from './App.vue'
import {createPinia} from 'pinia'
// import {PiniaVuePlugin} from 'pinia' // vue2
import persistence from "./plugins/pinia/persistence"

const app=createApp(App)

// app.use(createPinia().use(persistence('sessionStorage')))   //sessionStorage方式持久化
app.use(createPinia().use(persistence('localStorage')))  //localStorage方式持久化

app.mount('#app')
加载全部内容