SpringBoot thymeleaf
程序员阿红 人气:01. 支持的视图技术
前端模板引擎技术的出现,使前端开发人员无需关注后端业务的具体实现,只关注自己页面的呈现效果即可,并且解决了前端代码错综复杂的问题、实现了前后端分离开发。Spring Boot框架对很多常用的
模板引擎技术(如:FreeMarker、Thymeleaf、Mustache等)提供了整合支持
Spring Boot不太支持常用的JSP模板,并且没有提供对应的整合配置,这是因为使用嵌入式Servlet容器的Spring Boot应用程序对于JSP模板存在一些限制 :
- 在Jetty和Tomcat容器中,Spring Boot应用被打包成war文件可以支持JSP。但Spring Boot默认使用嵌入式Servlet容器以JAR包方式进行项目打包部署,这种JAR包方式不支持JSP。
- 如果使用Undertow嵌入式容器部署Spring Boot项目,也不支持JSP模板。(Undertow 是红帽公司开发的一款基于 NIO 的高性能 Web 嵌入式服务器)
- Spring Boot默认提供了一个处理请求路径“/error”的统一错误处理器,返回具体的异常信息。使用JSP模板时,无法对默认的错误处理器进行覆盖,只能根据Spring Boot要求在指定位置定制错误页面。
上面对Spring Boot支持的模板引擎进行了介绍,并指出了整合JSP模板的一些限制。接下来,对其中常用的Thymeleaf模板引擎进行介绍,并完成与Spring Boot框架的整合实现
2. Thymeleaf
Thymeleaf是一种现代的基于服务器端的Java模板引擎技术,也是一个优秀的面向Java的XML、XHTML、HTML5页面模板,它具有丰富的标签语言、函数和表达式,在使用Spring Boot框架进行页面设计时,一般会选择Thymeleaf模板
2.1 Thymeleaf语法
常用标签
在HTML页面上使用Thymeleaf标签,Thymeleaf 标签能够动态地替换掉静态内容,使页面动态展示。为了大家更直观的认识Thymeleaf,下面展示一个在HTML文件中嵌入了Thymeleaf的页面文件,示例代
码如下:
<!DOCTYPE html>
<html lang="en" xmlns:th="http://www.thymeleaf.org">
<head>
  <meta charset="UTF-8">
  <link rel="stylesheet" type="text/css" media="all"
     href="../../css/gtvg.css" rel="external nofollow"  th:href="@{/css/gtvg.css}" rel="external nofollow"  />
  <title>Title</title>
</head>
<body>
  <p th:text="${hello}">欢迎进入Thymeleaf的学习</p>
</body>
</html>

上述代码中,“xmlns:th=“http://www.thymeleaf.org”“ 用于引入Thymeleaf模板引擎标签,使用关键字“th”标注标签是Thymeleaf模板提供的标签,其中,“th:href”用于引入外联样式文件,“th:text”用于动态显示标签文本内容。
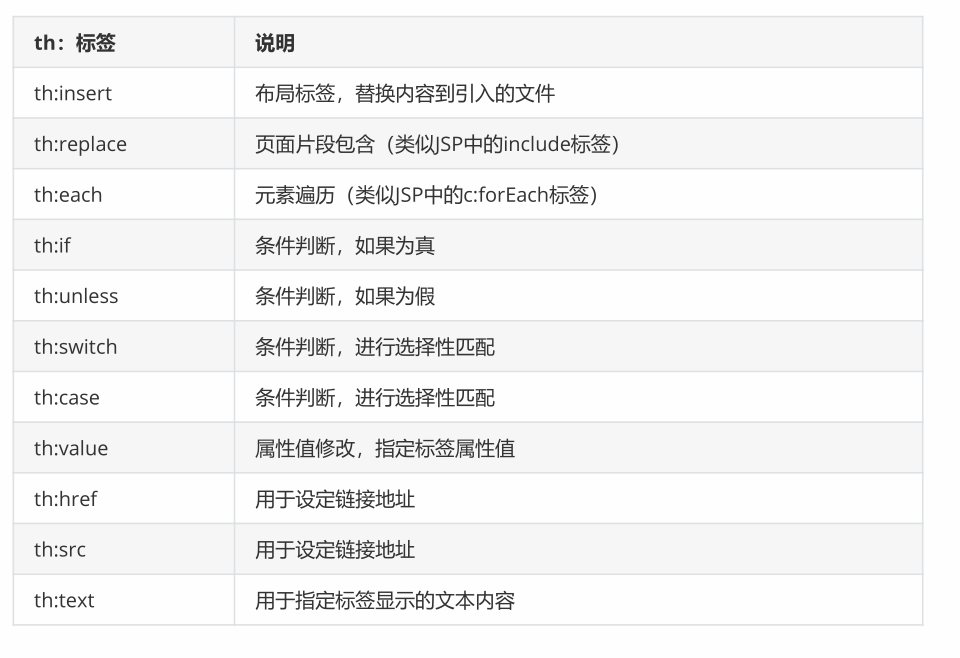
除此之外,Thymeleaf模板提供了很多标签,接下来,通过一张表罗列Thymeleaf的常用标签

2.2 标准表达式
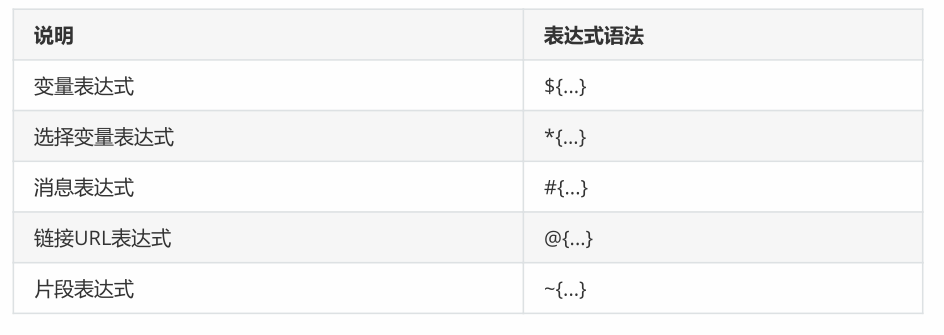
Thymeleaf模板引擎提供了多种标准表达式语法,在正式学习之前,先通过一张表来展示其主要语法及说明

1. 变量表达式 ${…}
变量表达式${…}主要用于获取上下文中的变量值,示例代码如下:
<p th:text="${title}">这是标题</p>
示例使用了Thymeleaf模板的变量表达式${…}用来动态获取P标签中的内容,如果当前程序没有启动或者当前上下文中不存在title变量,该片段会显示标签默认值“这是标题”;如果当前上下文中存在title变量
并且程序已经启动,当前P标签中的默认文本内容将会被title变量的值所替换,从而达到模板引擎页面数据动态替换的效果
同时,Thymeleaf为变量所在域提供了一些内置对象,具体如下所示
# ctx:上下文对象
# vars:上下文变量
# locale:上下文区域设置
# request:(仅限Web Context)HttpServletRequest对象
# response:(仅限Web Context)HttpServletResponse对象
# session:(仅限Web Context)HttpSession对象
# servletContext:(仅限Web Context)ServletContext对象
结合上述内置对象的说明,假设要在Thymeleaf模板引擎页面中动态获取当前国家信息,可以使用#locale内置对象,示例代码如下
The locale country is: <span th:text="${#locale.country}">US</span>.
上述代码中,使用th:text="${#locale.country}"动态获取当前用户所在国家信息,其中标签内默认内容为US(美国),程序启动后通过浏览器查看当前页面时,Thymeleaf会通过浏览器语言设置来识别当前用户所在国家信息,从而实现动态替换
2. 选择变量表达式 *{…}
选择变量表达式和变量表达式用法类似,一般用于从被选定对象而不是上下文中获取属性值,如果没有选定对象,则和变量表达式一样,示例代码如下
<div th:object="${book}">
 <p>titile: <span th:text="*{title}">标题</span>.</p>
</div
*{title} 选择变量表达式获取当前指定对象book的title属性值。
3. 消息表达式 #{…}
消息表达式#{…}主要用于Thymeleaf模板页面国际化内容的动态替换和展示,使用消息表达式#{…}进行国际化设置时,还需要提供一些国际化配置文件。
4. 链接表达式 @{…}
链接表达式@{…}一般用于页面跳转或者资源的引入,在Web开发中占据着非常重要的地位,并且使用也非常频繁,示例代码如下:
<a th:href="@{http://localhost:8080/order/details(orderId=${o.id})}" rel="external nofollow" >view</a>
<a  th:href="@{/order/details(orderId=${o.id},pid=${p.id})}" rel="external nofollow" >view</a>
上述代码中,链接表达式@{…}分别编写了绝对链接地址和相对链接地址。在有参表达式中,需要按照@{路径(参数名称=参数值,参数名称=参数值…)}的形式编写,同时该参数的值可以使用变量表达式来传递动态参数值
5. 片段表达式 ~{…}
片段表达式~{…}用来标记一个片段模板,并根据需要移动或传递给其他模板。其中,最常见的用法是使用th:insert或th:replace属性插入片段,示例代码如下:
<div th:insert="~{thymeleafDemo::title}"></div>上述代码中,使用th:insert属性将title片段模板引用到该标签中。thymeleafDemo为模板名称,Thymeleaf会自动查找 “/resources/templates/” 目录下的thymeleafDemo模板,title为片段名称
3. 基本使用
3.1 Thymeleaf模板基本配置
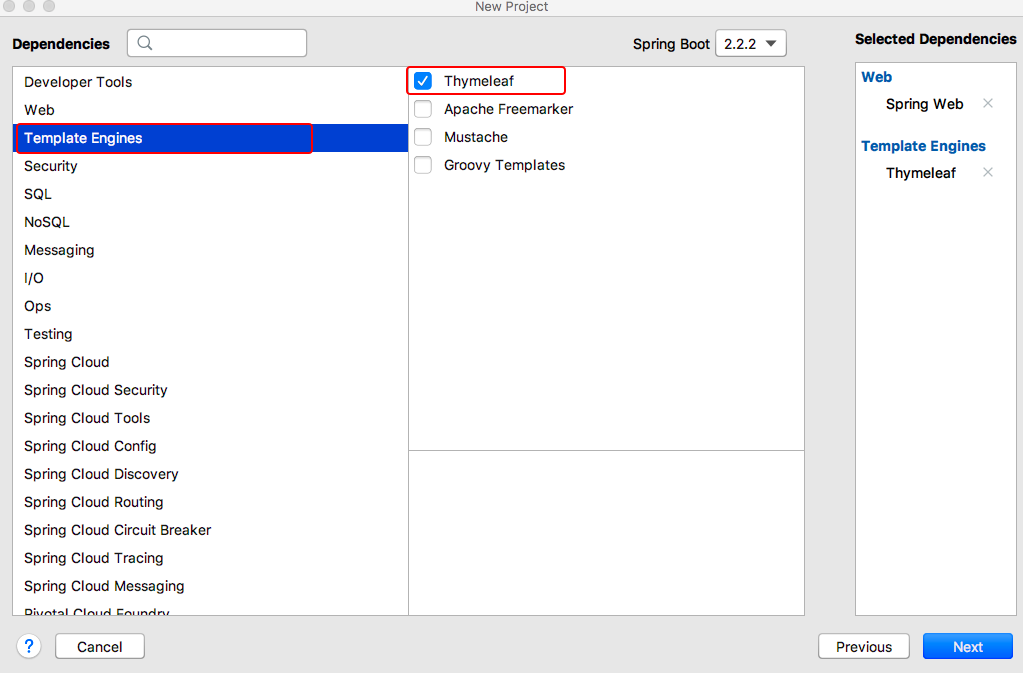
首先 在Spring Boot项目中使用Thymeleaf模板,首先必须保证引入Thymeleaf依赖,示例代码如下:
<dependency>
 <groupId>org.springframework.boot</groupId>
 <artifactId>spring-boot-starter-thymeleaf</artifactId>
</dependency>
其次,在全局配置文件中配置Thymeleaf模板的一些参数。一般Web项目都会使用下列配置,示例代码如:
spring.thymeleaf.cache = true #启用模板缓存
spring.thymeleaf.encoding = UTF_8 #模板编码
spring.thymeleaf.mode = HTML5 #应用于模板的模板模式
spring.thymeleaf.prefix = classpath:/templates/ #指定模板页面存放路径
spring.thymeleaf.suffix = .html #指定模板页面名称的后缀
上述配置中,spring.thymeleaf.cache表示是否开启Thymeleaf模板缓存,默认为true,在开发过程中通常会关闭缓存,保证项目调试过程中数据能够及时响应;spring.thymeleaf.prefix指定了Thymeleaf模板页面的存放路径,默认为classpath:/templates/;spring.thymeleaf.suffix指定了Thymeleaf模板页面的名称后缀,默认为.html
3.2 静态资源的访问
开发Web应用时,难免需要使用静态资源。Spring boot默认设置了静态资源的访问路径。
使用Spring Initializr方式创建的Spring Boot项目,默认生成了一个resources目录,在resources目录中新建public、resources、static三个子目录下,Spring boot默认会挨个从public、resources、static里面查找静态资源
3.3 完成数据的页面展示
1. 创建Spring Boot项目
引入Thymeleaf依赖

2. 编写配置文件
打开application.properties全局配置文件,在该文件中对Thymeleaf模板页面的数据缓存进行设置
# thymeleaf页面缓存设置(默认为true),开发中方便调试应设置为false,上线稳定后应保持默认
true
spring.thymeleaf.cache=false
使用“spring.thymeleaf.cache=false”将Thymeleaf默认开启的缓存设置为了false,用来关闭模板页面缓存
3. 创建web控制类
在项目中创建名为com.lagou.controller的包,并在该包下创建一个用于前端模板页面动态数据替换效果测试的访问实体类LoginController
@Controller
public class LoginController {
  /**
    * 获取并封装当前年份跳转到登录页login.html
   */
  @RequestMapping("/toLoginPage")
  public String toLoginPage(Model model){
    model.addAttribute("currentYear",
Calendar.getInstance().get(Calendar.YEAR));
    return "login";
 }
toLoginPage()方法用于向登录页面login.html跳转,同时携带了当前年份信息currentYear。
4. 创建模板页面并引入静态资源文件
在“classpath:/templates/”目录下引入一个用户登录的模板页面login.html
<!DOCTYPE html>
<html lang="en" xmlns:th="http://www.thymeleaf.org">
<head>
  <meta http-equiv="Content-Type" content="text/html; charset=UTF-8">
  <meta name="viewport" content="width=device-width, initial-scale=1,shrink-
to-fit=no">
  <title>用户登录界面</title>
  <link th:href="@{/login/css/bootstrap.min.css}" rel="external nofollow"  rel="stylesheet">
  <link th:href="@{/login/css/signin.css}" rel="external nofollow"  rel="stylesheet">
</head>
<body class="text-center">
<!-- 用户登录form表单 -->
<form class="form-signin">
  <img class="mb-4" th:src="@{/login/img/login.jpg}" width="72" height="72">
  <h1 class="h3 mb-3 font-weight-normal">请登录</h1>
  <input type="text" class="form-control"
     th:placeholder="用户名" required="" autofocus="">
  <input type="password" class="form-control"
     th:placeholder="密码" required="">
  <div class="checkbox mb-3">
    <label>
      <input type="checkbox" value="remember-me"> 记住我
    </label>
  </div>
  <button class="btn btn-lg btn-primary btn-block" type="submit" >登录</button>
  <p class="mt-5 mb-3 text-muted">© <span
th:text="${currentYear}">2019</span>-<span
th:text="${currentYear}+1">2020</span></p>
</form>
</body>
</html>
通过“xmlns:th=“http://www.thymeleaf.org””引入了Thymeleaf模板标签;
使用“th:href”和“th:src”分别引入了两个外联的样式文件和一个图片;
使用“th:text”引入了后台动态传递过来的当前年份currentYear
5.效果测试

加载全部内容