SpringBoot单元测试与热部署
程序员阿红 人气:1一、单元测试
开发中,每当完成一个功能接口或业务方法的编写后,通常都会借助单元测试验证该功能是否正确。Spring Boot对项目的单元测试提供了很好的支持,在使用时,需要提前在项目的pom.xml文件中添加spring-boot-starter-test测试依赖启动器,可以通过相关注解实现单元测试
演示:
1.添加spring-boot-starter-test测试依赖启动器
在项目的pom.xml文件中添加spring-boot-starter-test测试依赖启动器,示例代码如下 :
<dependency>
    <groupId>org.springframework.boot</groupId>
    <artifactId>spring-boot-starter-test</artifactId>
    <scope>test</scope>
</dependency>
注意:使用Spring Initializr方式搭建的Spring Boot项目,会自动加入spring-boot-starter-test测试依赖启动器,无需再手动添加
2.编写单元测试类和测试方法
使用Spring Initializr方式搭建的Spring Boot项目,会在src.test.java测试目录下自动创建与项目主程序启动类对应的单元测试类
package com.lagou;
import com.lagou.controller.HelloController;
import org.junit.jupiter.api.Test;
import org.junit.runner.RunWith;
import org.junit.runners.JUnit4;
import org.springframework.beans.factory.annotation.Autowired;
import org.springframework.boot.test.context.SpringBootTest;
import org.springframework.test.context.junit4.SpringJUnit4ClassRunner;
import org.springframework.test.context.junit4.SpringRunner;
/**
* SpringJUnit4ClassRunner.class:Spring运行环境
* JUnit4.class:JUnit运行环境
* SpringRunner.class:Spring Boot运行环境
*/
@RunWith(SpringRunner.class) //@RunWith:运行器
@SpringBootTest //标记为当前类为SpringBoot测试类,加载项目的ApplicationContext上下文环境
class Springbootdemo2ApplicationTests {
  /**
  * 需求:调用HelloController的hello方法
  */
  @Autowired
  private HelloController helloController;
  @Test
  void contextLoads() {
    String result = helloController.hello();
    System.out.println(result);
 }
}
上述代码中,先使用@Autowired注解注入了DemoController实例对象,然后在contextLoads()方法中调用了DemoController类中对应的请求控制方法contextLoads(),并输出打印结果。

二、热部署
在开发过程中,通常会对一段业务代码不断地修改测试,在修改之后往往需要重启服务,有些服务需要加载很久才能启动成功,这种不必要的重复操作极大的降低了程序开发效率。为此,Spring Boot框架专门提供了进行热部署的依赖启动器,用于进行项目热部署,而无需手动重启项目 。
热部署:在修改完代码之后,不需要重新启动容器,就可以实现更新。
使用步骤:
1)添加SpringBoot的热部署依赖启动器
2)开启Idea的自动编译
3)开启Idea的在项目运行中自动编译的功能
演示:
1.添加spring-boot-devtools热部署依赖启动器
在Spring Boot项目进行热部署测试之前,需要先在项目的pom.xml文件中添加spring-boot-devtools热部署依赖启动器:
<!-- 引入热部署依赖 -->
<dependency>
 <groupId>org.springframework.boot</groupId>
 <artifactId>spring-boot-devtools</artifactId>
</dependency>
由于使用的是IDEA开发工具,添加热部署依赖后可能没有任何效果,接下来还需要针对IDEA开发工具进行热部署相关的功能设置。
2.IDEA工具热部署设置
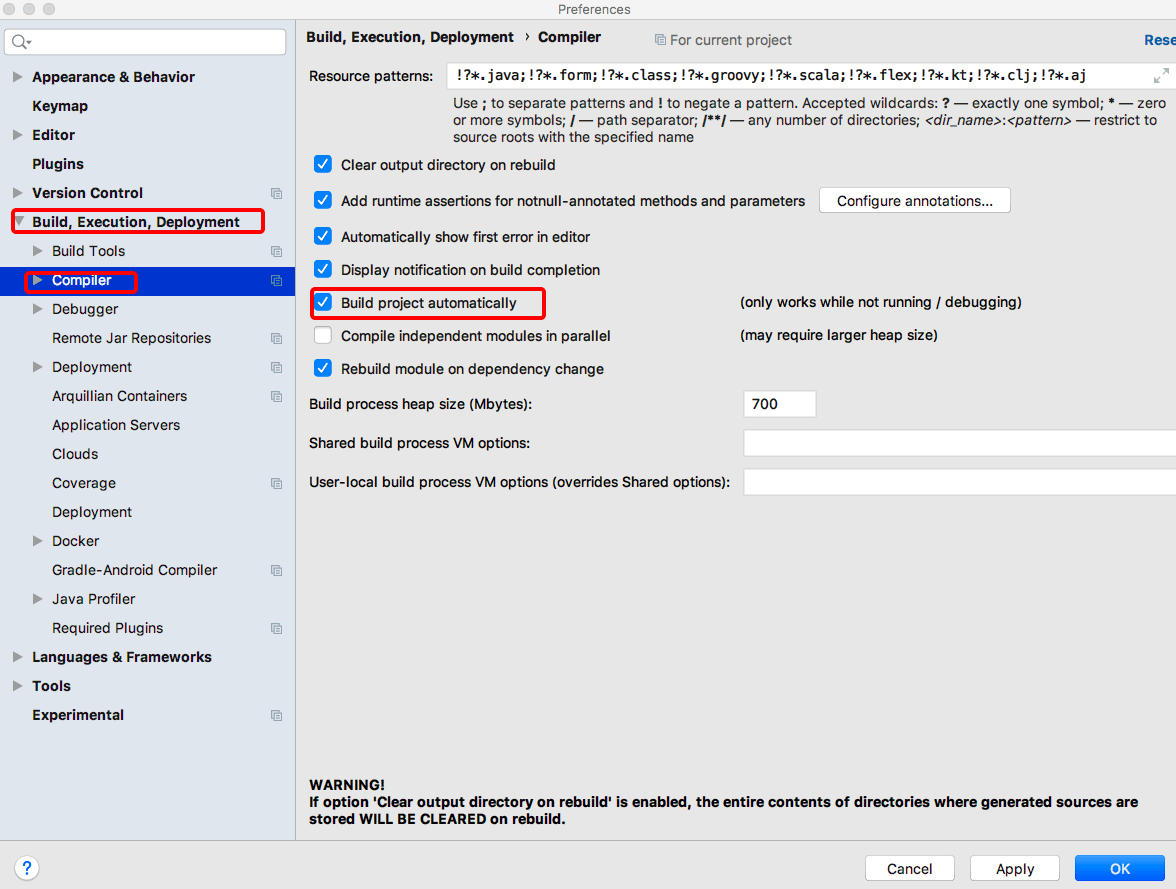
选择IDEA工具界面的【File】->【Settings】选项,打开Compiler面板设置页面

选择Build下的Compiler选项,在右侧勾选“Build project automatically”选项将项目设置为自动编译,单击【Apply】→【OK】按钮保存设置
在项目任意页面中使用组合快捷键“Ctrl+Shift+Alt+/”打开Maintenance选项框,选中并打开Registry页面,具体如图1-17所示

列表中找到“compiler.automake.allow.when.app.running”,将该选项后的Value值勾选,用于指定IDEA工具在程序运行过程中自动编译,最后单击【Close】按钮完成设置
3.热部署效果测试
启动chapter01http://localhost:8080/hello

可以看出,浏览器输出了“你好,Spring Boot”,说明项目热部署配置成功。
加载全部内容