Android Flutter页面滚动效果
岛上码农 人气:0在Flutter 高仿一个某支付价值几个亿的页面这一篇中,我们使用了 ListView 将几个 GridView 组合在一起实现了不同可滑动组件的粘合,但是这里必须要设置禁止 GridView 的滑动,防止多个滑动组件的冲突。这种方式写起来不太方便,事实上 Flutter 提供了 CustomScrollView 来粘合多个滑动组件,并且可以实现更有趣的滑动效果。

CustomScrollView 简介
CustomScrollView的常用属性如下:
slivers:最重要的属性,由多个SliverXX组件组成的数组,包括如SliverList(对应ListView),SliverGrid(对应GridView)等,如果普通组件无法直接使用,而需要使用SliverToBoxAdapter包裹。- reverse:是否反向滚动,如果为 true,则反方向滚动。
- scrollDirection:滚动方向,可以是横向或纵向。
改造原代码
页面结构需要重新调整,将原先的 GridView 改成 SliverGrid,然后顶部区域需要使用 SliverToBoxAdapter进行包裹。每个区域的标题栏也需要单独使用SliverToBoxAdapter 包裹起来。SliverToBoxAdapter使用很简单,只需要将原有的组件设置为其 child 属性即可。
Widget _headerGridButtons() {
  double height = 144;
  List<Map<String, String>> buttons = GridMockData.headerGrids();
  return SliverToBoxAdapter(
    child: Container(
      height: height,
      margin: EdgeInsets.fromLTRB(MARGIN, MARGIN, MARGIN, MARGIN / 2),
      decoration: BoxDecoration(
        borderRadius: BorderRadius.circular(4.0),
        gradient: LinearGradient(
            begin: Alignment.topCenter,
            end: Alignment.bottomCenter,
            colors: [
              Color(0xFF56AF6D),
              Color(0xFF56AA6D),
            ]),
      ),
      child: Center(
        child: Row(
            mainAxisAlignment: MainAxisAlignment.spaceEvenly,
            children: buttons
                .map((item) => _getMenus(item['icon'], item['name'],
                    color: Colors.white))
                .toList()),
      ),
    ),
  );
}

Widget _getMenuTitle(String title) {
  return SliverToBoxAdapter(
    child: Container(
      margin: EdgeInsets.fromLTRB(MARGIN, MARGIN, MARGIN, MARGIN / 2),
      padding: EdgeInsets.all(MARGIN),
      decoration: BoxDecoration(
        borderRadius: BorderRadius.circular(4.0),
        color: Colors.white,
      ),
      child: Text(
        title,
        style: TextStyle(color: Colors.grey[700]),
      ),
    ),
  );
}
GridView 我们之前使用的是 Grid.count() 方法,这里只需要更换为 SliverGrid.count()即可,参数基本相同,只是我们可以将之前禁止滑动的代码删除了。
//在 SliverGrid 中无需下面两行代码禁止滑动
shrinkWrap: true,
physics: NeverScrollableScrollPhysics(),
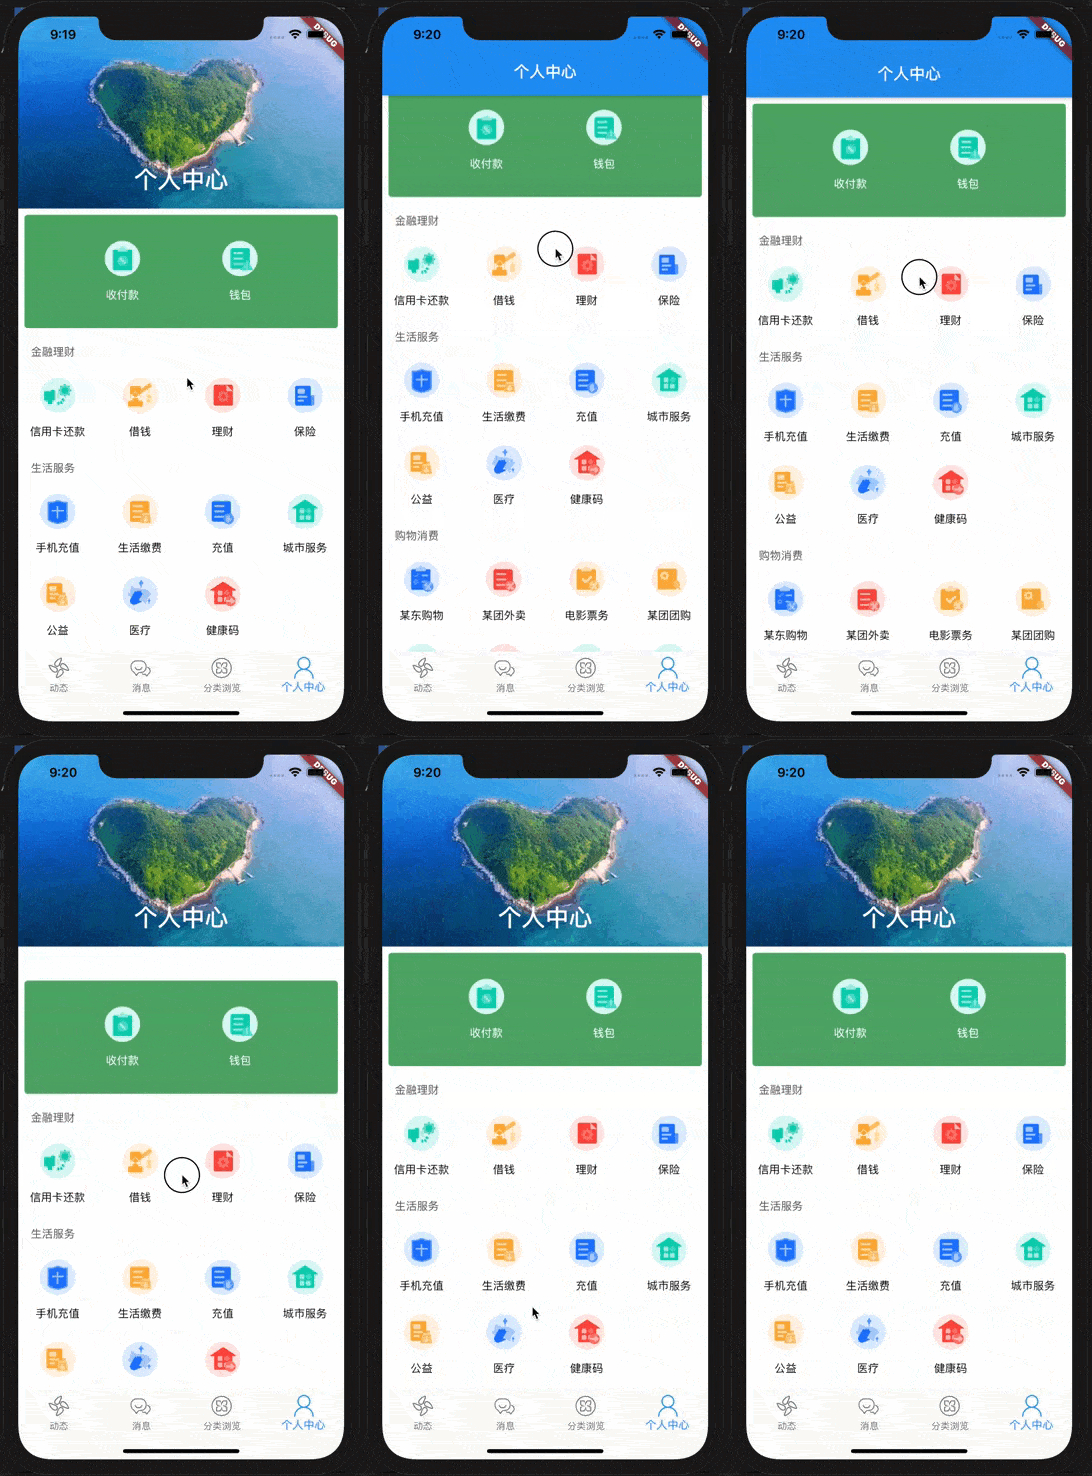
让导航栏更有趣
在 Flutter 中提供了一个 SliverAppBar专门用于 CustomScrollView,该导航栏基本属性和 AppBar 类似,但有些其他的属性:
floating:浮动,即便是滚动视图不在顶部,SliverAppBar也会跟随滚动出现。snap:手指放开时会根据当前状态决定是否展开或收起。如果为false,则导航栏会停留在上次滑动位置。pinned:滚动到顶部后,导航栏是否可见,默认是false。若为false,则滚动出顶部后导航栏将消失。expandedHeight:导航栏展开后的高度。flexibleSpace:扩展弹性空间,即导航栏滑动时的收起或展开组件,可以有背景图片和导航栏文字,当滑动到顶部后只显示文字导航栏,当下滑后,会逐步显示背景内容,从而实现动态导航栏的效果。
SliverAppBar _getAppBar(String title) {
  return SliverAppBar(
    pinned: true,
    expandedHeight: 200,
    brightness: Brightness.dark,
    flexibleSpace: FlexibleSpaceBar(
      title: Text(title),
      background: Image.network(
        'https://ss1.bdstatic.com/70cFvXSh_Q1YnxGkpoWK1HF6hhy/it/u=688497718,308119011&fm=26&gp=0.jpg',
        fit: BoxFit.cover,
      ),
    ),
  );
}
改造后的代码
改造后需要使用 Container 包裹,以设置背景颜色,多个 Sliver 组件依次排列就可以完成拼接后一起滚动,相比使用 ListView 来说会更简便,且效果更好。
@override
  Widget build(BuildContext context) {
    return Container(
      color: Colors.white,
      child: CustomScrollView(
        slivers: [
          _getAppBar('个人中心'),
          _headerGridButtons(),
          _getMenuTitle('金融理财'),
          _gridButtons(GridMockData.financeGrids()),
          _getMenuTitle('生活服务'),
          _gridButtons(GridMockData.serviceGrids()),
          _getMenuTitle('购物消费'),
          _gridButtons(GridMockData.thirdpartyGrids()),
        ],
      ),
    );
  }
其他效果
除了上述的效果外,Flutter 还提供了SliverPersistentHeader悬停头部组件用于显示悬停的表头。具体可以参考对应文档,这在需要展示顶部的功能切换栏或者表格表头的时候很有用。
总结
本篇介绍了 CustomScrollView 的基本用法以及 SliverAppBar 的使用,通过 SliverAppBar 可以让导航栏的滑动更有趣。在实际开发过程中,推荐在有多个滑动组件组合的时候优先使用 CustomScrollView。
加载全部内容