Vue3模仿Windows窗口
ZERO丶D 人气:0一、前言
Vue3终于在2022年2月7日正式发布了,之前用vite+vue3搭了一个小demo,资料太少而我太菜了,所以一直不敢用Vue3搭新项目,现在随着Vue3正式版本的发布,而且相关配合的子项目库也已经完善,大量的翻译资料和文献都已经可以百度到了,再加上领导支持用Vue3新框架,所以我在新项目上着手用vue-cli(@vue/cli 4.5.9)脚手架搭建Vue3项目。

图1 拖拽窗体效果展示
主要需求是做一个可以拖动并且放大缩小的窗体,类似于系统桌面的窗口,功能是可拖动然后宽高可通过鼠标拖拽调整,查阅了大量的博文后,打算基于Vue的自定义指令directive来实现,指令便于引用,而且使用的功能并不需要按照使用场景特殊化的修改,所以可以将这两个功能封装到指令中,然后基于这两个指令(v-drag、v-resize)再去封装一个通用窗体容器组件,项目框架基于Vue3+TS来实现,由于TS是刚上手,所以基本any一把梭,希望各位大佬莫要嘲笑,不熟悉TS的同学也可以看着代码实现一套JS版本的,主要功能都是JS基本功,和框架、语言的关系不大,只要能理解实现方法,简单的三剑客也能实现这个功能。接下来着手实现这个组件吧。
二、功能分析

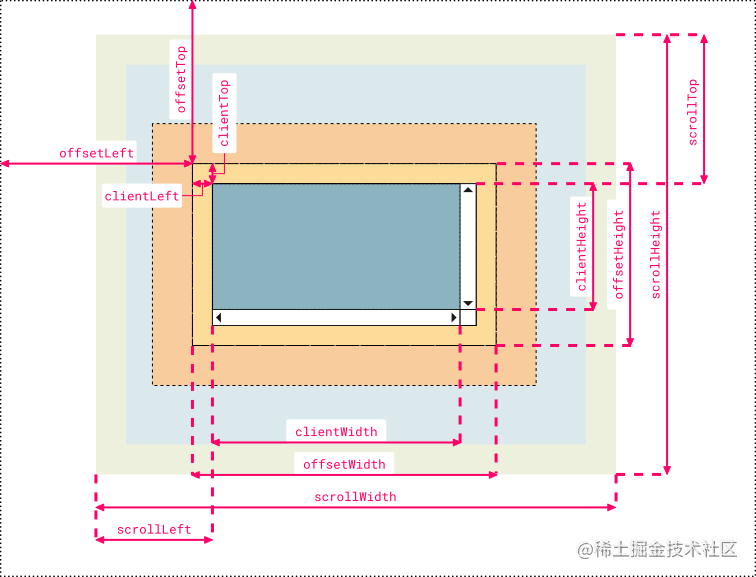
图2 dom对象属性

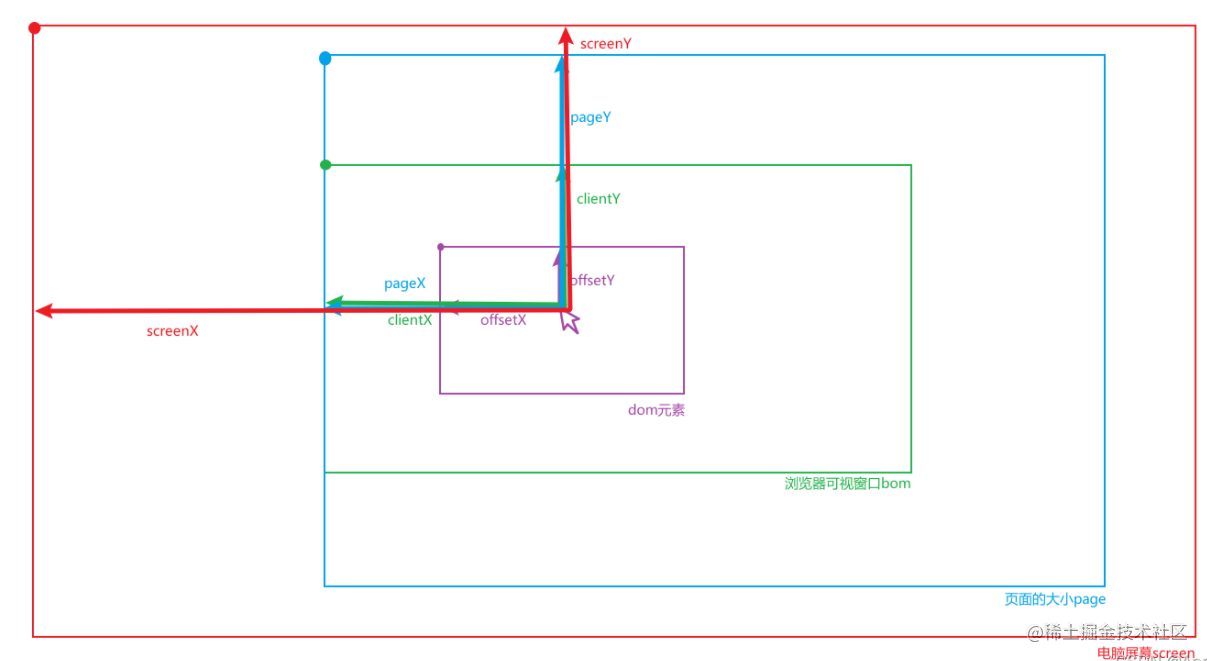
Event对象属性
因为是拖动和改变元素尺寸大小的功能,所以需要知道JS元素中的几个属性,如上图所示,我们需要知道的如下所示:
- Dom对象属性
- offsetTop: 返回当前元素上边界到其上级元素(offsetParent)的上边界的距离【只读】
- offsetLeft: 返回当前元素左边界到其上级元素(offsetParent)的左边界的距离【只读】
- offsetWidth: 返回元素的宽度,包含padding+border-width【只读】
- offsetHeight: 返回元素的高度,包含padding+border-width 【只读】
- clientWidth: 返回元素的宽度
- clientHeight: 返回元素的高度
- Event对象属性
- offsetX: 相对于元素的横坐标
- offsetY: 相对于元素的纵坐标
- clientX: 相对于浏览器窗口的横坐标
- clientY: 相对于浏览器窗口的纵坐标
- pageX: 相对于页面的横坐标
- pageY: 相对于页面的纵坐标
熟悉这几个属性后就可以着手来实现拖动和尺寸调整了,主要实现思路如下:
- v-drag 将该指令挂载到第一个子元素,然后通过监听子元素的事件来实现,通过子元素先获取到父元素方便后续对其进行操作,当鼠标按下事件触发的时候开始对鼠标移动事件监听,按下的时候需要记录鼠标所在位置的x,y轴的坐标值(相对于页面的位置x,y),然后记录拖动前父元素的top,left的数值,再获取窗口的宽高,减去父元素本身的宽高,计算得到父元素所能移动的最大位移距离,超过距离不能再移动。最后通过mousemove开始实时计算鼠标位移距离,并将变化的位移距离更新到父元素,实现元素的移动功能。
- v-resize 调整元素宽高的指令有一些复杂,需要给元素指定一个name属性为resize,绑定该指令不能覆盖预设的name值,然后通过name属性确定是该元素。这里先定义一些需要记录的属性数据,首先是cursor的属性值,cursor是css中的指定鼠标样式的属性,这里一共8个方位,所以分别列出这些属性,并和top、bottom、left、right做一个关系映射,这样方便理解,也容易操作。然后是记录元素修改前的大小、位置、鼠标按下的位置、改变方向,定义完这些变量后,对一些特殊的方法进行聚合,首先是获取鼠标的方位,通过计算鼠标在元素内移动的位置,设置一个内边距触发计算方法,这里设置offset偏移量为12px,当鼠标在元素水平或垂直距离边框为12px的时候,就可以通过getDirection获取到鼠标所在的方位。再定义一个computedDistance 方法,用于计算鼠标前后移动的x,y的距离,最后就是计算改变尺寸方法的封装,changeSize方法中获取到鼠标位移的距离,然后结合移动的方向记录值,进行方法调用修改尺寸,方法中只将一半做了最小宽高设置,这里可以通过css来设置不用在js中编写,后续组件封装会看到。同样触发的方式是onmousedown的时候开启事件,这里会获取是否在8个方位范围上,如果在就记录按下按钮时的数据和方位,并且触发移动计算方法,鼠标按钮抬起释放的时候会对数据和方法重置,结束尺寸调整。 鼠标样式控制可以分开来看,主要对于宽高调整没有影响,监听8个方位,然后修改鼠标样式,使交互操作更加友好。
三、指令封装
v-drag与v-resize指令:
//directives.ts
import { App } from "vue";
import { throttle } from "@/utils"; //节流函数不再展示,不要直接去除即可,在下面样式引用去除即可

const directives = {
  drag: {
    mounted(el: any, binding: any, vnode: any) {
      // 如果传递了false就不启用指令,反之true undefined null 不传 则启动
      if (!binding.value && (binding.value ?? "") !== "") return;
      // 拖拽实现
      const odiv = el.parentNode;
      el.onmousedown = (eve: any) => {
        odiv.style.zIndex = 1; //当前拖拽的在最前面显示
        eve = eve || window.event;
        const mx = eve.pageX; //鼠标点击时的坐标
        const my = eve.pageY; //鼠标点击时的坐标
        const dleft = odiv.offsetLeft; //窗口初始位置
        const dtop = odiv.offsetTop;
        const clientWidth = document.documentElement.clientWidth; //页面的宽
        const oWidth = odiv.clientWidth; //窗口的宽
        const maxX = clientWidth - oWidth; // x轴能移动的最大距离
        const clientHeight = document.documentElement.clientHeight; //页面的高
        const oHeight = odiv.clientHeight; //窗口的高度
        const maxY = clientHeight - oHeight; //y轴能移动的最大距离
        document.onmousemove = (e: any) => {
          const x = e.pageX;
          const y = e.pageY;
          let left = x - mx + dleft; //移动后的新位置
          let top = y - my + dtop; //移动后的新位置
          if (left < 0) left = 0;
          if (left > maxX) left = maxX;
          if (top < 0) top = 0;
          if (top > maxY) top = maxY;

          odiv.style.left = left + "px";
          odiv.style.top = top + "px";
          odiv.style.marginLeft = 0;
          odiv.style.marginTop = 0;
        };
        document.onmouseup = () => {
          document.onmousemove = null;
        };
      };
    }
  },
  resize: {
    mounted(el: any, binding: any, vnode: any) {
      // 如果传递了false就不启用指令,反之true undefined null 不传 则启动
      if (!binding.value && (binding.value ?? "") !== "") return;
      // 给选定的元素绑定name属性 设置name为resize区分只有该元素可以缩放
      el.name = "resize";
      // 八个方位对应
      const mouseDir = {
        top: "n-resize", //上
        bottom: "s-resize", //下
        left: "w-resize", //左
        right: "e-resize", //右
        topright: "ne-resize", //右上
        topleft: "nw-resize", //左上
        bottomleft: "sw-resize", //左下
        bottomright: "se-resize" //右下
      };
      // 记录被修改元素的原始位置大小,以及变更方向
      const pos = { width: 0, height: 0, top: 0, left: 0, x: 0, y: 0, dir: "" };
      // 获取鼠标所在方位
      const getDirection = (ev: any): string => {
        let dir = "";
        const xP = ev.offsetX;
        const yP = ev.offsetY;
        const offset = 12; //内边距为多少时触发
        // 计算是那个方位
        if (yP < offset) dir += "top";
        else if (yP > ev.toElement.clientHeight - offset) dir += "bottom";
        if (xP < offset) dir += "left";
        else if (xP > ev.toElement.clientWidth - offset) dir += "right";
        return dir;
      };
      // 计算移动距离
      const computedDistance = (pre: any, cur: any): any => {
        return [cur.x - pre.x, cur.y - pre.y];
      };
      //数据重置
      const resetData = () => {
        pos.width = 0;
        pos.height = 0;
        pos.top = 0;
        pos.left = 0;
        pos.x = 0;
        pos.y = 0;
        pos.dir = "";
        document.onmousemove = null;
      };
      // 变更尺寸方法
      const changeSize = (e: any) => {
        // 两个点之间的差值,计算鼠标位移数值
        const [disX, disY] = computedDistance(
          { x: pos.x, y: pos.y },
          { x: e.pageX, y: e.pageY }
        );
        const addWid = pos.width + disX;
        const subWid = pos.width - disX;
        const addHig = pos.height + disY;
        const subHig = pos.height - disY;
        const minX = 200;
        const minY = 200;
        //上下左右的变更方法
        const top = () => {
          if (subHig <= minY) return; //不能小于最小最高
          el.style.height = subHig + "px";
          el.style.top = pos.top + disY + "px";
        }; // 上
        const bottom = () => {
          el.style.height = addHig + "px";
        }; // 下
        const left = () => {
          if (subWid <= minX) return; //不能小于最小宽度
          el.style.width = subWid + "px";
          el.style.left = pos.left + disX + "px";
        }; // 左
        const right = () => {
          el.style.width = addWid + "px";
        }; // 右
        // 变更方位及其修改方法映射
        const doFn = {
          top, //上
          bottom, //下
          left, //左
          right, //右
          topright: () => {
            top();
            right();
          }, //右上
          topleft: () => {
            top();
            left();
          }, //左上
          bottomleft: () => {
            bottom();
            left();
          }, //左下
          bottomright: () => {
            bottom();
            right();
          } //右下
        };
        doFn[pos.dir]();
      };
      //鼠标按下 触发变更事件
      el.onmousedown = (e: any) => {
        if (e.target.name !== "resize") return;
        let d = getDirection(e);
        //当位置为四个边和四个角才开启尺寸修改
        if (mouseDir[d]) {
          pos.width = el.clientWidth;
          pos.height = el.clientHeight;
          pos.top = el.offsetTop;
          pos.left = el.offsetLeft;
          pos.x = e.pageX;
          pos.y = e.pageY;
          pos.dir = d;
          document.onmousemove = changeSize;
        }
        document.onmouseup = resetData;
      };

      /** 鼠标样式变更 */
      const changeShowCursor = throttle((e: any) => {
        e.preventDefault();
        el.style.cursor = "default"; //先恢复鼠标默认
        if (e.target.name !== "resize") return;
        // 修改鼠标显示效果
        let d = getDirection(e);
        // 确定是某个方位的动向
        el.style.cursor = mouseDir[d] || "default";
      }, 200); //节流0.2s
      el.onmousemove = changeShowCursor; //监听根元素上移动的鼠标事件
    }
  }
};

export default (app: App) => {
  //批量注册指令
  Object.entries(directives).forEach(([key, fn]) => {
    app.directive(key, fn);
  });
};
上面的两个指令,主要都是获取元素本身,使用原生的js方法对元素进行操作,需要注意的是v-drag是绑定在根元素的第一个子元素上(调整父元素的位置),而v-resize则是绑定元素本身(调整元素本身的大小)。完成两个指令的编写后,可以在局部引用注册或是全局注册,这里我使用全局注册的方法。
//main.ts 全局注册
import { createApp } from "vue";
import App from "./App.vue";
import registerDirectives from "@/directives";
const app = createApp(App);
registerDirectives(app);
app.mount("#app");
全局注册指令完成后,就可以在组件内使用这两个指令了,接下来我们编写一个比较通用的弹窗组件,可以打开关闭,并且能够拖动和尺寸调整。
四、通用组件封装
这里封装组件的过程和Vue2差别不大,只是组件的编写采用Vue3的组合式API写法,其他方面基本都差不多,对于vue的css过渡效果2和3的版本有些许差异,这里请自行查阅Vue3文档,剩下就是定义一些需要修改的属性,使用props接收,并且设置默认值,尽量让组件可以更方便的自定义修改和扩展。
下面是使用两个指令后,封装的一个弹窗组件,这里面在设置窗体css样式drag-dialog的时候使用了min-width: 200px;min-height: 200px;max-width: 100vw;max-height: 100vh;在这里通过对宽高的限制,就可以不用通过js来限制窗体的大小调整了,之前在写v-resize指令的时候有提到过,使用js来控制显示窗体的最小和最大显示范围,这里个人觉得还是通过css编写方便一些。
<template>
  <transition name="drag-win">
    <div
      class="drag-dialog ban-select-font"
      ref="dragWin"
      v-show="props.modelValue"
      v-resize="props.resizeAble"
    >
      <!-- 拖拽窗体头部 -->
      <div class="drag-bar" :style="props.headStyle" v-drag="props.dragAble">
        <slot name="head" />
        <div
          class="drag-btn drag-close"
          @click="controlDialog"
          v-if="props.closeShow"
        />
        <i
          class="drag-btn drag-full"
          @click="fullScreen"
          v-if="props.fullShow"
        />
      </div>
      <!-- 拖拽框主要部分 -->
      <div class="drag-main" :style="props.mainStyle">
        <slot />
      </div>
    </div>
  </transition>
</template>

<script lang="ts" setup>
import { ref } from "vue";

// props传入数据类型约束
interface Props {
  modelValue: boolean; //控制窗体的显示与否
  width?: string; // 默认宽 —— 设置头高 宽高最好传入变量
  height?: string; // 默认高
  headHeight?: string; // 默认控制栏高
  headStyle?: string; // 控制栏样式
  mainStyle?: string; //主要内容区域样式
  resizeAble?: boolean | string; // 是否可以调整尺寸 默认可以调整
  dragAble?: boolean | string; // 是否可以拖拽 默认可拖拽
  closeShow?: boolean; // 关闭控制显示 默认不显示
  fullShow?: boolean; // 全屏控制显示 默认不显示
}
/** 组件调整参数默认值 */
const props = withDefaults(defineProps<Props>(), {
  modelValue: true,
  width: "500px",
  height: "60vh",
  headHeight: "35px",
  headStyle: "",
  mainStyle: "",
  resizeAble: "",
  dragAble: "",
  closeShow: false,
  fullShow: false
});

// 窗体记录数据类型约束
interface recordType {
  width: number;
  height: number;
  top: number;
  left: number;
  fill: boolean;
}
//记录原来的大小
const recordBox: recordType = {
  width: 0,
  height: 0,
  top: 0,
  left: 0,
  fill: false
};

//获取窗口实体
const dragWin: any = ref(null);
// 事件定义
const emits = defineEmits(["update:modelValue"]);

/** 方法定义 */
// 内部控制窗口开关
const controlDialog = () => {
  emits("update:modelValue", !props.modelValue);
};

// 全屏控件
const fullScreen = () => {
  const tmp = dragWin.value;
  const style = dragWin.value.style;
  // 宽的样式 如果被手动缩小或者放大,则表示非全屏状态,则将状态置为false
  if (!style.width || style.width !== "100vw") {
    recordBox.fill = false;
  }
  // 全屏或是还原
  if (recordBox.fill) {
    style.width = `${recordBox.width}px`;
    style.height = `${recordBox.height}px`;
    style.top = `${recordBox.top}px`;
    style.left = `${recordBox.left}px`;
  } else {
    // 记录一下原来的样式
    recordBox.width = tmp.offsetWidth;
    recordBox.height = tmp.offsetHeight;
    recordBox.top = tmp.offsetTop;
    recordBox.left = tmp.offsetLeft;
    //全屏样式
    style.width = "100vw";
    style.height = "100vh";
    style.top = "0px";
    style.left = "0px";
  }
  recordBox.fill = !recordBox.fill; // 全屏状态变换
};
</script>

<style scoped>
 /* 禁止选中文字 */
.ban-select-font {
  -moz-user-select: none; /*火狐*/
  -webkit-user-select: none; /*webkit浏览器*/
  -ms-user-select: none; /*IE10*/
  -khtml-user-select: none; /*早期浏览器*/
  user-select: none;
}

.drag-dialog {
  position: fixed;
  width: v-bind("props.width");
  height: v-bind("props.height");
  left: calc(50% - v-bind("props.width") / 2);
  top: calc(50% - v-bind("props.height") / 2);
  box-sizing: border-box;
  padding: 8px;
  overflow: hidden;
  color: #fff;
  min-width: 200px;
  min-height: 200px;
  max-width: 100vw;
  max-height: 100vh;
  background-color: #313438cc;
}

.drag-bar {
  width: 100%;
  cursor: move;
  height: v-bind("props.headHeight");
  border-bottom: 1px solid #fff;
  box-sizing: border-box;
  padding: 1px 2px 9px;
}

.drag-btn {
  width: 25px;
  height: 25px;
  float: right;
  cursor: pointer;
  margin-left: 5px;
  border-radius: 50%;
}

.drag-full {
  background-color: #28c940b8;
}

.drag-full:hover {
  background-color: #28c93f;
}

.drag-close {
  background-color: #f2473ec7;
}

.drag-close:hover {
  background-color: #f2473e;
}

.drag-main {
  width: 100%;
  height: calc(100% - v-bind("props.headHeight"));
  box-sizing: border-box;
  overflow: auto;
  font-size: 13px;
  line-height: 1.6;
}

/* vue渐入渐出样式 */
.drag-win-enter-from,
.drag-win-leave-to {
  opacity: 0;
  transform: scale(0);
}
.drag-win-enter-to,
.drag-win-leave-from {
  opacity: 1;
}
.drag-win-enter-active,
.drag-win-leave-active {
  transition: all 0.5s ease;
}
</style>
这个组件编写还是有一些问题的,比如打开关闭的时候如果设置过top、left属性,就会变回初始化时候定义的位置,这里可以参考放大缩小记录一下窗口的位置等属性,做一个关闭打开窗体的记录,我这里没有写相关的代码,主要是对我这个项目影响不大,所以有需要的同学可以自己尝试一下怎么编写(ps:主要还是懒)。
编写完组件后就可以引用注册,可以全局或局部注册,这里我使用局部引用注册,然后编写了两个小例子,来使用封装好的组件,可以查看组件封装的props,通过里面的属性来进行组件定制化配置,增减所需功能,然后这里有两个style,一个是头部的样式headStyle,一个是主体样式mainStyle,最外层样式直接在引用时编写style调整即可,然后窗体宽高最好通过传入字符串变量的方式,因为这里还涉及窗体所在容器内的具体位置计算,默认是水平垂直都居中。下面是引用代码:
<template>
  <div>示例演示:</div>
  <button @click="control">{{ btnName }}</button>
  <button @click="box = !box">box控制</button>
  <IsDragDialog v-model="show" closeShow fullShow>
    <template #head>我是头</template>
    <div>我是内容区域</div>
  </IsDragDialog>
  <!-- 关闭某些选项 -->
  <IsDragDialog
    style="top: 200px; left: 10px"
    v-model="box"
    :resize-able="false"
    drag-able
    closeShow
    fullShow
    width="100px"
    height="100px"
  />
</template>

<script lang="ts" setup>
import IsDragDialog from "@/components/IsDragDialog.vue"; //因为使用的是 script setup 这里组件会直接注册
import { computed } from "@vue/reactivity";
import { ref } from "vue";

const show = ref(true);
const box = ref(true);
const control = () => {
  show.value = !show.value;
};

const btnName = computed(() => {
  return show.value ? `关闭窗口` : `打开窗口`;
});
</script>
五、总结及其源代码参考
功能实现主要还是对于dom元素自带的属性需要熟悉掌握,然后通过js的监听事件进行组合事件触发,修改位置,调整dom元素的大小等等,通过一系列的变量参数修改与记录,来实现拖动和dom元素拖拽调整的功能。博文中的代码可能还不够全面,所以我将这个代码抽离然后写了个demo,基于vue/cli搭了个VUe3+TS的小例子,可以在gitee上下载,下面是源码地址,npm i然后npm run sreve就可以查看组件demo了,其实这个组件还可以打包成npm包,但是精力有限,而且这个组件兼容性可能会有问题,所以等以后有机会再做个npm包吧。各位大佬,如果有什么更好的想法欢迎分享,也可以指出本文不足或错误之处,欢迎指正批评。
源代码地址:gitee.com/zero-dg/dra…
六、博文参考
加载全部内容