python人脸检测
biyezuopinvip 人气:0人脸识别
算法简介
我们的算法可以分成两个部分,识别人脸位置和确定人脸分类。这两个部分可以看成:
1.检测出人脸之间相似性。
2.检测出人脸之间不同性。
由于这两项工作截然相反,所以我们使用了两个网络来分别完成这两项工作。
人脸检测
简述
我们的人脸检测网络采用了和Faster RCNN类似的策略,但我们在ROI Polling上进行了创新,兼顾了小目标检测和大目标检测,为此,我们还使用了改进后的RESNET101_V2的网络,使我们的网络对于小目标更加敏感。在增加了少量的运算单元后,我们的网络可以识别24*24像素下的人脸(甚至于更低!)。我们调整了网络结构,并没有采用传统的卷积网络(提取特征)+全连接层(分类)的结构,而是采用了全卷积结构,这让我们的识别网络的速度远远高于传统的神经网络识别方法,识别精度也高于传统的算子和特征值人脸识别算法。
数据集介绍
采用的数据集为FDDB数据集,该数据集图像+注释有600M左右。
图像有各种大小和形状,主要集中在(300600)*(300600)的像素上。
注:我们的训练网络不在乎训练图像的大小形状(只要长宽大于192就好)。
其注释内容为图像中的人脸椭圆框:
[ra, rb, Θ, cx, cy, s]
ra,rb:半长轴、半短轴
cx, cy:椭圆中心点坐标
Θ:长轴与水平轴夹角(头往左偏Θ为正,头往右偏Θ为负)
s:置信度得分
通过坐标变换后我们可以得到矩形框:
w = 2*max([abs(ra*math.sin(theta)),abs(rb*math.cos(theta))])
h = 2*max([abs(ra*math.cos(theta)),abs(rb*math.sin(theta))])
rect = [cx-w/2,cy-h/2,w,h]
即:
rect = [x,y,w,h](x,y为左上角坐标)
我们以图为单位,从图中抽取128个anchors,这128个anchors包括该图中的全部正例和随机的负例。最后使用我们进行坐标变换的矩形框进行Bounding Box回归。
算法介绍
流程图
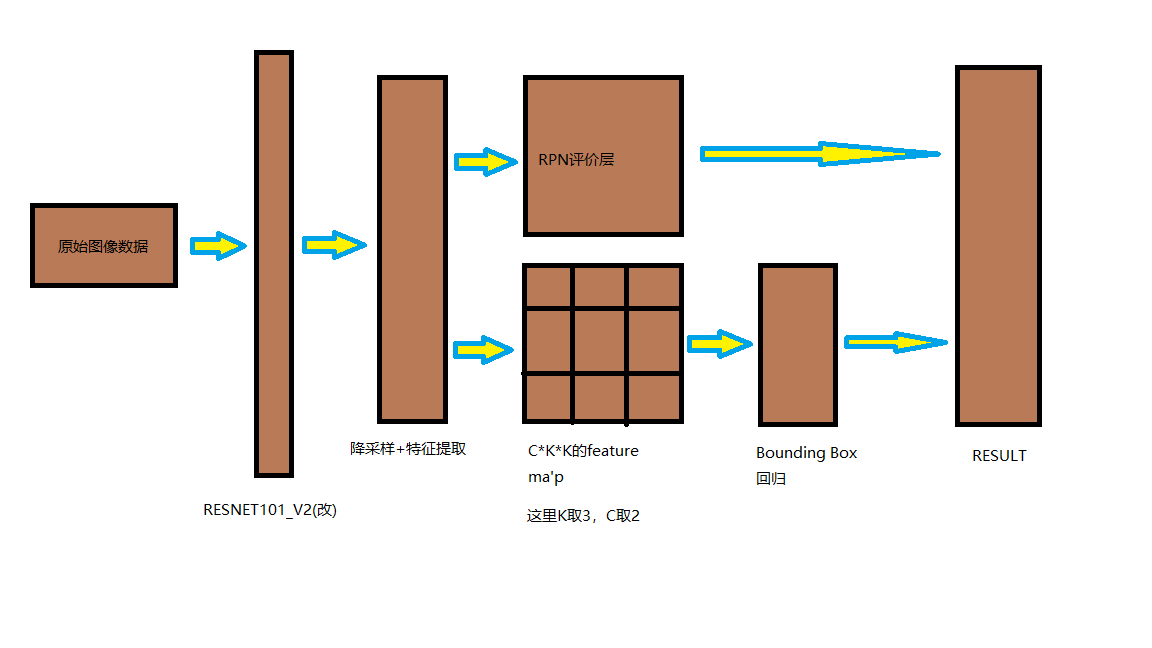
img = tf.constant(img,shape = (1,h,w,mod),dtype = tf.float32) # 图像原始数据
# 使用无pool1&pool5的RESNET 101
net, endpoints = my_resnet(img,global_pool = False,num_classes=None,is_training=True,reuse = tf.compat.v1.AUTO_REUSE) # net's w&h = original_img's w&h / 8
我们进行模型搭建和使用的平台为windows10-python3.6.2-tensorflow-gpu。
首先,我们的图像(img_batch = [batch_size,h,w,mod],batch_size为图像的数量,h为图像高度,w为图像宽度,mod为图像通道数,这里我们处理的均为RGB三色彩图,所以我们的通道数均为3)通过我们改进版的RESNET101_V2网络,传统的RESNET101_V2的网络结构如下:www.biyezuopin.vip
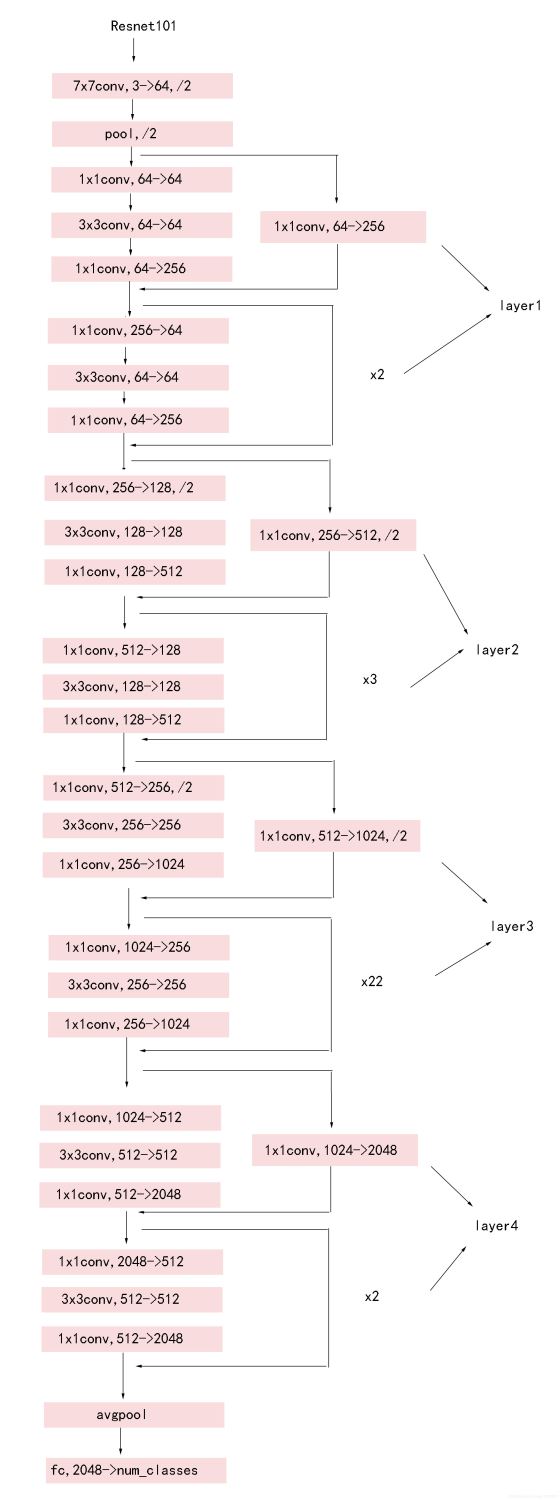
而我们的网络去掉了pool1和pool5层,使网络放缩系数从32下降到了8。这使我们的网络对于小目标更加的敏感。通过了该网络后,我们得到了卷积后的信息图:img_batch_conv = [batch_size,h/8,w/8,2048]
weights = {
            'down':tf.compat.v1.get_variable(name = 'w_down',shape = [1,1,2048,1024]),# 降采样
            'feature':tf.compat.v1.get_variable(name = 'w_feature',shape = [1,1,1024,K*K*2])
            }
biases = {
            'down':tf.compat.v1.get_variable(name = 'b_down',shape = [1024,]), # 降采样
            'feature':tf.compat.v1.get_variable(name = 'b_feature',shape = [K*K*2,])
        }
img_batch_conv首先通过一个shape = [1,1,2048,1024]的卷积算子,该算子的作用是进一步的特征提取和降采样。我们采用多步特征提取的策略是由于在RCNN[1]一文中,作者提出在VOC2012测试集下,三层的特征识别网络比一层特征识别网络的正确率要高。
通过该算子我们得到了一个[batch_size,h/8,w/8,1024]结构的数据,将该数据通过一个[1,1,1024,K*K*C]的算子得到特征图feature_map。feature_map的概念在Faster RCNN[2]的文章内提出,提取特征图的算子的K*K代表着每一块feature_map有K*K个bin,而C代表着识别物体的类别+1(背景),这里我们的K取3,C取2(只有两个分类:人脸和背景)。
    with tf.compat.v1.variable_scope('RPN', reuse=tf.compat.v1.AUTO_REUSE):
        weights = {
            'rpn_1':tf.compat.v1.get_variable(name = 'w_rpn_1_1',shape = [3,3,1024,1]), # 高:宽 1:1的卷积
            'rpn_2':tf.compat.v1.get_variable(name = 'w_rpn_1_2',shape = [3,6,1024,1]), # 高:宽 1:2的卷积
            'rpn_3':tf.compat.v1.get_variable(name = 'w_rpn_2_1',shape = [6,3,1024,1]), # 高:宽 2:1的卷积
            'rpn_4':tf.compat.v1.get_variable(name = 'w_rpn_2_2',shape = [6,6,1024,1]),
            'rpn_5':tf.compat.v1.get_variable(name = 'w_rpn_2_4',shape = [6,12,1024,1]),
            'rpn_6':tf.compat.v1.get_variable(name = 'w_rpn_4_2',shape = [12,6,1024,1]),
            'rpn_7':tf.compat.v1.get_variable(name = 'w_rpn_4_4',shape = [12,12,1024,1]),
            'rpn_8':tf.compat.v1.get_variable(name = 'w_rpn_4_8',shape = [12,24,1024,1]),
            'rpn_9':tf.compat.v1.get_variable(name = 'w_rpn_8_4',shape = [24,12,1024,1])
        }
        biases = {
            'rpn_1':tf.compat.v1.get_variable(name = 'b_rpn_1_1',shape = [1,]),
            'rpn_2':tf.compat.v1.get_variable(name = 'b_rpn_1_2',shape = [1,]),
            'rpn_3':tf.compat.v1.get_variable(name = 'b_rpn_2_1',shape = [1,]),
            'rpn_4':tf.compat.v1.get_variable(name = 'b_rpn_2_2',shape = [1,]),
            'rpn_5':tf.compat.v1.get_variable(name = 'b_rpn_2_4',shape = [1,]),
            'rpn_6':tf.compat.v1.get_variable(name = 'b_rpn_4_2',shape = [1,]),
            'rpn_7':tf.compat.v1.get_variable(name = 'b_rpn_4_4',shape = [1,]),
            'rpn_8':tf.compat.v1.get_variable(name = 'b_rpn_4_8',shape = [1,]),
            'rpn_9':tf.compat.v1.get_variable(name = 'b_rpn_8_4',shape = [1,])
        }
我们将得到的feature_map = [batch_size,h/8,w/8,K*K*C]使用三种不同形状,三种不同大小,一共九种不同形状或大小的卷积核对我们的网络进行卷积,得到了9种不同形状或大小的archors中是否存在人脸的概率。这里我们虽然沿用了Faster RCNN[2]中anchor的概念,但我们并没有使用ROI Pooling而是只使用了ROI。因为Tensorflow采用的是流图计算,增加ROI Pooling反而会让每个anchor独立计算,大大增加了我们的计算量,而且不同大小的anchor进行Pooling后均会生成K*K形状的数据,不方便我们的网络对于不同大小的anchor进行不同状态的识别。而且由于我们只用分成背景和人脸两个类别,所以即使不进行ROI Pooling,我们网络所需的运算单元也不会增加太多。所以我们采用了9种不同形状的卷积核对应九种anchor的策略。通过RPN评价层后,我们可以得到对于每个区域是否存在人脸的评价。
这里我们训练采用了YOLO[3]而不是Faster RCNN[2]的训练策略,即我们对于不同比例的正例和负例采用比例因子去平衡它。这是因为我们是一张一张图去训练的,训练的图中正例的数量远小于负例。
loss_rpn[i] = -(up*tf.math.log(pred_rpn[i])*rpn_view[i] + (1 - rpn_view[i])*tf.math.log(1 - pred_rpn[i]))
这里loss_rpn[i]为第i个anchor的loss,up为正例激励因子,pred_rpn[i]为网络预测的第i个anchor的结果,rp_view[i]为第i个anchor的真实结果。我们的损失函数使用的是交叉熵。
之后,我们将选出来的区域的feature_map,通过ROI Pooling。在Bounding Box回归之前通过ROI Pooling一方面是由于Bounding Box回归只针对正例(选出来的区域),区域的个数较少,即使创建独立运算的anchor数量也不多,训练压力不大;二是对于Bounding Box回归,anchor的大小和形状不具有太大的意义。Bounding Box回归的计算规则如下:www.biyezuopin.vip
dx = x - x'
dy = y - y'
kw = w / w'
kh = h / h'
# 计算损失
loss_bbox = (pre_bbox - select_bbox) * data_type
loss_bbox = tf.reduce_mean(loss_bbox*loss_bbox)
x,y为中心点坐标,w,h为宽高。
通过网络我们可以得到[dx,dy,dw,dh]
loss_bbox即Bounding Box回归的loss,损失函数我们采用的是平方函数。
我们首先通过RPN评价层得到评分最高的N个anchor,每个anchor都带有[ax,ay,aw,ah]的属性,ax,ay为网络放缩下的左上角坐标,aw,ah为网络放缩下的宽高。所以首先要对放缩后的图像区域进行恢复:
x' = ax * NET_SCALE
y' = ay * NET_SCALE
w' = aw * NET_SCALE
h' = ah * NET_SCALE
这里我们的网络放缩系数NET_SACLE为8。
然后进行Bounding Box回归:
x = x' + dx
y = y' + dy
w = w' * kw
h = h' * kh
得到[x,y,w,h],如果该区域与其他比它得分高的区域的IOU>0.5的情况下,该区域会被抑制(NMS非极大值抑制)。
测试网络
这里我们给出测试网络的初始化部分:
def loadModel(self,model_path = RPN_BATCH_PATH):
        """
        从model_path中加载模型
        """
        with tf.compat.v1.variable_scope('RPN', reuse=tf.compat.v1.AUTO_REUSE):
            weights = {
                'rpn_1':tf.compat.v1.get_variable(name = 'w_rpn_1_1',shape = [3,3,K*K*2,1]), # 高:宽 1:1的卷积
                'rpn_2':tf.compat.v1.get_variable(name = 'w_rpn_1_2',shape = [3,6,K*K*2,1]), # 高:宽 1:2的卷积
                'rpn_3':tf.compat.v1.get_variable(name = 'w_rpn_2_1',shape = [6,3,K*K*2,1]), # 高:宽 2:1的卷积
                'rpn_4':tf.compat.v1.get_variable(name = 'w_rpn_2_2',shape = [6,6,K*K*2,1]),
                'rpn_5':tf.compat.v1.get_variable(name = 'w_rpn_2_4',shape = [6,12,K*K*2,1]),
                'rpn_6':tf.compat.v1.get_variable(name = 'w_rpn_4_2',shape = [12,6,K*K*2,1]),
                'rpn_7':tf.compat.v1.get_variable(name = 'w_rpn_4_4',shape = [12,12,K*K*2,1]),
                'rpn_8':tf.compat.v1.get_variable(name = 'w_rpn_4_8',shape = [12,24,K*K*2,1]),
                'rpn_9':tf.compat.v1.get_variable(name = 'w_rpn_8_4',shape = [24,12,K*K*2,1])
            }
            biases = {
                'rpn_1':tf.compat.v1.get_variable(name = 'b_rpn_1_1',shape = [1,]),
                'rpn_2':tf.compat.v1.get_variable(name = 'b_rpn_1_2',shape = [1,]),
                'rpn_3':tf.compat.v1.get_variable(name = 'b_rpn_2_1',shape = [1,]),
                'rpn_4':tf.compat.v1.get_variable(name = 'b_rpn_2_2',shape = [1,]),
                'rpn_5':tf.compat.v1.get_variable(name = 'b_rpn_2_4',shape = [1,]),
                'rpn_6':tf.compat.v1.get_variable(name = 'b_rpn_4_2',shape = [1,]),
                'rpn_7':tf.compat.v1.get_variable(name = 'b_rpn_4_4',shape = [1,]),
                'rpn_8':tf.compat.v1.get_variable(name = 'b_rpn_4_8',shape = [1,]),
                'rpn_9':tf.compat.v1.get_variable(name = 'b_rpn_8_4',shape = [1,])
            }
        with tf.compat.v1.variable_scope('BBOX', reuse=tf.compat.v1.AUTO_REUSE):
            weights['bbox'] = tf.compat.v1.get_variable(name = 'w_bbox',shape = [K,K,K*K*2,4]) # 分类
            biases['bbox'] = tf.compat.v1.get_variable(name = 'b_bbox',shape = [4,]) # 分类
        weights['down'] = tf.compat.v1.get_variable(name = 'w_down',shape = [1,1,2048,1024])# 降采样
        weights['feature'] = tf.compat.v1.get_variable(name = 'w_feature',shape = [1,1,1024,K*K*2])
        biases['down'] = tf.compat.v1.get_variable(name = 'b_down',shape = [1024,]) # 降采样
        biases['feature'] = tf.compat.v1.get_variable(name = 'b_feature',shape = [K*K*2,])
        self.img = tf.compat.v1.placeholder(dtype = tf.float32,shape = (1,self.h,self.w,3))
        # 使用无pool1&pool5的RESNET 101
        net, endpoints = my_resnet(self.img,global_pool = False,num_classes=None,is_training=True,reuse = tf.compat.v1.AUTO_REUSE) # net's w&h = original_img's w&h / 16
        net = tf.nn.conv2d(input = net,filter = weights['down'],strides = [1, 1, 1, 1],padding = 'VALID')
        net = tf.add(net,biases['down'])
        # 生成feature_map
        self.feature_map = tf.nn.conv2d(input = net,filter = weights['feature'],strides = [1, 1, 1, 1],padding = 'VALID')
        self.feature_map = tf.add(self.feature_map,biases['feature'])
        self.pred_rpn = [None]*9
        for i in range(9):
            r = tf.nn.conv2d(input = self.feature_map,filter = weights['rpn_' + str(i+1)],strides = [1, 1, 1, 1],padding = 'VALID')
            r = tf.reshape(r,r.get_shape().as_list()[1:-1])
            self.pred_rpn[i] = tf.add(r,biases['rpn_' + str(i+1)])
            self.pred_rpn[i] = tf.sigmoid(self.pred_rpn[i])
        self.select = tf.compat.v1.placeholder(dtype = tf.float32,shape = (self.RPN_RESULT_NUM,K,K,K*K*2))
        self.pre_bbox = tf.nn.conv2d(self.select,weights['bbox'],[1,1,1,1],padding = 'VALID')
        self.pre_bbox = tf.add(self.pre_bbox,biases['bbox'])
        self.pre_bbox = tf.reshape(self.pre_bbox,shape = (self.RPN_RESULT_NUM,4))
        saver = tf.compat.v1.train.Saver(tf.compat.v1.get_collection(tf.compat.v1.GraphKeys.TRAINABLE_VARIABLES))
        self.sess =  tf.compat.v1.Session()
        init = tf.compat.v1.global_variables_initializer()
        self.sess.run(init)
        saver.restore(self.sess,RPN_BATCH_PATH)
结果预览
我们从测试集随机取出两张图片进行测试
我们在测试时,需要把图像resize到合适的大小,这里选择的是192*384,得益于我们改进后的RESNET101_V2,我们的最小宽度和长度是普通网络的1/8,可以适配于我们测试集,也能适配于大多数情况。
第一张图片:
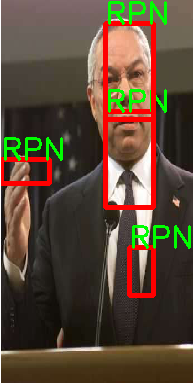
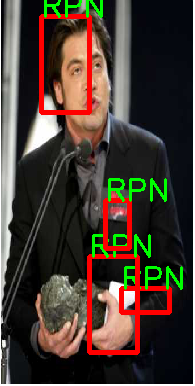
RPN结果:
经过Bounding Box回归后
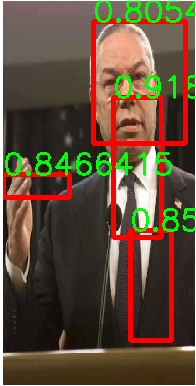
我们选取了一张图中的TOP5Answer,即得分最高的5个anchors,如RPN结果。
之后采取了Bounding Box回归,得到了最终结果,如第二张图所示。
我们可以看到RPN选取的anchors只包括了头像中的中间部分,经过Bounding Box回归之后,选取框完好的罩住了头像。
RPN结果:
经过Bounding Box回归后
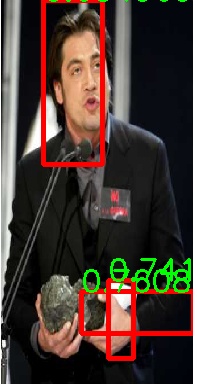
同样,RPN选取的anchors与真实框有偏移,而Bounding Box回归修补了偏移量。
我们上面测试时采用Top5Answer是由于我们的网络是在个人电脑上训练的,训练次数有限且训练时长也有限,所以训练出来的模型效果还不能达到能完全识别出人脸,所以Top5Answer的机制可以显著提高识别机率,当然也会带来额外的计算量。
运行速度:

这里我们的速度在2.6s一张图左右,这也是由于我们使用的个人电脑性能不足的原因,也是由于我们在结果测试时同时进行了绘图和分析结果所带来的额外计算量。
加载全部内容