@RequestParam注解使用
sswqzx 人气:0@RequestParam注解使用
1、作用
@RequestParam:将请求参数绑定到你控制器的方法参数上(是springmvc中接收普通参数的注解)
2、语法
语法:@RequestParam(value=”参数名”,required=”true/false”,defaultValue=””)
value:参数名required:是否包含该参数,默认为true,表示该请求路径中必须包含该参数,如果不包含就报错。defaultValue:默认参数值,如果设置了该值,required=true将失效,自动为false,如果没有传该参数,就使用默认值
3、测试环境
环境:jdk1.8 Tomcat8.5 idea2018 manven父工程子模块
步骤:
1、创建web工程、引入依赖
2、配置SpringMvc入口文件 --DispatcherServlet--为总调度、web.xml里配置
3、创建Springmvc.xml文件--理解为:适配器(这里不需要自已指定适配、springmvc会自动指定)--视图解析器
4、创建 业务处理器 Controller类
5、测试
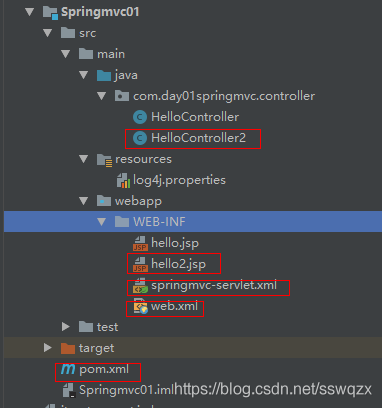
4、工程结构

步骤1、2、3、参考:SpringMvc入门案例
5、业务处理器HelloController.java
package com.day01springmvc.controller;
import org.springframework.stereotype.Controller;
import org.springframework.web.bind.annotation.*;
import org.springframework.web.servlet.ModelAndView;

/**
 * @ Author     :ShaoWei Sun.
 * @ Date       :Created in 20:58 2018/11/16
 */
@Controller
@RequestMapping("hello")
public class HelloController2 {

    /**
     * 接收普通请求参数
     * http://localhost:8080/hello/show16?name=linuxsir
     * url参数中的name必须要和@RequestParam("name")一致
     * @return
     */
    @RequestMapping("show16")
    public ModelAndView test16(@RequestParam("name")String name){
        ModelAndView mv = new ModelAndView();
        mv.setViewName("hello2");
        mv.addObject("msg", "接收普通的请求参数:" + name);
        return mv;
    }

    /**
     * 接收普通请求参数
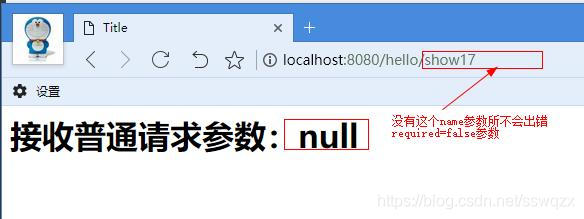
     * http://localhost:8080/hello/show17
     * url中没有name参数不会报错、有就显示出来
     * @return
     */
    @RequestMapping("show17")
    public ModelAndView test17(@RequestParam(value="name",required=false)String name){
        ModelAndView mv = new ModelAndView();
        mv.setViewName("hello2");
        mv.addObject("msg", "接收普通请求参数:" + name);
        return mv;
    }

    /**
     * 接收普通请求参数
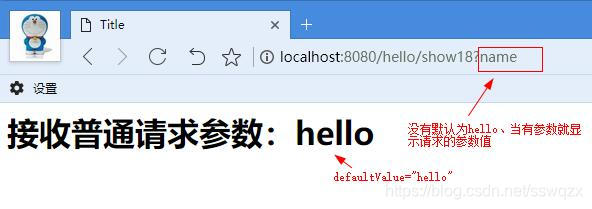
     * http://localhost:8080/hello/show18?name=998 显示为998
     * http://localhost:8080/hello/show18?name 显示为hello
     * @return
     */
    @RequestMapping("show18")
    public ModelAndView test18(@RequestParam(value="name",required=true,defaultValue="hello")String name){
        ModelAndView mv = new ModelAndView();
        mv.setViewName("hello2");
        mv.addObject("msg", "接收普通请求参数:" + name);
        return mv;
    }
}
6、测试


@RequestParam与@Param区别
@RequestParam 用于controller层,是Spring的注解
解决前台参数名称与后台接收参数变量名称不一致的问题,等价于request.getParam
value:参数名字,即入参的请求参数名字,如username表示请求的参数区中的name为username的参数的值将传入;required:是否必须,默认是true,表示请求中一定要有相应的参数,否则将报404错误码;defaultValue:默认值,表示如果请求中没有同名参数时的默认值,默认值可以是SpEL表达式,如“#{systemProperties['java.vm.version']}”。
    @ResponseBody
    @RequestMapping("login")
    public String login(@RequestParam(value = "username") final String username,
                        @RequestParam(value = "password",required = false) final String password,
                        @RequestParam(value = "valcode",required = false) final String valcode) {
                        }
**@Param** 用于dao层,是mybatis中的注解
使得mapper.xml中的参数与后台的参数对应上,也增强了可读性
如果两者参数名一致得话,spring会自动进行封装,不一致的时候就需要手动去使其对应上。
即:用注解来简化xml配置的时候,@Param注解的作用是给参数命名,参数命名后就能根据名字得到参数值,正确的将参数传入sql语句中 。
public interface Mapper {
@Select("select s_id id,s_name name,class_id classid"+
        "from student where  s_name= #{aaaa} and class_id = #{bbbb}")
 public Student select(@Param("aaaa") String name,@Param("bbbb")int class_id);

@Delete......
@Insert......
}
在dao层,用来给参数命名,在Mybatis的mapper中加上该注解,传递的参数与Sql中的字段名一致
 List<Employee> getAllEmployeeByPage(@Param("page") Integer page,
                                      @Param("size") Integer size);
以上为个人经验,希望能给大家一个参考,也希望大家多多支持。
加载全部内容