SpringBoot项目启动信息打印
一线大码 人气:91. 修改 Banner
默认情况下,在启动SpringBoot项目的时候能在日志中看到如下所示的Banner,这个Banner是支持自定义的。
  .   ____          _            __ _ _
 /\\ / ___'_ __ _ _(_)_ __  __ _ \ \ \ \
( ( )\___ | '_ | '_| | '_ \/ _` | \ \ \ \
 \\/  ___)| |_)| | | | | || (_| |  ) ) ) )
  '  |____| .__|_| |_|_| |_\__, | / / / /
 =========|_|==============|___/=/_/_/_/
 :: Spring Boot ::        (v2.3.5.RELEASE)
1.1. 字符 Banner
可以将想要使用的字符保存到一个banner.txt文件中,然后将该文件放到SpringBoot项目中的resources目录中,启动项目,就能看到自定义的字符Banner了。文件名也可以自定义,见下面的Banner配置。
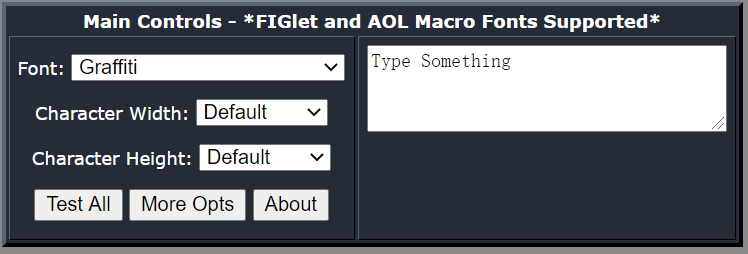
字符Banner可以在ASCII艺术字(图)集搜索下载喜欢的直接使用,也可以通过一个网站对文本来生成艺术字:Text to ASCII Art Generator。下面简单说下该工具网站(第二个)的使用方法。进入后会看到如下界面:

右边是文本框,文本框中可以输入你的目标字符串。左边是设置项,下面主要说下设置项:
Font:字型。Featured(精选) FIGlet Fonts;ANSI(标准) FIGlet Fonts,Regular(常规) FIGlet Fonts,AOL Macro(宏) Fonts。Character Width:字符宽度。Full充满的、Fitted合适的、Smush(R)、Smush(U)、Default默认的。这里直接用默认的就行。Character Height:字符高度。和字符宽度一样。Test All:全部测试。点这个按钮会按照Font列表中的字型顺序将转换结果全部显示出来。会比较慢。中途可以点击Cancel按钮取消操作。More Opts:更多选项。里面可以进行输出格式指定和空白字符替换。一般不使用。About:关于。里面是关于操作界面的介绍和列表选项的区别。
下面是我得到的parking manage字符串的一种艺术体:
                   _    _
                  | |  (_)
  _ __   __ _ _ __| | ___ _ __   __ _   _ __ ___   __ _ _ __   __ _  __ _  ___
 | '_ \ / _` | '__| |/ / | '_ \ / _` | | '_ ` _ \ / _` | '_ \ / _` |/ _` |/ _ \
 | |_) | (_| | |  |   <| | | | | (_| | | | | | | | (_| | | | | (_| | (_| |  __/
 | .__/ \__,_|_|  |_|\_\_|_| |_|\__, | |_| |_| |_|\__,_|_| |_|\__,_|\__, |\___|
 | |                             __/ |                               __/ |
 |_|                            |___/                               |___/
1.2. 图片 Banner
SpringBoot不仅可以使用字符Banner,还可以使用图片Banner,可以将想要使用的图片命名为banner.png(jpg格式测试未生效,版本:Spring Boot v2.3.5.RELEASE),然后将该图片文件放到SpringBoot项目中的resources目录中,启动项目,就能看到自定义的图片Banner了。(如果同时包括banner.pngh和banner.txt,则都会被打印出来。)图片名也可以自定义,见下面的Banner配置。
比如下面是我使用的图片和打印出的效果:

                                        @@@                    @@@
                                       @.@@@@                @@@*@
                                       @..@@@@8     ...    @@@@@.@:
                                       @....@@& ....@@o.....&@...#@
                          :            @.............@...........8@
                8@@@o:o@@@@@@@@        @......@...@..............@#
              @@         @@@@@@@@      @@.........@...... @ .....@
             @                          @......**.@*****:***...&@@
            @                      o@@@&@@o......@......@.......@&
            @                  @@@@::::::@ .....&.**..***:..... @
            @              @@@::@@@o:::@@@@@@@....@@..#@... @@@@@@
            @@          @@::@@:::::@:::@@@@@@@.....#@##.....@@@@@@
             @.      @@@@:::::::::::::::::::@@..............#@
              @#   @@::::o::::::::::::::::::::@*...........@
               &@@8:::::::::@:::::::::::::::::::@&......*@.
               @@@&::::::::&@:::::::::::::::::::::@@&.@@
             @@::::@::o&&oo@&::::::::::::::::::::::::::@:
           *@:::@@&  @@@@@@@8    :@@@@@o::::::::::::::@8:@:
          @&::@&       @@@@@@            .@@@8:::::::::::@@@
         @::#@           #@@@@                 &@@#::::::::::@
       @@:::@               @@@@@@@                 @@@:::::::&@
      @o:::@.                                           *@@o::::@@@@@
     @@@@@@@:                                               .@@o::::::@
                                                                :oooooo*
1.3. Banner 配置
SpringBoot提供了一下配置项,可对Banner进行相应的配置,版本Spring Boot v2.3.5.RELEASE):
# 应用程序运行时用于显示Banner的模式:console,将标志输出到控制台,默认值;log,将标志输出到日志;off:关闭标志输出。
spring.main.banner-mode=console
# Banner文件编码
spring.banner.charset=UTF-8
# Banner文本资源位置
spring.banner.location=classpath:banner.txt
# Banner图像文件位置(也可以使用jpg或png),默认值为classpath:banner.gif
spring.banner.image.location=classpath:banner.gif
# 用于ANSI颜色的位深度。支持4(16色)或8(256色),默认4
spring.banner.image.bitdepth=4
# Banner图像的高度(以字符为单位),默认是图片的高度
spring.banner.image.height=
# Banner图像的宽度,单位为字符。默认是76
spring.banner.image.width=76
# 是否将图像反转为黑色主题,即白色转换为黑色,黑色转换为白色。默认false
spring.banner.image.invert=false
# 左边图像边距(以字符表示),默认为2
spring.banner.image.margin=50
# 渲染图像时使用的像素模式,默认text
spring.banner.image.pixelmode=text
2. 添加访问地址
可以在启动类里面添加上一些项目访问信息,这样方便接下来的测试,直接复制粘贴到浏览器或者Postman即可。
package com.example.demo;
import lombok.extern.slf4j.Slf4j;
import org.mybatis.spring.annotation.MapperScan;
import org.springframework.boot.SpringApplication;
import org.springframework.boot.autoconfigure.SpringBootApplication;
import org.springframework.context.ConfigurableApplicationContext;
import org.springframework.core.env.Environment;
import java.net.InetAddress;
import java.net.UnknownHostException;
@Slf4j
@SpringBootApplication
@MapperScan(basePackages = "com.example.demo.dao")
public class DemoApplication {
    public static void main(String[] args) throws UnknownHostException {
        ConfigurableApplicationContext application = SpringApplication.run(DemoApplication.class, args);
        Environment env = application.getEnvironment();
        String ip = InetAddress.getLocalHost().getHostAddress();
        String port = env.getProperty("server.port");
        port = port == null ? "8080" : port;
        String path = env.getProperty("server.servlet.context-path");
        path = path == null ? "" : path;
        log.info("\n----------------------------------------------------------\n\t" +
                "Application Demo is running! Access URLs:\n\t" +
                "本地访问地址: \thttp://localhost:" + port + path + "/\n\t" +
                "外部访问地址: \thttp://" + ip + ":" + port + path + "/\n\t" +
                "Swagger文档: \thttp://" + ip + ":" + port + path + "/swagger-ui.html\n" +
                "----------------------------------------------------------");
    }
}
显示效果
----------------------------------------------------------
Application Demo is running! Access URLs:
本地访问地址: http://localhost:8080/
外部访问地址: http://192.168.31.7:8080/
Swagger文档: http://192.168.31.7:8080/swagger-ui.html
----------------------------------------------------------
自定义springboot启动图案输出
直接上内容
1、在项目中,目录src\main\resources文件夹下新建banner.txt,名字不要变哦。
2、登录网站 http://patorjk.com/software/taag/ 输入字符串,生成自己想要的图案。

以上为个人经验,希望能给大家一个参考,也希望大家多多支持。
加载全部内容