springBoot @Scheduled执行原理
james__Gao 人气:6springBoot @Scheduled执行原理
一、前言
本文主要介绍Spring Boot中使用定时任务的执行原理。
二、@Scheduled使用方式
定时任务注解为@Scheduled。使用方式举例如下:
//定义一个按时间执行的定时任务,在每天16:00执行一次。
@Scheduled(cron = "0 0 16 * * ?")
public void depositJob() {
  //执行代码
}
//定义一个按一定频率执行的定时任务,每隔1分钟执行一次
    @Scheduled(fixedRate = 1000 * 60)
    public void job2() {
    //执行代码
}
//定义一个按一定频率执行的定时任务,每隔1分钟执行一次,延迟1秒执行
    @Scheduled(fixedRate = 1000 * 60,initialDelay = 1000)
    public void updatePayRecords() {
    //执行代码
}
备注:具体参数可以参考“spring-context-4.2.4.RELEASE.jar”下面的
“org.springframework.scheduling.annotation.Scheduled"类。
三、@Scheduled代码执行原理说明
简要介绍:spring在初始化bean后,通过“postProcessAfterInitialization”拦截到所有的用到“@Scheduled”注解的方法,并解析相应的的注解参数,放入“定时任务列表”等待后续处理;之后再“定时任务列表”中统一执行相应的定时任务(任务为顺序执行,先执行cron,之后再执行fixedRate)。
重要代码如下:
第一步:依次加载所有的实现Scheduled注解的类方法。
//说明:ScheduledAnnotationBeanPostProcessor继承BeanPostProcessor。
@Override
public Object postProcessAfterInitialization(final Object bean, String beanName) {
          //省略多个判断条件代码
         for (Map.Entry<Method, Set<Scheduled>> entry : annotatedMethods.entrySet()) {
            Method method = entry.getKey();
            for (Scheduled scheduled : entry.getValue()) {
               processScheduled(scheduled, method, bean);
            }
         }
   }
   return bean;
}
第二步:将对应类型的定时器放入相应的“定时任务列表”中。
//说明:ScheduledAnnotationBeanPostProcessor继承BeanPostProcessor。
//获取scheduled类参数,之后根据参数类型、相应的延时时间、对应的时区放入不同的任务列表中
protected void processScheduled(Scheduled scheduled, Method method, Object bean) {
     //获取corn类型
      String cron = scheduled.cron();
      if (StringUtils.hasText(cron)) {
         Assert.isTrue(initialDelay == -1, "'initialDelay' not supported for cron triggers");
         processedSchedule = true;
         String zone = scheduled.zone();
         //放入cron任务列表中(不执行)
         this.registrar.addCronTask(new CronTask(runnable, new CronTrigger(cron, timeZone)));
      }
      //执行频率类型(long类型)
      long fixedRate = scheduled.fixedRate();
      String fixedDelayString = scheduled.fixedDelayString();
      if (fixedRate >= 0) {
         Assert.isTrue(!processedSchedule, errorMessage);
         processedSchedule = true;
          //放入FixedRate任务列表中(不执行)(registrar为ScheduledTaskRegistrar)
         this.registrar.addFixedRateTask(new IntervalTask(runnable, fixedRate, initialDelay));
      }
     //执行频率类型(字符串类型,不接收参数计算如:600*20)
      String fixedRateString = scheduled.fixedRateString();
      if (StringUtils.hasText(fixedRateString)) {
         Assert.isTrue(!processedSchedule, errorMessage);
         processedSchedule = true;
         if (this.embeddedValueResolver != null) {
            fixedRateString = this.embeddedValueResolver.resolveStringValue(fixedRateString);
         }
         fixedRate = Long.parseLong(fixedRateString);
         //放入FixedRate任务列表中(不执行)
         this.registrar.addFixedRateTask(new IntervalTask(runnable, fixedRate, initialDelay));
      }
}
   return bean;
}
第三步:执行相应的定时任务。
说明:定时任务先执行corn,判断定时任务的执行时间,计算出相应的下次执行时间,放入线程中,到相应的时间后进行执行。之后执行按“频率”(fixedRate)执行的定时任务,直到所有任务执行结束。
protected void scheduleTasks() {
   //顺序执行相应的Cron
   if (this.cronTasks != null) {
      for (CronTask task : this.cronTasks) {
         this.scheduledFutures.add(this.taskScheduler.schedule(
               task.getRunnable(), task.getTrigger()));
      }
   }
  //顺序执行所有的“fixedRate”定时任务(无延迟,也就是说initialDelay参数为空),因为无延迟,所以定时任务会直接执行一次,执行任务完成后,会将下次执行任务的时间放入delayedExecute中等待下次执行。
   if (this.fixedRateTasks != null) {
      for (IntervalTask task : this.fixedRateTasks) {
         if (task.getInitialDelay() > 0) {
            Date startTime = new Date(now + task.getInitialDelay());
            this.scheduledFutures.add(this.taskScheduler.scheduleAtFixedRate(
                  task.getRunnable(), startTime, task.getInterval()));
         }
         else {
            this.scheduledFutures.add(this.taskScheduler.scheduleAtFixedRate(
                  task.getRunnable(), task.getInterval()));
         }
      }
   }
//顺序执行所有的“fixedRate”定时任务(有延迟,也就是说initialDelay参数不为空)
   if (this.fixedDelayTasks != null) {
      for (IntervalTask task : this.fixedDelayTasks) {
         if (task.getInitialDelay() > 0) {
            Date startTime = new Date(now + task.getInitialDelay());
            this.scheduledFutures.add(this.taskScheduler.scheduleWithFixedDelay(
                  task.getRunnable(), startTime, task.getInterval()));
         }
         else {
            this.scheduledFutures.add(this.taskScheduler.scheduleWithFixedDelay(
                  task.getRunnable(), task.getInterval()));
         }
      }
   }
}
接下来看下定时任务run(extends自Runnable接口)方法:
//说明:每次执行定时任务结束后,会先设置下下次定时任务的执行时间,以此来确认下次任务的执行时间。
public void run() {
    boolean periodic = isPeriodic();
    if (!canRunInCurrentRunState(periodic))
        cancel(false);
    else if (!periodic)
        ScheduledFutureTask.super.run();
    else if (ScheduledFutureTask.super.runAndReset()) {
        setNextRunTime();
        reExecutePeriodic(outerTask);
    }
}
备注1:从上面的代码可以看出,如果多个定时任务定义的是同一个时间,那么也是顺序执行的,会根据程序加载Scheduled方法的先后来执行。
但是如果某个定时任务执行未完成会出现什么现象呢?
答:此任务一直无法执行完成,无法设置下次任务执行时间,之后会导致此任务后面的所有定时任务无法继续执行,也就会出现所有的定时任务“失效”现象。
所以应用springBoot中定时任务的方法中,一定不要出现“死循环”、“http持续等待无响应”现象,否则会导致定时任务程序无法正常。再就是非特殊需求情况下可以把定时任务“分散”下。
@Scheduled 的一些坑
SpringBoot使用@scheduled定时执行任务的时候是在一个单线程中,如果有多个任务,其中一个任务执行时间过长,则有可能会导致其他后续任务被阻塞直到该任务执行完成。也就是会造成一些任务无法定时执行的错觉
无论@scheduled是用在一个类的多个方法还是用在多个类中的方法 默认都是单线程的。
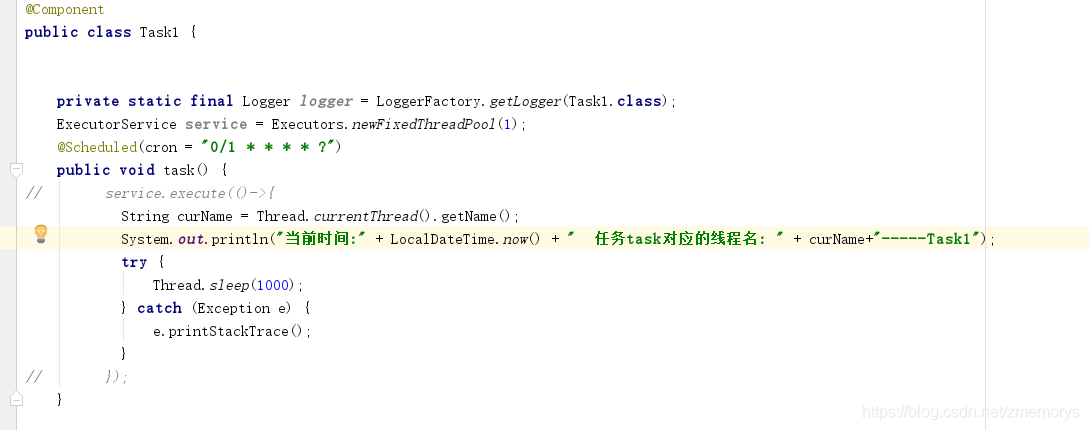
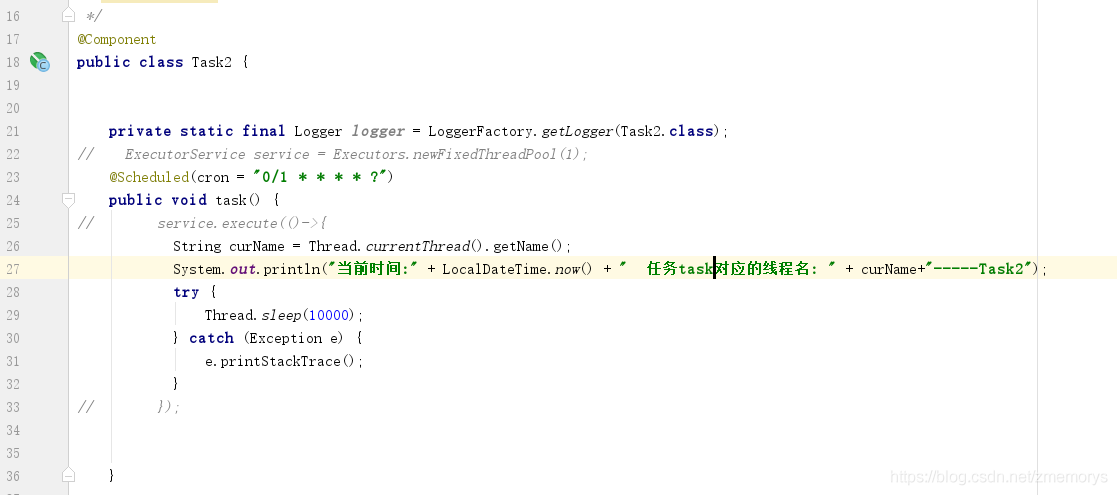
类 task1和类task2 都有task()方法


task1和task2都是每秒执行一次 task1 每次睡眠1s task2每次睡眠10s 测试结果发现 task2会造成task1的阻塞。
所以task1和task2的定时任务是单线程的要避免阻塞
要在每个类中加上线程池
ExecutorService service = Executors.newFixedThreadPool(1);
这样每次task1和task2执行的时候就会互不影响。
newFixedThreadPool(1); 中的线程池大小要根据具体的业务来定 。
看你想要每个任务按照每1s执行一次 还是要按照每个任务按照串行来执行。
如果是串行只需要给这个任务的线程池大小设置成1 这样即便任务设置的是1s执行一次 ,但是这个任务执行耗时10s。那么他也会等上次执行完以后才会进行下一次执行。
以上为个人经验,希望能给大家一个参考,也希望大家多多支持。
加载全部内容