Java中File文件的创建及读写 浅谈Java中File文件的创建以及读写
ThatMonth 人气:0想了解浅谈Java中File文件的创建以及读写的相关内容吗,ThatMonth在本文为您仔细讲解Java中File文件的创建及读写的相关知识和一些Code实例,欢迎阅读和指正,我们先划重点:Java,File文件的创建,Java,File文件的读写,下面大家一起来学习吧。
1.创建一个文件
 @Test
    public void test6() throws IOException {
        File file1 = new File("C:\\IDEA\\h1.txt");
        if(!file1.exists()){//文件不存在
            file1.createNewFile();
            System.out.println("创建成功");
        }else{//文件存在
            file1.delete();
            System.out.println("删除成功");
        }
    }
输出


2.创建一个文件夹
file.mkdir,不会帮你创建上层目录 file.mkdirs,会帮你创建上层目录
@Test
    public void test7(){
        //创建文件夹,mkdir,不会帮你创建上层目录
        File file1 = new File("c:\\IDEA\\io2");
        boolean mkdir =file1.mkdir();
        if(mkdir){
            System.out.println("创建成功1");
        }

        //创建文件夹,mkdirs,会帮你创建上层目录
        File file2 = new File("c:\\IDEA\\io1\\io3");
        boolean mkdirs =file2.mkdirs();
        if(mkdirs){
            System.out.println("创建成功2");
        }
    }
输出


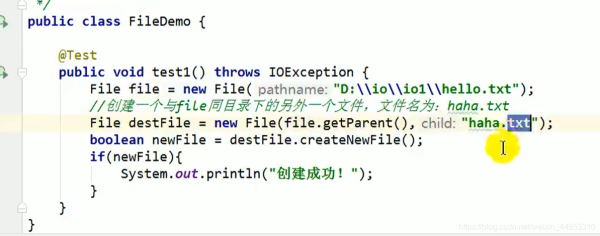
3.创建同目录下文件

4.删除文件或空文件夹
@Test
    public void test8(){
        //删除文件或空文件夹
        File file1 = new File("c:\\IDEA\\h1.txt");

        file1.delete();
    }
5.递归删除所有文件(包括子文件)
//递归函数删除所有文件
    private boolean deletedir(File dir){
        if (dir.isDirectory()) {
          File[] files =  dir.listFiles();
            //递归删除目录中的子目录下
            for (File f:files) {
                boolean success = deletedir(f);
                if (!success) {
                    return false;
                }
            }
        }
        // 目录此时为空,可以删除
        return dir.delete();
    }

    @Test
    public  void test8() {
        File dir = new File("c:\\IDEA");
        System.out.println(deletedir(dir));

    }

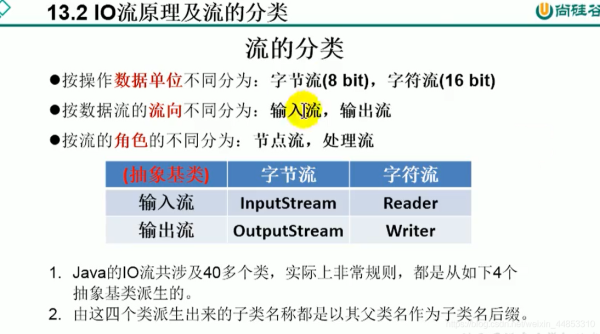
1.对于文本文件(.txt,.java,.c,.cpp),使用字符流处理
2.对于非文本文件(.jpg,.mp3,.mp4,.avi,.doc,.ppt)使用字节流处理
6.读取txt文件内容,流操作要用try-catch(字符流)
@Test
        public void test9() {
            FileReader fr = null;//自动补的
            try {
                //1.实例化File类的对象,指明要操作的文件
                File file1  = new File("c:\\IDEA\\hello.txt");
                file1.createNewFile();//要抛出异常
                //2.提供具体的流
                fr = new FileReader(file1);
                //3.数据的读入
                //read():返回读入的一个字符,如果达到文件末尾,返回-1
                int data = fr.read();
                while(data!=-1){
                    System.out.print((char)data);
                    data  = fr.read();
                }
            } catch (IOException e) {
                e.printStackTrace();
            }finally {
                try {
                    //4.流的关闭操作
                    if(fr!=null)//防止没有实例化成功,避免空指针异常
                        fr.close();
                } catch (IOException e) {
                    e.printStackTrace();
                }

            }

要记得关闭,因为物理连接JVM垃圾回收机制不会自动回收,要手动关闭。
7.读取文件内容升级方法(字符流)
@Test
    public void test1() {
        FileReader fr = null;
        try {
            //1.File类的实例化
            File file = new File("hello.txt");

            //2.FileReader流的实例化
            fr = new FileReader(file);

            //3.读入的操作
            //read(char[] cbuf):返回每次读入cbuf数组中的字符的个数。如果达到文件末尾,返回-1
            char[] cbuf = new char[5];
            int len;
            while ((len = fr.read(cbuf)) != -1) {
                //错误的写法
                //for(int i=0;i<cbuf.length;i++{
                // System.out.println(cbuf[i]);
                //}

                //正确的写法
                for (int i = 0; i < len; i++) {
                    System.out.println(cbuf[i]);
                }

            }
        } catch (IOException e) {
            e.printStackTrace();
        } finally {
            if (fr != null)
                try {
                    //4.资源的关闭
                    fr.close();
                } catch (IOException e) {
                    e.printStackTrace();
                }
        }


    }

8.文件的写入(字符流)
@Test
    public void test2() throws IOException{
        //File对应的硬盘中的文件
        // 如果不存在,在输出的过程中,会自动创建此文件
        //1.提供File类的对象,指明写出到的文件
        FileWriter fw = null;
        try {
            File file =  new File("hello.txt");

            //2.提供FileWriter的对象,用于数据的写出
            //FileWriter(file,append)第二个参数,append是true则在后面添加,是false就覆盖
            fw = new FileWriter(file,true);

            //3.写出的操作
            fw.write("I have a dream!");
            fw.write("you need have a dream");
        } catch (IOException e) {
            e.printStackTrace();
        } finally {
            try {
                if(fw!=null)
                //4.流资源的关闭
                fw.close();
            } catch (IOException e) {
                e.printStackTrace();
            }
        }


    }

9.从一个文件读取然后写入到另一个文件(字符流)
@Test
    public void test3(){
        FileReader fr = null;
        FileWriter fw = null;
        try {
            // 1.创建File类的对象,指明读入和写出的文件
            File src = new File("hello.txt");
            File des = new File("hello1.txt");

            // 2.创建输入输出流的对象
            fr = new FileReader(src);
            fw = new FileWriter(des,true);//不覆盖
            // 3.数据的读入和写出操作
            char[] cbuf = new char[5];
            int len;
            while((len = fr.read(cbuf))!=-1){
                //每次写出len个字符
                fw.write(cbuf,0,len);//从cbuf的0号位开始写入len个字符
            }
        } catch (IOException e) {
            e.printStackTrace();
        } finally {

            try {
                // 4.关闭流资源1
                fw.close();

            } catch (IOException e) {
                e.printStackTrace();
            }

            try {
                // 4.关闭流资源2
                fr.close();
            } catch (IOException e) {
                e.printStackTrace();
            }
        }

    }

10.从一个文件读取然后写入到另一个文件(字节流图片)
@Test
    public void test4(){
        FileInputStream  fis=null;
        FileOutputStream  fos=null;
        try {
            //1.造文件
            File src = new File("b.jpg");
            File des = new File("c.jpg");
            //2.造流
            fis = new FileInputStream(src);
            fos = new FileOutputStream(des);

            //3.读数据,存数据
            byte[] buffer = new byte[5];
            int len;//记录每次读取的字节的个数
            while((len = fis.read(buffer))!=-1){
                fos.write(buffer,0,len);
            }
        } catch (IOException e) {
            e.printStackTrace();
        } finally {
            if(fos!=null) {
                try {
                    //4.关闭资源
                    fos.close();
                } catch (IOException e) {
                    e.printStackTrace();
                }
            }
            if(fis!=null) {
                try {
                    //4.关闭资源
                    fis.close();
                } catch (IOException e) {
                    e.printStackTrace();
                }
            }
        }


    }

11.缓冲流(开发时使用速度更快,效率更高)
@Test
    public void test5(){
        BufferedInputStream bis = null;
        BufferedOutputStream bos = null;
        try {
            //1.造文件
            File src = new File("b.jpg");
            File des = new File("d.jpg");
            //2.造流
            //2.1造节点流
            FileInputStream fis = new FileInputStream(src);
            FileOutputStream fos = new FileOutputStream(des);
            //2.2造缓冲流
            bis = new BufferedInputStream(fis);
            bos = new BufferedOutputStream(fos);


            //3.复制的细节:读取,写入
            byte[] buffer =new byte[10];
            int len;
            while((len=bis.read(buffer))!=-1){
                bos.write(buffer,0,len);
            }
        } catch (IOException e) {
            e.printStackTrace();
        } finally {

            //4.资源关闭
            //要求,先关闭外层的流,再关闭内层的流
            if(bos!=null){
                try {
                    bos.close();
                } catch (IOException e) {
                    e.printStackTrace();
                }
            }

            if(bis!=null){
                try {
                    bis.close();
                } catch (IOException e) {
                    e.printStackTrace();
                }
            }
            //说明:关闭外层流的同时,内层自动关闭,所以外层关闭可以省略
            //fos.close();
            //fis.close();
        }


     }

用缓冲流快了很多

经典步骤:
1.创建File类的对象,指明读入和写出的文件
2.创建输入输出流的对象
3.数据的读入和写出操作
4.关闭流资源
加载全部内容