Vue.js 动态组件模板 Vue.js的动态组件模板的实现
james 人气:4组件并不总是具有相同的结构。有时需要管理许多不同的状态。异步执行此操作会很有帮助。
实例:
组件模板某些网页中用于多个位置,例如通知,注释和附件。让我们来一起看一下评论,看一下我表达的意思是什么。
评论现在不再仅仅是简单的文本字段。您希望能够发布链接,上传图像,集成视频等等。必须在此注释中呈现所有这些完全不同的元素。如果你试图在一个组件内执行此操作,它很快就会变得非常混乱。

处理方式
我们该如何处理这个问题?可能大多数人会先检查所有情况,然后在此之后加载特定组件。像这样的东西:
<template>
 <div class="comment">
  // comment text
  <p>...</p>
  // open graph image
  <link-open-graph v-if="link.type === 'open-graph'" />
  // regular image
  <link-image v-else-if="link.type === 'image'" />
  // video embed
  <link-video v-else-if="link.type === 'video'" />
  ...
 </div>
</template>
但是,如果支持的模板列表变得越来越长,这可能会变得非常混乱和重复。在我们的评论案例中 - 只想到支持Youtube,Twitter,Github,Soundcloud,Vimeo,Figma的嵌入......这个列表是无止境的。
动态组件模板
另一种方法是使用某种加载器来加载您需要的模板。这允许你编写一个像这样的干净组件:
<template>
 <div class="comment">
  // comment text
  <p>...</p>

  // type can be 'open-graph', 'image', 'video'...
  <dynamic-link :data="someData" :type="type" />
 </div>
</template>
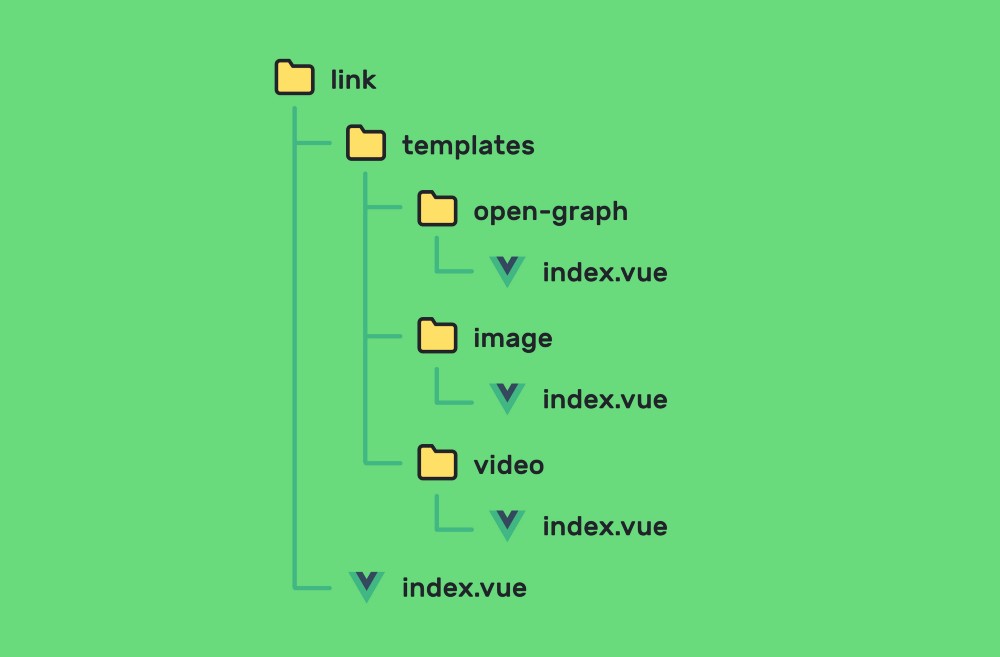
看起来好多了,不是吗?让我们看看这个组件是如何工作的。首先,我们必须更改模板的文件夹结构。

就个人而言,我喜欢为每个组件创建一个文件夹,因为可以在以后添加更多用于样式和测试的文件。当然,您希望如何构建结构取决于你自己。
接下来,我们来看看如何<dynamic-link />构建此组件。
<template>
 <component :is="component" :data="data" v-if="component" />
</template>
<script>
export default {
 name: 'dynamic-link',
 props: ['data', 'type'],
 data() {
  return {
   component: null,
  }
 },
 computed: {
  loader() {
   if (!this.type) {
    return null
   }
   return () => import(`templates/${this.type}`)
  },
 },
 mounted() {
  this.loader()
   .then(() => {
    this.component = () => this.loader()
   })
   .catch(() => {
    this.component = () => import('templates/default')
   })
 },
}
</script>
那么这里发生了什么?默认情况下,Vue.js支持动态组件。问题是您必须注册/导入要使用的所有组件。
<template>
 <component :is="someComponent"></component>
</template>
<script>
import someComponent from './someComponent'
export default {
 components: {
  someComponent,
 },
}
</script>
这里没有任何东西,因为我们想要动态地使用我们的组件。所以我们可以做的是使用Webpack的动态导入。与计算值一起使用时,这就是魔术发生的地方 - 是的,计算值可以返回一个函数。超级方便!
computed: {
 loader() {
  if (!this.type) {
   return null
  }
  return () => import(`templates/${this.type}`)
 },
},
安装我们的组件后,我们尝试加载模板。如果出现问题我们可以设置后备模板。也许这对向用户显示错误消息很有帮助。
mounted() {
 this.loader()
  .then(() => {
   this.component = () => this.loader()
  })
  .catch(() => {
   this.component = () => import('templates/default')
  })
},
结论
如果您有一个组件的许多不同视图,则可能很有用。
- 易于扩展。
- 它是异步的。模板仅在需要时加载
- 。保持代码干净。
基本上就是这样!
加载全部内容