Android build.gradle技巧 浅析Android中build.gradle的实用技巧
谢长意 人气:01.替换符的使用
(1)在 app-android-defaultConfig (或者多渠道打包)下面可以这样使用
android {
  defaultConfig {
  manifestPlaceholders = [
        //高德地图key
        GDKEY: "123456789",
    ]
   }
}
(2)在 AndroidManifest.xml 文件的 application 标签下面这样引用
<!-- 高德地图 -->
    <meta-data
      android:name="com.amap.api.v2.apikey"
      android:value="${GDKEY}" />
2.打包设置appname(启动图标类似,res下面的都可以这样使用)
android {
  defaultConfig {
    //在string.xml中不能出现app_name这个字段,否则生成报错
    resValue "string", "app_name", "app名称"
   }
}
3.生成BuildConfig.java字段
在build.gradle中
android {
  defaultConfig {
      //生成一个boolea类型的变量
      buildConfigField "boolean", "IS_TEST_URL", "true"
      //生成一个字符串变量
      buildConfigField "String", "APP_UPDATE_TIME", "\"${System.currentTimeMillis().toString()}\""
   }
}
在java代码
public final class BuildConfig {
 // Fields from product flavor: 渠道名
 public static final String APP_UPDATE_TIME = "1551754973086";
 public static final boolean IS_TEST_URL = false;
}
4.多渠道打包(注意在defaultConfig下面添加flavorDimensions "versionCode")
android {
  compileSdkVersion 28
  defaultConfig {
    minSdkVersion 19
    targetSdkVersion 28
    testInstrumentationRunner "android.support.test.runner.AndroidJUnitRunner"
    flavorDimensions "versionCode"

  productFlavors {
    name1 {
      applicationId "com.test.name"
      versionName "0.1.4"
      versionCode 5
      resValue "string", "app_name", "app名字"
      buildConfigField "boolean", "IS_TEST_URL", "false"
      buildConfigField "String", "APP_UPDATE_TIME", "\"${System.currentTimeMillis().toString()}\""
    }
  }
5.设置签名
android{
 signingConfigs {
    release {
      keyAlias ''
      keyPassword ''
      storeFile file('./sign.jks')
      storePassword ''
      v2SigningEnabled false
    }
  }
  buildTypes {
    release {
      debuggable false
      minifyEnabled true
      shrinkResources true
      useProguard true
      proguardFiles getDefaultProguardFile('proguard-android.txt'), 'proguard-rules.pro'
      signingConfig signingConfigs.release
    }
    debug {
      debuggable true
      minifyEnabled false
      shrinkResources false
      useProguard false
      proguardFiles getDefaultProguardFile('proguard-android.txt'), 'proguard-rules.pro'
      signingConfig signingConfigs.release
    }
  }
}
6.更改打包的apk名
android{
 android.applicationVariants.all { variant ->
    variant.outputs.all {
      Date nowTime = new Date()
      SimpleDateFormat time = new SimpleDateFormat("MM月dd日HH时mm分")
      outputFileName = "${variant.flavorName}(${variant.versionCode}_${variant.versionName})(${time.format(nowTime)}).apk"
    }
  }
}
7.引入第三方库的时候,剔除某些不需要的包或者重复的包
1.直接在configuration中排除
configurations {
  compile.exclude module: 'commons'
  all*.exclude group: 'org.gradle.test.excludes', module: 'reports'
}
2.在具体的某个dependency中排除
dependencies {
  implementation("com.github.bumptech.glide:glide:4.8.0") {
    exclude module: 'appcompat-v7'
  }
}
PS:Android Studio开发Build.gradle小技巧
引用版本统一规范
Android开发存在着众多版本的不同,比如compileSdkVersion、minSdkVersion、targetSdkVersion以及项目中依赖第三方库的版本,不同的module及不同的开发人员都有不同的版本,所以需要一个统一版本规范的文件,现在我就来介绍一种方式。
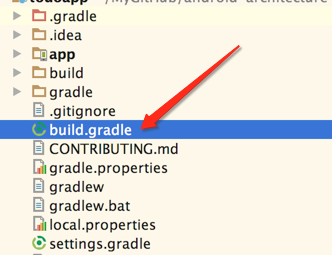
在项目根目录,也就是跟app同一目录下的build.gradle文件,如下图所示

在其最后添加如下groovy代码。
ext {
  compileSdkVersion = 25
  buildToolsVersion = "25.0.0"
  minSdkVersion = 19
  targetSdkVersion = 19

  supportVersion = '25.3.1'
  rxjavaVersion = '1.1.8'
  rxandroidVersion = '1.2.1'
  glideVersion = '3.6.1'
  junitVersion = '4.12'

  deps = [
      appcompatv7  : "com.android.support:appcompat-v7:$supportVersion",
      supportv4   : "com.android.support:support-v4:$supportVersion",
      recyclerviewv7: "com.android.support:recyclerview-v7:$supportVersion",
      rxjava    : "io.reactivex:rxjava:$rxjavaVersion",
      rxandroid   : "io.reactivex:rxandroid:$rxandroidVersion",
      glide     : "com.github.bumptech.glide:glide:$glideVersion",
      junit     : "junit:junit:$junitVersion"
  ]
}
有了这个规范,那么我们在app下的build.gradle文件就可以这样来引用了
android {
  compileSdkVersion rootProject.compileSdkVersion
  buildToolsVersion rootProject.buildToolsVersion
  defaultConfig {
    applicationId "com.ecarx.thememanager"
    minSdkVersion rootProject.minSdkVersion
    targetSdkVersion rootProject.targetSdkVersion
    versionCode 1
    versionName "1.0"
  }
  ...
}

dependencies {
  compile fileTree(include: ['*.jar'], dir: 'libs')
  compile deps.supportv4
  compile deps.appcompatv7
  compile deps.recyclerviewv7
  compile deps.rxjava
  compile deps.rxandroid
  compile deps.glide

  testCompile deps.junit
}
是不是一劳永逸了,今后修改版本只需要修根目录下的build.gradle文件即可把所有依赖版本都修改
对资源进行分包
我们可以对每个页面的资源都进行具体分类,不只是layout,还有drawable及value,是不是心动了,赶紧照着如下配置试一试吧,别再让资源文件们“混为一潭”了。
方法很简单,配置我们的app文件夹下的build.gradle文件,比如我的
android {
  ...
  sourceSets {
    main {
      res.srcDirs =
          [
              'src/main/res',
              'src/main/res/layouts',
              'src/main/res/layouts/home',
              'src/main/res/layouts/hot_sale',
              'src/main/res/layouts/amuse',
              'src/main/res/layouts/delicacy',
              'src/main/res/layouts/food_management',
              'src/main/res/layouts/settings',
          ]
    }
  }
}
新建相关文件夹,配置完之后,sync project一下就成功了
加载全部内容