【Springboot】注解@ConfigurationProperties让配置整齐而简单
南瓜慢说 人气:21 简介
前面我们用一篇文章《【Spring】只想用一篇文章记录@Value的使用,不想再找其它了(附思维导图)》
详细讲解了在Spring中如何使用@Value来实现我们对配置的需求,它功能强大、使用方便。但它也是有它的局限性的,比如对于邮件服务,我们配置有:
mail.hostname=smtp.qq.com
mail.username=larry@qq.com
mail.password=123456
mail.to=to@163.com
mail.cc=cc@gmail.com使用@Value,我们需要5个注解及5个独立的变量:
@Value("${mail.hostname}")
private String hostname;
@Value("${mail.username}")
private String username;
@Value("${mail.password}")
private String password;
@Value("${mail.to}")
private List<String> to;
@Value("${mail.cc}")
private List<String> cc;这样非常不方便,容易出错,较难维护,不好传递。如果能把相同功能的配置组合起来,那配置就不会这么乱了。而Springboot为我们提供了注解@ConfigurationProperties完美解决了这个问题。现在我们来深入了解一下这个注解的强大之处。
2 启动注解的三种方式
启动@ConfigurationProperties有三种方式,分别是:
(1)属性类@ConfigurationProperties+属性类@Component
@Component
@ConfigurationProperties(prefix = "pkslow")
public class PkslowProperties {
    private String name;
    private List<String> emails;
    private Map<String, Integer> price;
  //getter and setter
}在属性配置类上加注解@ConfigurationProperties是三种方式都需要的,第一种方式通过@Component声明为一个可用的Bean。实际不一定是@Component,@Service等也是可以的。
(2)属性类@ConfigurationProperties+配置类@Bean
在配置类中通过@Bean声明:
@Configuration
public class Config {
    @Bean
    public PkslowProperties pkslowProperties(){
        return new PkslowProperties();
    }
}(3)属性类@ConfigurationProperties+配置类@EnableConfigurationProperties
我们可以在Springboot启动类中加上注解@EnableConfigurationProperties来声明:
@SpringBootApplication
@EnableConfigurationProperties(PkslowProperties.class)
public class ConfigurationPropertiesDemoApplication {
    public static void main(String[] args) {
        SpringApplication.run(ConfigurationPropertiesDemoApplication.class, args);
    }
}
3 两大优点
3.1 宽松的绑定规则
支持宽松的绑定规则,以下格式都可以识别为accountType属性:
pkslow.accountType=QQ
pkslow.accounttype=QQ
pkslow.account_type=QQ
pkslow.account-type=QQ
pkslow.ACCOUNT_TYPE=QQ
3.2 支持多种属性类型
支持多种属性类型,Java类如下:
@Component
@ConfigurationProperties(prefix = "pkslow")
@Data
public class PkslowProperties {
    private String name;
    private List<String> emails;
    private Map<String, Integer> price;
    private Account mainAccount;
    private List<Account> emailAccounts;
    private Map<String, Account> friendAccounts;
    private Duration activeTime;
    private DataSize appFileSize;
}
配置如下:
#普通类型
pkslow.name=Larry
#List
pkslow.emails[0]=larry@qq.com
pkslow.emails[1]=larry@gmail.com
#Map
pkslow.price.shoe=200
pkslow.price.pen=10
pkslow.price.book=43
#Object
pkslow.mainAccount.username=larry
pkslow.mainAccount.password=123456
pkslow.mainAccount.accountType=Main
#List<Object>
pkslow.emailAccounts[0].username=larry
pkslow.emailAccounts[0].password=******
pkslow.emailAccounts[0].accounttype=QQ
pkslow.emailAccounts[1].username=larry
pkslow.emailAccounts[1].password=xxxxxx
pkslow.emailAccounts[1].account_type=Gmail
pkslow.emailAccounts[2].username=larry
pkslow.emailAccounts[2].password=xxxxxx
pkslow.emailAccounts[2].account-type=163
pkslow.emailAccounts[3].username=larry
pkslow.emailAccounts[3].password=xxxxxx
pkslow.emailAccounts[3].ACCOUNT_TYPE=Apple
#Map<String, Object>
pkslow.friendAccounts.JJ.username=JJ
pkslow.friendAccounts.JJ.password=******
pkslow.friendAccounts.JJ.accountType=QQ
pkslow.friendAccounts.Larry.username=Larry
pkslow.friendAccounts.Larry.password=******
pkslow.friendAccounts.Larry.accountType=QQ
#Duration
pkslow.activeTime=30d
#DataSize
pkslow.appFileSize=10KBDuration为持续时间属性,可支持的单位有:
ns:nanosecond,纳秒
us:microsecond,微秒
ms:millisecond,毫秒
s:second,秒
m :minute,分
h:hour,小时
d :day,天
不写默认为毫秒,也可以通过注解@DurationUnit来指定单位。
@DurationUnit(ChronoUnit.DAYS)
private Duration timeInDays;DataSize类似,用来表示文件大小,支持的单位有:B/KB/MB/GB/TB。默认单位为B,可以用@DataSizeUnit指定单位。
4 属性转换失败处理
4.1 无法转换的类型
有时配置错误,就会无法转换成正常的类型,例如属性为布尔类型,却定义为pkslow.enabled=open,那肯定是无法转换的。默认会启动失败,并抛出异常。
Description:
Failed to bind properties under 'pkslow.enabled' to boolean:
    Property: pkslow.enabled
    Value: open
    Origin: class path resource [application.properties]:46:16
    Reason: failed to convert java.lang.String to boolean

Action:
Update your application's configuration
但如果我们并不想影响Springboot的启动,可以通过设置 ignoreInvalidFields 属性为 true (默认为 false),就会忽略错误的属性。
@Component
@ConfigurationProperties(prefix = "pkslow", ignoreInvalidFields = true)
public class PkslowProperties {
}设置之后,错误的属性就会取默认值,如null或false。
4.2 未知的属性
如果写错的不是配置的值,而是配置的项,会发生什么呢?
#Java类没有该属性myAppName
pkslow.myAppName=pkslow
结果是什么也不会发生。
因为在默认情况下,Springboot 会忽略那些不能识别的字段。如果你希望它在这种情况下启动失败,可以配置ignoreUnknownFields为false,默认是为true的。这样你就必须要删除这个配置错误的属性了。
@Component
@ConfigurationProperties(prefix = "pkslow", ignoreUnknownFields = false)
public class PkslowProperties {
}
有两点需要注意:
(1)如果设置ignoreInvalidFields为true,则ignoreUnknownFields不起作用;
(2)带有 @ConfigurationProperties 的不同的类不要使用相同的前缀(命名空间),容易造成冲突,如某个属性一个可用,一个不可用。
5 自定义转换器
如前面讲解的Duration和DataSize,都是比较特殊的属性。实际上我们还可以自定义属性,并自定义转换器来实现属性绑定。
配置如下:
pkslow.convertAccount=Larry:123456:QQ对应的属性为:
private Account convertAccount;其中Account类如下:
@Data
@NoArgsConstructor
@AllArgsConstructor
public class Account {
    private String username;
    private String password;
    private String accountType;
}通过实现Converter接口自定义转换器如下:
public class AccountConverter implements Converter<String, Account> {
    @Override
    public Account convert(String s) {
        String[] strings = s.split(":");
        return new Account(strings[0], strings[1], strings[2]);
    }
}通过注解@ConfigurationPropertiesBinding声明启用该转换器:
@Configuration
public class Config {
    @Bean
    @ConfigurationPropertiesBinding
    public AccountConverter accountConverter() {
        return new AccountConverter();
    }
}
完成以上,就可以使用自定义的属性和配置了。
6 使用Spring Boot Configuration Processor
自定义的属性在IDE中是有告警的,无法被识别成合法的配置。通过引入Springboot Configuration Processor可以解决这个问题,并且IDE还能启动自动补全功能。
引入:
<dependency>
  <groupId>org.springframework.boot</groupId>
  <artifactId>spring-boot-configuration-processor</artifactId>
  <optional>true</optional>
<https://img.qb5200.com/download-x/dependency>
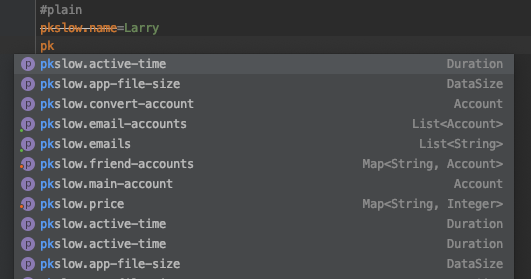
6.1 完成自动补全
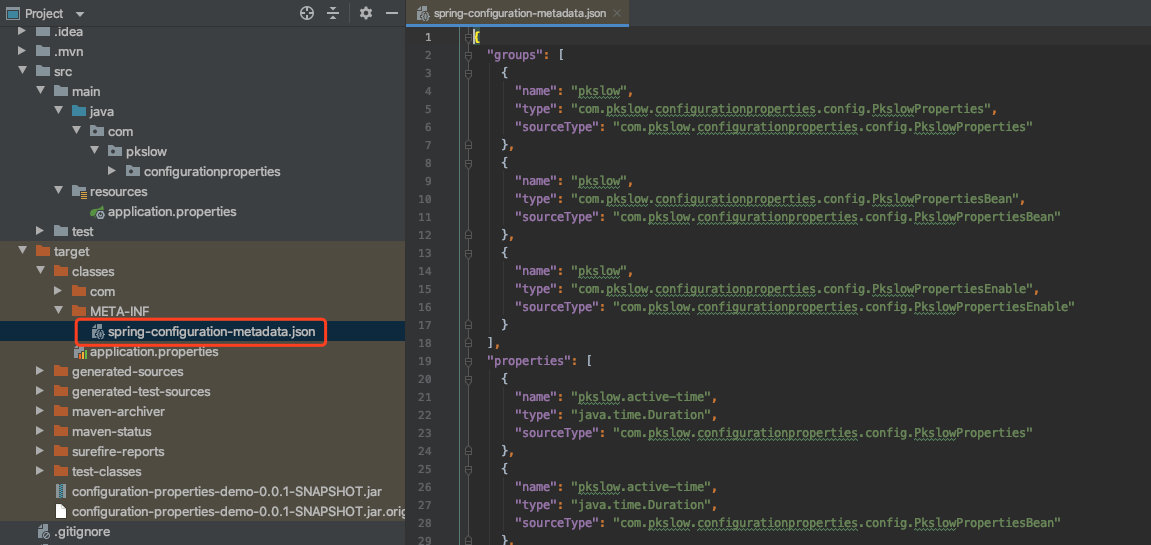
引入依赖后,重新build一下project就可以了。它会为我们创建一个Json格式的文件:

6.2 标记配置属性为 Deprecated
把注解@DeprecatedConfigurationProperty放在getter方法,该属性还会被显示为Deprecated:
@Component
@ConfigurationProperties(prefix = "pkslow")
public class PkslowProperties {
    private String name;
    @DeprecatedConfigurationProperty
    public String getName() {
        return name;
    }
}
自动补全和Deprecated的效果如下:

7 总结
本文通过代码案例详细讲解了@ConfigurationProperties的使用,demo的代码可关注公众号后台回复”ConfigurationProperties“获取。
欢迎关注公众号<南瓜慢说>,将持续为你更新...

多读书,多分享;多写作,多整理。
加载全部内容