SpringBoot整合SSM
胖墩哥 人气:1SpringBoot整合SSM
请查看博客SpringBoot介绍与使用了解Spring基本介绍与使用
如何使用springboot来整合SSM
1.0 使用lombok
我们编写pojo时,经常需要编写构造函数和getter、setter方法,属性多的时候,就非常浪费时间,使用lombok插件可以解决这个问题:
在idea中安装lombok插件:
需要在maven中引入依赖:
<dependency>
    <groupId>org.project.lombok</groupId>
    <artifactId>lombok</artifactId>
<https://img.qb5200.com/download-x/dependency>
然后可以在Bean上使用:
@Data :自动提供getter 和setter 、hashCode、 equals、toString等方法
@Getter :自动提供getter方法
@Setter: 自动提供setter方法
@Slf4j:自动在bean中提供log变量,其实用的是slf4j的日志功能
2.1.整合SpringMVC
虽然默认配置已经可以使用SpringMVC了,不过我们有时候需要进行自定义配置。
日志级别控制:
logging:
  level:
    com.jim: debug
    org.springfreamework: debug
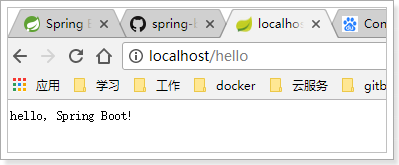
2.1.1.修改端口
查看SpringBoot的全局属性可知,端口通过以下方式配置:
# 映射端口
server.port=80
重启服务后测试:
2.1.2.访问静态资源
现在,我们的项目是一个jar工程,那么就没有webapp,我们的静态资源该放哪里呢?
回顾我们上面看的源码,有一个叫做ResourceProperties的类,里面就定义了静态资源的默认查找路径:

默认的静态资源路径为:
- classpath:/META-INF/resources/
- classpath:/resources/
- classpath:/static/
- classpath:/public
只要静态资源放在这些目录中任何一个,SpringMVC都会帮我们处理。
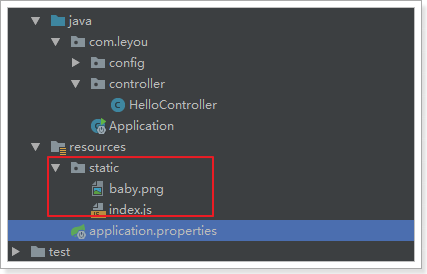
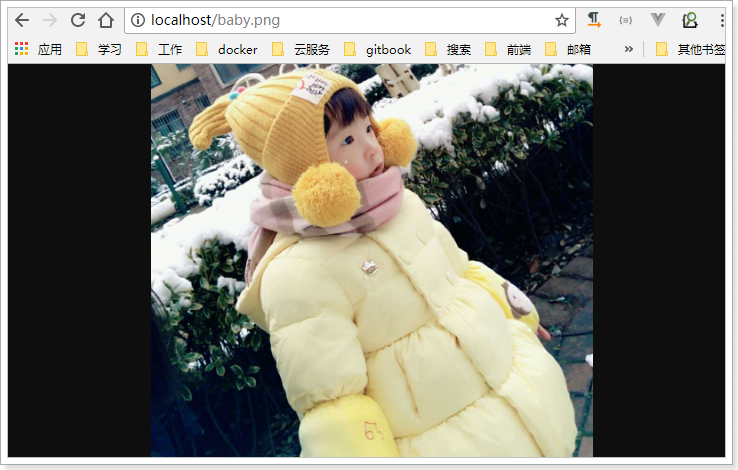
我们习惯会把静态资源放在classpath:/static/目录下。我们创建目录,并且添加一些静态资源:
重启项目后测试:
2.1.3.添加拦截器
拦截器也是我们经常需要使用的,在SpringBoot中该如何配置呢?
拦截器不是一个普通属性,而是一个类,所以就要用到java配置方式了。在SpringBoot官方文档中有这么一段说明:
If you want to keep Spring Boot MVC features and you want to add additional MVC configuration (interceptors, formatters, view controllers, and other features), you can add your own
@Configurationclass of typeWebMvcConfigurerbut without@EnableWebMvc. If you wish to provide custom instances ofRequestMappingHandlerMapping,RequestMappingHandlerAdapter, orExceptionHandlerExceptionResolver, you can declare aWebMvcRegistrationsAdapterinstance to provide such components.If you want to take complete control of Spring MVC, you can add your own
@Configurationannotated with@EnableWebMvc.
翻译:
如果你想要保持Spring Boot 的一些默认MVC特征,同时又想自定义一些MVC配置(包括:拦截器,格式化器, 视图控制器、消息转换器 等等),你应该让一个类实现
WebMvcConfigurer,并且添加@Configuration注解,但是千万不要加@EnableWebMvc注解。如果你想要自定义HandlerMapping、HandlerAdapter、ExceptionResolver等组件,你可以创建一个WebMvcRegistrationsAdapter实例 来提供以上组件。如果你想要完全自定义SpringMVC,不保留SpringBoot提供的一切特征,你可以自己定义类并且添加
@Configuration注解和@EnableWebMvc注解
总结:通过实现WebMvcConfigurer并添加@Configuration注解来实现自定义部分SpringMvc配置。
首先我们定义一个拦截器:
public class LoginInterceptor implements HandlerInterceptor {

    private Logger logger = LoggerFactory.getLogger(LoginInterceptor.class);
    @Override
    public boolean preHandle(HttpServletRequest request, HttpServletResponse response, Object handler) {
        logger.debug("preHandle method is now running!");
        return true;
    }

    @Override
    public void postHandle(HttpServletRequest request, HttpServletResponse response, Object handler, ModelAndView modelAndView) {
        logger.debug("postHandle method is now running!");
    }

    @Override
    public void afterCompletion(HttpServletRequest request, HttpServletResponse response, Object handler, Exception ex) {
        logger.debug("afterCompletion method is now running!");
    }
}
然后,我们定义配置类,注册拦截器:
@Configuration
public class MvcConfig implements WebMvcConfigurer{
    /**
     * 通过@Bean注解,将我们定义的拦截器注册到Spring容器
     * @return
     */
    @Bean
    public LoginInterceptor loginInterceptor(){
        return new LoginInterceptor();
    }

    /**
     * 重写接口中的addInterceptors方法,添加自定义拦截器
     * @param registry
     */
    @Override
    public void addInterceptors(InterceptorRegistry registry) {
        // 通过registry来注册拦截器,通过addPathPatterns来添加拦截路径
        registry.addInterceptor(this.loginInterceptor()).addPathPatterns("/**");
    }
}
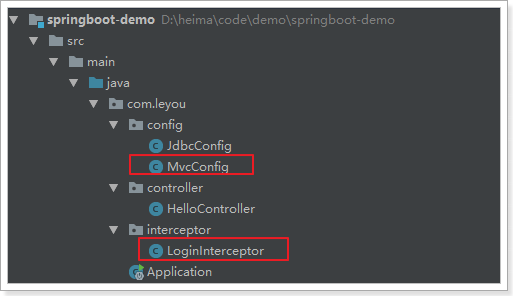
结构如下:
接下来运行并查看日志:
你会发现日志中什么都没有,因为我们记录的log级别是debug,默认是显示info以上,我们需要进行配置。
SpringBoot通过logging.level.*=debug来配置日志级别,*填写包名
# 设置com.leyou包的日志级别为debug
logging.level.com.leyou=debug
再次运行查看:
2018-05-05 17:50:01.811 DEBUG 4548 --- [p-nio-80-exec-1] com.leyou.interceptor.LoginInterceptor   : preHandle method is now running!
2018-05-05 17:50:01.854 DEBUG 4548 --- [p-nio-80-exec-1] com.leyou.interceptor.LoginInterceptor   : postHandle method is now running!
2018-05-05 17:50:01.854 DEBUG 4548 --- [p-nio-80-exec-1] com.leyou.interceptor.LoginInterceptor   : afterCompletion method is now running!
3.整合jdbc和事务
spring中的jdbc连接和事务是配置中的重要一环,在SpringBoot中该如何处理呢?
答案是不需要处理,我们只要找到SpringBoot提供的启动器即可:
<dependency>
    <groupId>org.springframework.boot</groupId>
    <artifactId>spring-boot-starter-jdbc</artifactId>
<https://img.qb5200.com/download-x/dependency>
当然,不要忘了数据库驱动,SpringBoot并不知道我们用的什么数据库,这里我们选择MySQL:
<dependency>
    <groupId>mysql</groupId>
    <artifactId>mysql-connector-java</artifactId>
<https://img.qb5200.com/download-x/dependency>至于事务,SpringBoot中通过注解来控制。就是我们熟知的@Transactional
@Service
public class UserService {

    @Autowired
    private UserMapper userMapper;

    public User queryById(Long id){
        return this.userMapper.selectByPrimaryKey(id);
    }

    @Transactional
    public void deleteById(Long id){
        this.userMapper.deleteByPrimaryKey(id);
    }
}
4.整合连接池
其实,在刚才引入jdbc启动器的时候,SpringBoot已经自动帮我们引入了一个连接池:
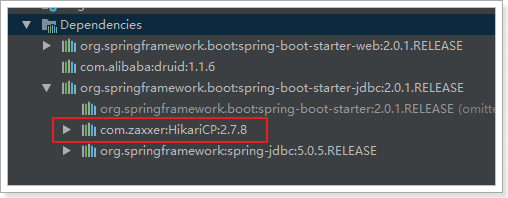
HikariCP应该是目前速度最快的连接池了,我们看看它与c3p0的对比:
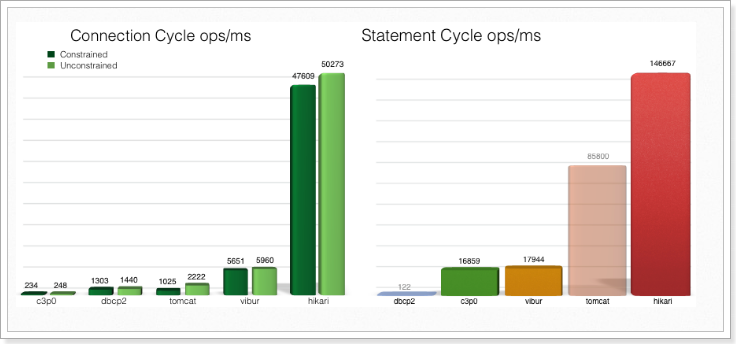
因此,我们只需要指定连接池参数即可:
# 连接四大参数
spring.datasource.url=jdbc:mysql://localhost:3306/heima
spring.datasource.username=root
spring.datasource.password=123
# 可省略,SpringBoot自动推断
spring.datasource.driverClassName=com.mysql.jdbc.Driver

spring.datasource.hikari.idle-timeout=60000
spring.datasource.hikari.maximum-pool-size=30
spring.datasource.hikari.minimum-idle=10
当然,如果你更喜欢Druid连接池,也可以使用Druid官方提供的启动器:
<!-- Druid连接池 -->
<dependency>
    <groupId>com.alibaba</groupId>
    <artifactId>druid-spring-boot-starter</artifactId>
    <version>1.1.6</version>
<https://img.qb5200.com/download-x/dependency>
而连接信息的配置与上面是类似的,只不过在连接池特有属性上,方式略有不同:
#初始化连接数
spring.datasource.druid.initial-size=1
#最小空闲连接
spring.datasource.druid.min-idle=1
#最大活动连接
spring.datasource.druid.max-active=20
#获取连接时测试是否可用
spring.datasource.druid.test-on-borrow=true
#监控页面启动
spring.datasource.druid.stat-view-servlet.allow=true
5.整合mybatis
5.1.mybatis
SpringBoot官方并没有提供Mybatis的启动器,不过Mybatis官网自己实现了:
<!--mybatis -->
<dependency>
    <groupId>org.mybatis.spring.boot</groupId>
    <artifactId>mybatis-spring-boot-starter</artifactId>
    <version>1.3.2</version>
<https://img.qb5200.com/download-x/dependency>
配置,基本没有需要配置的:
# mybatis 别名扫描
mybatis.type-aliases-package=com.heima.pojo
# mapper.xml文件位置,如果没有映射文件,请注释掉
mybatis.mapper-locations=classpath:mappers/*.xml需要注意,这里没有配置mapper接口扫描包,因此我们需要给每一个Mapper接口添加@Mapper注解,才能被识别。
@Mapper
public interface UserMapper {
}
5.2.通用mapper
通用Mapper的作者也为自己的插件编写了启动器,我们直接引入即可:
<!-- 通用mapper -->
<dependency>
    <groupId>tk.mybatis</groupId>
    <artifactId>mapper-spring-boot-starter</artifactId>
    <version>2.0.2</version>
<https://img.qb5200.com/download-x/dependency>
注意:一旦引入通用Mapper的启动器,会覆盖Mybatis官方启动器的功能,因此需要移除对官方Mybatis启动器的依赖。
无需任何配置就可以使用了。如果有特殊需要,可以到通过mapper官网查看。
public interface UserMapper extends Mapper<User>{
}
另外,我们需要把启动类上的@MapperScan注解修改为通用mapper中自带的:
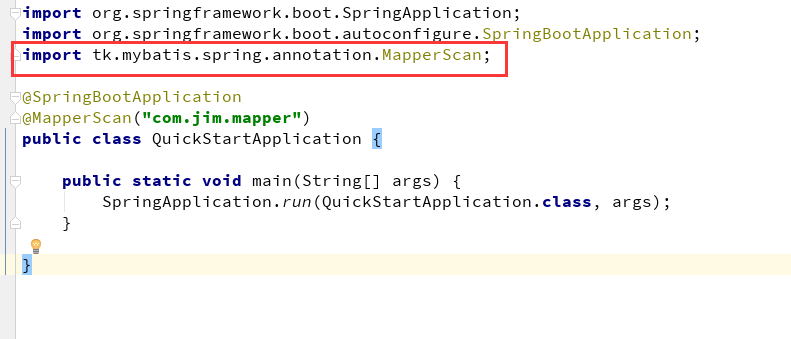
而且需要对pojo类进行添加注解:
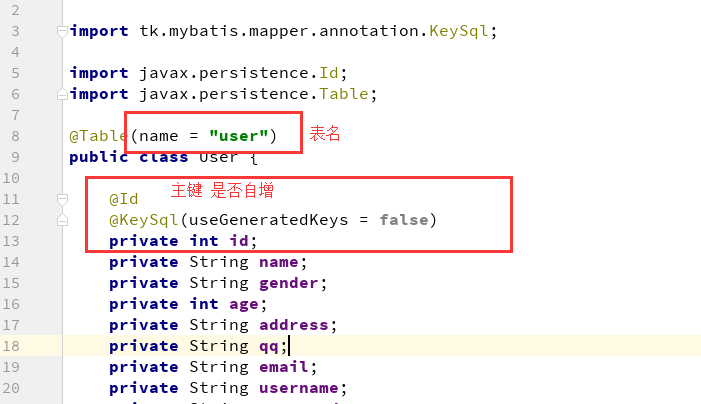
注意:如果对应的属性在mysql的表中没有对应列,则对该属性添加注解@Transient
6.启动测试
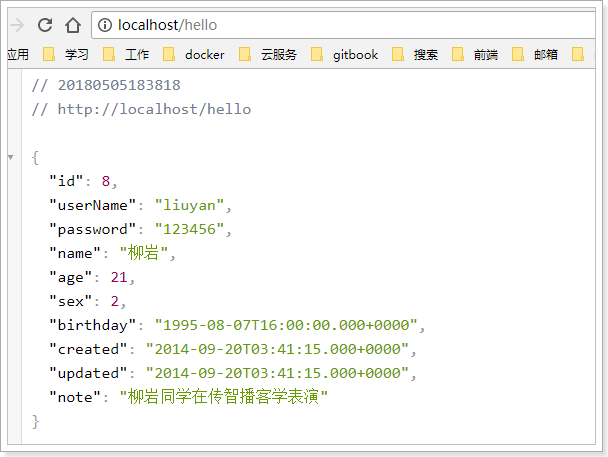
将controller进行简单改造:
@RestController
public class HelloController {

    @Autowired
    private UserService userService;

    @GetMapping("/hello")
    public User hello() {
        User user = this.userService.queryById(8L);
        return user;
    }
}
我们启动项目,查看:
加载全部内容