SpringSceurity实现短信验证码登陆
雨点的名字 人气:1本文着重讲解了SpringSceurity实现短信验证码登陆,文中会用代码示例为大家做详细介绍,希望能够帮助到您,欢迎大家阅读和收藏
一、短信登录验证机制原理分析
了解短信验证码的登陆机制之前,我们首先是要了解用户账号密码登陆的机制是如何的,我们来简要分析一下Spring Security是如何验证基于用户名和密码登录方式的,
分析完毕之后,再一起思考如何将短信登录验证方式集成到Spring Security中。
1、账号密码登陆的流程
一般账号密码登陆都有附带 图形验证码 和 记住我功能 ,那么它的大致流程是这样的。
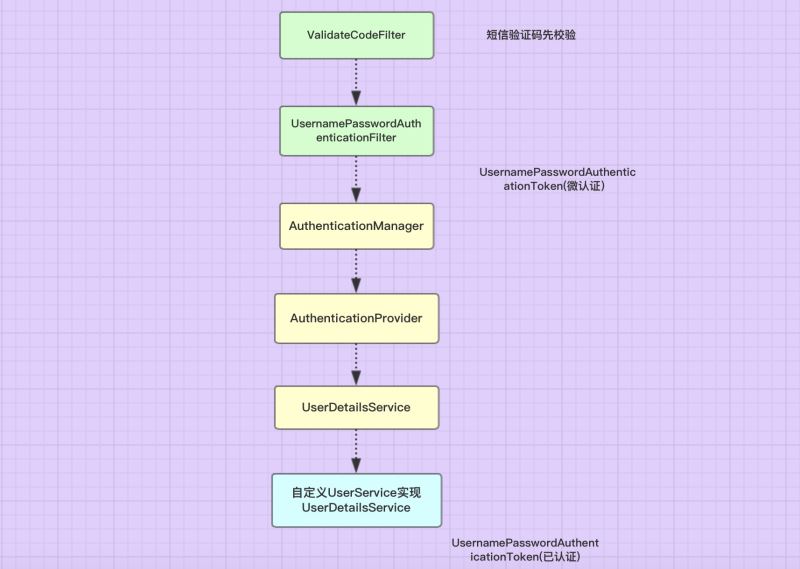
1、 用户在输入用户名,账号、图片验证码后点击登陆。那么对于springSceurity首先会进入短信验证码Filter,因为在配置的时候会把它配置在
UsernamePasswordAuthenticationFilter之前,把当前的验证码的信息跟存在session的图片验证码的验证码进行校验。2、短信验证码通过后,进入 UsernamePasswordAuthenticationFilter 中,根据输入的用户名和密码信息,构造出一个暂时没有鉴权的
UsernamePasswordAuthenticationToken,并将 UsernamePasswordAuthenticationToken 交给 AuthenticationManager 处理。3、AuthenticationManager 本身并不做验证处理,他通过 for-each 遍历找到符合当前登录方式的一个 AuthenticationProvider,并交给它进行验证处理
,对于用户名密码登录方式,这个 Provider 就是 DaoAuthenticationProvider。4、在这个 Provider 中进行一系列的验证处理,如果验证通过,就会重新构造一个添加了鉴权的 UsernamePasswordAuthenticationToken,并将这个
token 传回到 UsernamePasswordAuthenticationFilter 中。5、在该 Filter 的父类 AbstractAuthenticationProcessingFilter 中,会根据上一步验证的结果,跳转到 successHandler 或者是 failureHandler。
流程图

2、短信验证码登陆流程
因为短信登录的方式并没有集成到Spring Security中,所以往往还需要我们自己开发短信登录逻辑,将其集成到Spring Security中,那么这里我们就模仿账号
密码登陆来实现短信验证码登陆。
1、用户名密码登录有个 UsernamePasswordAuthenticationFilter,我们搞一个SmsAuthenticationFilter,代码粘过来改一改。
2、用户名密码登录需要UsernamePasswordAuthenticationToken,我们搞一个SmsAuthenticationToken,代码粘过来改一改。
3、用户名密码登录需要DaoAuthenticationProvider,我们模仿它也 implenments AuthenticationProvider,叫做 SmsAuthenticationProvider。

这个图是网上找到,自己不想画了
我们自己搞了上面三个类以后,想要实现的效果如上图所示。当我们使用短信验证码登录的时候:
1、先经过 SmsAuthenticationFilter,构造一个没有鉴权的 SmsAuthenticationToken,然后交给 AuthenticationManager处理。
2、AuthenticationManager 通过 for-each 挑选出一个合适的 provider 进行处理,当然我们希望这个 provider 要是 SmsAuthenticationProvider。
3、验证通过后,重新构造一个有鉴权的SmsAuthenticationToken,并返回给SmsAuthenticationFilter。
filter 根据上一步的验证结果,跳转到成功或者失败的处理逻辑。
二、代码实现
1、SmsAuthenticationToken
首先我们编写 SmsAuthenticationToken,这里直接参考 UsernamePasswordAuthenticationToken 源码,直接粘过来,改一改。
说明
principal 原本代表用户名,这里保留,只是代表了手机号码。
credentials 原本代码密码,短信登录用不到,直接删掉。
SmsCodeAuthenticationToken() 两个构造方法一个是构造没有鉴权的,一个是构造有鉴权的。
剩下的几个方法去除无用属性即可。
代码
public class SmsCodeAuthenticationToken extends AbstractAuthenticationToken {

 private static final long serialVersionUID = SpringSecurityCoreVersion.SERIAL_VERSION_UID;

 /**
 * 在 UsernamePasswordAuthenticationToken 中该字段代表登录的用户名,
 * 在这里就代表登录的手机号码
 */
 private final Object principal;

 /**
 * 构建一个没有鉴权的 SmsCodeAuthenticationToken
 */
 public SmsCodeAuthenticationToken(Object principal) {
 super(null);
 this.principal = principal;
 setAuthenticated(false);
 }

 /**
 * 构建拥有鉴权的 SmsCodeAuthenticationToken
 */
 public SmsCodeAuthenticationToken(Object principal, Collection<? extends GrantedAuthority> authorities) {
 super(authorities);
 this.principal = principal;
 // must use super, as we override
 super.setAuthenticated(true);
 }

 @Override
 public Object getCredentials() {
 return null;
 }

 @Override
 public Object getPrincipal() {
 return this.principal;
 }

 @Override
 public void setAuthenticated(boolean isAuthenticated) throws IllegalArgumentException {
 if (isAuthenticated) {
  throw new IllegalArgumentException(
   "Cannot set this token to trusted - use constructor which takes a GrantedAuthority list instead");
 }

 super.setAuthenticated(false);
 }

 @Override
 public void eraseCredentials() {
 super.eraseCredentials();
 }
}
2、SmsAuthenticationFilter
然后编写 SmsAuthenticationFilter,参考 UsernamePasswordAuthenticationFilter 的源码,直接粘过来,改一改。
说明
原本的静态字段有 username 和 password,都干掉,换成我们的手机号字段。
SmsCodeAuthenticationFilter() 中指定了这个 filter 的拦截 Url,我指定为 post 方式的 /sms/login。
剩下来的方法把无效的删删改改就好了。
代码
public class SmsCodeAuthenticationFilter extends AbstractAuthenticationProcessingFilter {
 /**
 * form表单中手机号码的字段name
 */
 public static final String SPRING_SECURITY_FORM_MOBILE_KEY = "mobile";

 private String mobileParameter = "mobile";
 /**
 * 是否仅 POST 方式
 */
 private boolean postOnly = true;

 public SmsCodeAuthenticationFilter() {
 //短信验证码的地址为/sms/login 请求也是post
 super(new AntPathRequestMatcher("/sms/login", "POST"));
 }

 @Override
 public Authentication attemptAuthentication(HttpServletRequest request, HttpServletResponse response) throws AuthenticationException {
 if (postOnly && !request.getMethod().equals("POST")) {
  throw new AuthenticationServiceException(
   "Authentication method not supported: " + request.getMethod());
 }

 String mobile = obtainMobile(request);
 if (mobile == null) {
  mobile = "";
 }

 mobile = mobile.trim();

 SmsCodeAuthenticationToken authRequest = new SmsCodeAuthenticationToken(mobile);

 // Allow subclasses to set the "details" property
 setDetails(request, authRequest);

 return this.getAuthenticationManager().authenticate(authRequest);
 }

 protected String obtainMobile(HttpServletRequest request) {
 return request.getParameter(mobileParameter);
 }

 protected void setDetails(HttpServletRequest request, SmsCodeAuthenticationToken authRequest) {
 authRequest.setDetails(authenticationDetailsSource.buildDetails(request));
 }

 public String getMobileParameter() {
 return mobileParameter;
 }

 public void setMobileParameter(String mobileParameter) {
 Assert.hasText(mobileParameter, "Mobile parameter must not be empty or null");
 this.mobileParameter = mobileParameter;
 }

 public void setPostOnly(boolean postOnly) {
 this.postOnly = postOnly;
 }
}
3、SmsAuthenticationProvider
这个方法比较重要,这个方法首先能够在使用短信验证码登陆时候被 AuthenticationManager 挑中,其次要在这个类中处理验证逻辑。
说明
实现 AuthenticationProvider 接口,实现 authenticate() 和 supports() 方法。
代码
public class SmsCodeAuthenticationProvider implements AuthenticationProvider {

 private UserDetailsService userDetailsService;

 /**
 * 处理session工具类
 */
 private SessionStrategy sessionStrategy = new HttpSessionSessionStrategy();

 String SESSION_KEY_PREFIX = "SESSION_KEY_FOR_CODE_SMS";

 @Override
 public Authentication authenticate(Authentication authentication) throws AuthenticationException {
 SmsCodeAuthenticationToken authenticationToken = (SmsCodeAuthenticationToken) authentication;

 String mobile = (String) authenticationToken.getPrincipal();

 checkSmsCode(mobile);

 UserDetails userDetails = userDetailsService.loadUserByUsername(mobile);
 // 此时鉴权成功后,应当重新 new 一个拥有鉴权的 authenticationResult 返回
 SmsCodeAuthenticationToken authenticationResult = new SmsCodeAuthenticationToken(userDetails, userDetails.getAuthorities());
 authenticationResult.setDetails(authenticationToken.getDetails());

 return authenticationResult;
 }

 private void checkSmsCode(String mobile) {
 HttpServletRequest request = ((ServletRequestAttributes) RequestContextHolder.getRequestAttributes()).getRequest();
 // 从session中获取图片验证码
 SmsCode smsCodeInSession = (SmsCode) sessionStrategy.getAttribute(new ServletWebRequest(request), SESSION_KEY_PREFIX);
 String inputCode = request.getParameter("smsCode");
 if(smsCodeInSession == null) {
  throw new BadCredentialsException("未检测到申请验证码");
 }

 String mobileSsion = smsCodeInSession.getMobile();
 if(!Objects.equals(mobile,mobileSsion)) {
  throw new BadCredentialsException("手机号码不正确");
 }

 String codeSsion = smsCodeInSession.getCode();
 if(!Objects.equals(codeSsion,inputCode)) {
  throw new BadCredentialsException("验证码错误");
 }
 }

 @Override
 public boolean supports(Class<?> authentication) {
 // 判断 authentication 是不是 SmsCodeAuthenticationToken 的子类或子接口
 return SmsCodeAuthenticationToken.class.isAssignableFrom(authentication);
 }

 public UserDetailsService getUserDetailsService() {
 return userDetailsService;
 }

 public void setUserDetailsService(UserDetailsService userDetailsService) {
 this.userDetailsService = userDetailsService;
 }
}
4、SmsCodeAuthenticationSecurityConfig
既然自定义了拦截器,可以需要在配置里做改动。
代码
@Component
public class SmsCodeAuthenticationSecurityConfig extends SecurityConfigurerAdapter<DefaultSecurityFilterChain, HttpSecurity> {
 @Autowired
 private SmsUserService smsUserService;
 @Autowired
 private AuthenctiationSuccessHandler authenctiationSuccessHandler;
 @Autowired
 private AuthenctiationFailHandler authenctiationFailHandler;

 @Override
 public void configure(HttpSecurity http) {
 SmsCodeAuthenticationFilter smsCodeAuthenticationFilter = new SmsCodeAuthenticationFilter();
 smsCodeAuthenticationFilter.setAuthenticationManager(http.getSharedObject(AuthenticationManager.class));
 smsCodeAuthenticationFilter.setAuthenticationSuccessHandler(authenctiationSuccessHandler);
 smsCodeAuthenticationFilter.setAuthenticationFailureHandler(authenctiationFailHandler);

 SmsCodeAuthenticationProvider smsCodeAuthenticationProvider = new SmsCodeAuthenticationProvider();
 //需要将通过用户名查询用户信息的接口换成通过手机号码实现
 smsCodeAuthenticationProvider.setUserDetailsService(smsUserService);

 http.authenticationProvider(smsCodeAuthenticationProvider)
  .addFilterAfter(smsCodeAuthenticationFilter, UsernamePasswordAuthenticationFilter.class);
 }
}
5、SmsUserService
因为用户名,密码登陆最终是通过用户名查询用户信息,而手机验证码登陆是通过手机登陆,所以这里需要自己再实现一个SmsUserService
@Service
@Slf4j
public class SmsUserService implements UserDetailsService {

 @Autowired
 private UserMapper userMapper;

 @Autowired
 private RolesUserMapper rolesUserMapper;

 @Autowired
 private RolesMapper rolesMapper;

 /**
 * 手机号查询用户
 */
 @Override
 public UserDetails loadUserByUsername(String mobile) throws UsernameNotFoundException {
 log.info("手机号查询用户,手机号码 = {}",mobile);
 //TODO 这里我没有写通过手机号去查用户信息的sql,因为一开始我建user表的时候,没有建mobile字段,现在我也不想临时加上去
 //TODO 所以这里暂且写死用用户名去查询用户信息(理解就好)
 User user = userMapper.findOneByUsername("小小");
 if (user == null) {
  throw new UsernameNotFoundException("未查询到用户信息");
 }
 //获取用户关联角色信息 如果为空说明用户并未关联角色
 List<RolesUser> userList = rolesUserMapper.findAllByUid(user.getId());
 if (CollectionUtils.isEmpty(userList)) {
  return user;
 }
 //获取角色ID集合
 List<Integer> ridList = userList.stream().map(RolesUser::getRid).collect(Collectors.toList());
 List<Roles> rolesList = rolesMapper.findByIdIn(ridList);
 //插入用户角色信息
 user.setRoles(rolesList);
 return user;
 }
}
6、总结
到这里思路就很清晰了,我这里在总结下。
1、首先从获取验证的时候,就已经把当前验证码信息存到session,这个信息包含验证码和手机号码。
2、用户输入验证登陆,这里是直接写在SmsAuthenticationFilter中先校验验证码、手机号是否正确,再去查询用户信息。我们也可以拆开成用户名密码登陆那样一个
过滤器专门验证验证码和手机号是否正确,正确在走验证码登陆过滤器。3、在SmsAuthenticationFilter流程中也有关键的一步,就是用户名密码登陆是自定义UserService实现UserDetailsService后,通过用户名查询用户名信息而这里是
通过手机号查询用户信息,所以还需要自定义SmsUserService实现UserDetailsService后。
三、测试
1、获取验证码

获取验证码的手机号是 15612345678 。因为这里没有接第三方的短信SDK,只是在后台输出。
向手机号为:15612345678的用户发送验证码:254792
2、登陆
1)验证码输入不正确

发现登陆失败,同样如果手机号码输入不对也是登陆失败
2)登陆成功

当手机号码 和 短信验证码都正确的情况下 ,登陆就成功了。
参考
1、Spring Security技术栈开发企业级认证与授权(JoJo)
加载全部内容