关于react的代理配置(可配置多个代理)
牛先森家的牛奶 人气:0react的代理配置
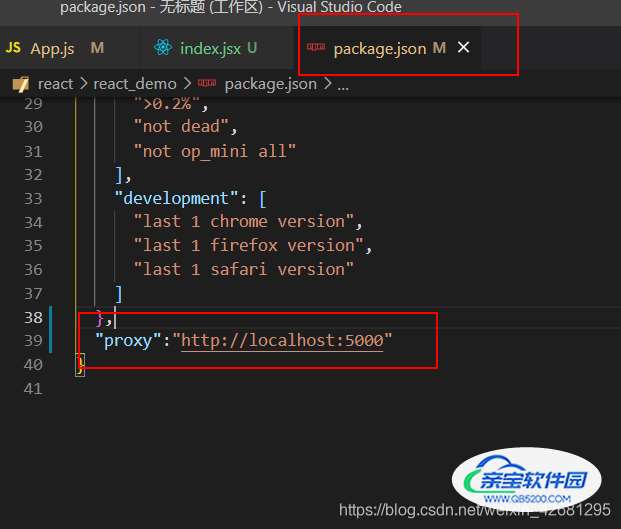
第一种写在package.json中(不推荐)

代码中使用3000的端口访问, 例如如下:
// 创建并暴露App
export default class App extends Component{
  getData = () => {
    axios.get('http://localhost:3000/api/info').then(
      response => {console.log('成功', response.data);},
      error => {console.log('失败',error);}
    )
  }
  render(){
    return (
      <div>
        <Hello></Hello>
        <Welcome></Welcome>
        <button onClick={this.getData}>点我请求数据</button>
      </div>
    )
  }
}
- 优点:配置简单,前端请求资源时可以不加任何前缀。
- 缺点:不能配置多个代理。
- 工作方式:上述方式配置代理,当请求了3000不存在的资源时,那么该请求会转发给5000 (优先匹配前端资源)
第二种 建立 setupProxy.js,注意必须是这个文件名
在src同级目录创建setupProxy.js;
注意:这个文件里面需要用commonjs写法,不能使用ES6用法,react会找到这个文件并把它添加到webpack配置中;

setupProxy.js文件中代码如下:
const proxy = require('http-proxy-middleware')

module.export = function(app){
  app.use(
    // 代理api 下面再把 /api 替换为空字符串 因为路径里面没有 /api
    proxy('/api1', {  // 遇见 /api1 前缀的请求 就会触发该代理配置
      target: 'http://localhost:5000', // 请求转发给谁
      changeOrigin: true, // 控制服务器接收到的请求头Host的值
      // 重新请求路径 把 /api1 替换为空字符串 必须加
      pathRewrite:{'^/api1' : ''}
    }),
    proxy('/api2', { // 遇见 /api2前缀的请求 就会触发该代理配置
      target: 'http://localhost:5001',
      changeOrigin: true,
      // 把api 替换为空字符串
      pathRewrite:{'^/api2' : ''}
    }),
  )
}
项目页面中调接口使用:
// 创建并暴露App
export default class App extends Component{
  getDataOne = () => {
    axios.get('http://localhost:3000/api1/info').then(
      response => {console.log('成功', response.data);},
      error => {console.log('失败',error);}
    )
  }
  getDataTwo = () => {
    axios.get('http://localhost:3000/api2/car').then(
      response => {console.log('成功', response.data);},
      error => {console.log('失败',error);}
    )
  }
  render(){
    return (
      <div>
        <Hello></Hello>
        <Welcome></Welcome>
        <button onClick={this.getDataOne}>点我请求数据1</button>
        <button onClick={this.getDataTwo}>点我请求数据2</button>
      </div>
    )
  }
}
优点:可以配置多个代理,可以灵活的控制请求是否走代理。
缺点:配置繁琐,前端请求资源时必须加前缀。
总结
以上为个人经验,希望能给大家一个参考,也希望大家多多支持。
加载全部内容