Javascript使用uploadify来实现多文件上传
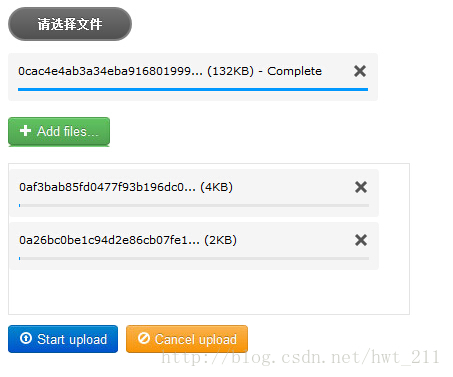
hwt_211 人气:0使用uploadify来实现文件上传能够客户端判断文件大小、控制文件上传的类型、实现多文件上传、显示进度条等功能,方便易用,兼容性较好。

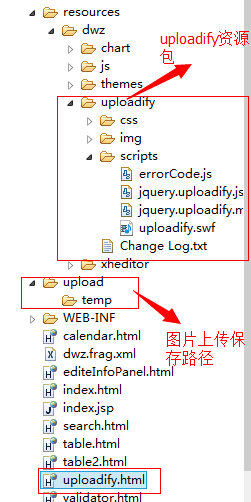
本例是把dwz中整合uploadify功能抽取出来的,可以进行单独使用,不一定要遭dwz中才能使用,本例只是为了测试,所以使用静态页面进行测试:
话不多说,代码敬上:

2,html页面的代码
<!DOCTYPE HTML PUBLIC "-//W3C//DTD HTML 4.01 Transitional//EN">
<html>
<head>
<title>MyHtml.html</title>
<meta http-equiv="content-type" content="text/html; charset=UTF-8">
<link href="resourceshttps://img.qb5200.com/download-x/dwz/uploadify/css/uploadify.css" rel="stylesheet" type="text/css" media="screen" />
<script src="resourceshttps://img.qb5200.com/download-x/dwz/js/jquery-1.7.2.js" type="text/javascript"></script>
<script src="resourceshttps://img.qb5200.com/download-x/dwz/uploadify/scripts/jquery.uploadify.js" type="text/javascript"></script>
 <script src="resourceshttps://img.qb5200.com/download-x/dwz/uploadify/scripts/errorCode.js" type="text/javascript"></script>
<!--<link rel="stylesheet" type="text/css" href="./styles.css">-->
<style type="text/css" media="screen">
.my-uploadify-button {
  background: none;
  border: none;
  text-shadow: none;
  border-radius: 0;
}

.uploadify:hover .my-uploadify-button {
  background: none;
  border: none;
}

.fileQueue {
  width: 400px;
  height: 150px;
  overflow: auto;
  border: 1px solid #E5E5E5;
  margin-bottom: 10px;
}
</style>
<script type="text/javascript">
  $(function(){
    $('#testFileInput').uploadify({
      swf:'resourceshttps://img.qb5200.com/download-x/dwz/uploadify/scripts/uploadify.swf',
      uploader:'servlet/uploadify.do',//上传的url
      formData:{PHPSESSID:'xxx', ajax:1},
      buttonText:'请选择文件',
      fileSizeLimit:'200KB',//设置上传大小
      fileTypeDesc:'*.jpg;*.jpeg;*.gif;*.png;',
      fileTypeExts:'*.jpg;*.jpeg;*.gif;*.png;',//允许的后缀
      auto:true,//是否自动上传
      multi:true,
      overrideEvents: ['onDialogClose', 'onUploadError', 'onSelectError' ],//重新错误信息的显示方法
      onSelectError: uploadify_onSelectError,
      onUploadError: uploadify_onUploadError,
      onUploadSuccess: uploadify_onUploadSuccess
    });

  $('#testFileInput2').uploadify({
      swf:'resourceshttps://img.qb5200.com/download-x/dwz/uploadify/scripts/uploadify.swf',
      uploader:'servlet/uploadify.do',
      formData:{PHPSESSID:'xxx', ajax:1},
      queueID:'fileQueue',
      buttonImage:'resourceshttps://img.qb5200.com/download-x/dwz/uploadify/img/add.jpg',
      buttonClass:'my-uploadify-button',
      width:102,
      auto:false,
      fileSizeLimit:'100KB',
      fileTypeDesc:'*.jpg;*.jpeg;*.gif;*.png;',
      fileTypeExts:'*.jpg;*.jpeg;*.gif;*.png;',
      overrideEvents: [ 'onDialogClose','onUploadError', 'onSelectError' ],
      onSelectError: uploadify_onSelectError,
      onUploadError: uploadify_onUploadError,
      onUploadSuccess: uploadify_onUploadSuccess
    });
  });

</script>
</head>

<body>
    <!-- 单文件上传 -->
    <input id="testFileInput" type="file" name="image" />
    <div class="divider"></div>
    <!-- 多文件上传 -->
    <input id="testFileInput2" type="file" name="image2" />
    <div id="fileQueue" class="fileQueue"></div>
    <input type="image" src="resourceshttps://img.qb5200.com/download-x/dwz/uploadify/img/upload.jpg" onclick="$('#testFileInput2').uploadify('upload', '*');" />
    <input type="image" src="resourceshttps://img.qb5200.com/download-x/dwz/uploadify/img/cancel.jpg" onclick="$('#testFileInput2').uploadify('cancel', '*');" />
</body>
</html>
3,上传的servlet代码
package uploadFile;

import java.io.File;
import java.io.IOException;
import java.util.Iterator;
import java.util.List;

import javax.servlet.ServletException;
import javax.servlet.http.HttpServlet;
import javax.servlet.http.HttpServletRequest;
import javax.servlet.http.HttpServletResponse;

import org.apache.commons.fileupload.FileItem;
import org.apache.commons.fileupload.FileUploadException;
import org.apache.commons.fileupload.disk.DiskFileItemFactory;
import org.apache.commons.fileupload.servlet.ServletFileUpload;

public class UploadFile extends HttpServlet {

  @Override
  protected void service(HttpServletRequest request, HttpServletResponse response)
      throws ServletException, IOException {
    super.service(request, response);
  }


  @Override
  protected void doPost(HttpServletRequest req, HttpServletResponse resp)
      throws ServletException, IOException {
    //临时目录
    String basePath = req.getServletContext().getRealPath("upload");
    String tempDir = "temp";

    File tempFile = new File(basePath + File.separator +tempDir);
    if (!tempFile.exists()) {
      tempFile.mkdir();
    }

    DiskFileItemFactory dfc = new DiskFileItemFactory();
    dfc.setSizeThreshold(1*1024*1024);//设置临界值
    dfc.setRepository(tempFile);//设置临时上传目录

    ServletFileUpload upload = new ServletFileUpload(dfc);
    upload.setHeaderEncoding("UTF-8");//设置编码
    // 设置文件最大值,这里设置5Mb,5*1024*1024;
    upload.setSizeMax(5 * 1024 * 1024);

    try {
      List fileList = upload.parseRequest(req);
      Iterator<FileItem> iterator = fileList.iterator();
      while (iterator.hasNext()) {
        FileItem item = iterator.next();
        String fileName = item.getName();//得到文件名
        if (fileName != null) {
        //System.out.println(fileName);
        //System.out.println(item.getSize());
        File sourceFile = new File(basePath+File.separator+fileName);
        item.write(sourceFile);
        }
      }
    } catch (FileUploadException e) {
      e.printStackTrace();
    } catch (Exception e) {
      e.printStackTrace();
    }

    //resp.getWriter().print("上传成功!");
  }


  @Override
  protected void doGet(HttpServletRequest req, HttpServletResponse resp)
      throws ServletException, IOException {
    super.doPost(req, resp);
  }
}
4,web.xml配置
<servlet>
 <servlet-name>upLoadify</servlet-name>
 <servlet-class>uploadFile.UploadFile</servlet-class>
</servlet>
<servlet-mapping>
 <servlet-name>upLoadify</servlet-name>
 <url-pattern>/servlet/uploadify.do</url-pattern>
</servlet-mapping>
5,uploadify的提示信息是英文的,为了显示中文的提示信息,将其错误提示方法进行重新,新建errorCode.js放入在resourcehttps://img.qb5200.com/download-x/dwz/uploadify/scripts文件夹下面,并在页面进行导入这个js,js代码如下:
var uploadify_onSelectError = function(file, errorCode, errorMsg) {
    var msgText = "上传失败\n";
    switch (errorCode) {
      case SWFUpload.QUEUE_ERROR.QUEUE_LIMIT_EXCEEDED:
        //this.queueData.errorMsg = "每次最多上传 " + this.settings.queueSizeLimit + "个文件";
        msgText += "每次最多上传 " + this.settings.queueSizeLimit + "个文件";
        break;
      case SWFUpload.QUEUE_ERROR.FILE_EXCEEDS_SIZE_LIMIT:
        msgText += "文件大小超过限制( " + this.settings.fileSizeLimit + " )";
        break;
      case SWFUpload.QUEUE_ERROR.ZERO_BYTE_FILE:
        msgText += "文件大小为0";
        break;
      case SWFUpload.QUEUE_ERROR.INVALID_FILETYPE:
        msgText += "文件格式不正确,仅限 " + this.settings.fileTypeExts;
        break;
      default:
        msgText += "错误代码:" + errorCode + "\n" + errorMsg;
    }
    alert(msgText);
  };

var uploadify_onUploadError = function(file, errorCode, errorMsg, errorString) {
    // 手工取消不弹出提示
    if (errorCode == SWFUpload.UPLOAD_ERROR.FILE_CANCELLED
        || errorCode == SWFUpload.UPLOAD_ERROR.UPLOAD_STOPPED) {
      return;
    }
    var msgText = "上传失败\n";
    switch (errorCode) {
      case SWFUpload.UPLOAD_ERROR.HTTP_ERROR:
        msgText += "HTTP 错误\n" + errorMsg;
        break;
      case SWFUpload.UPLOAD_ERROR.MISSING_UPLOAD_URL:
        msgText += "上传文件丢失,请重新上传";
        break;
      case SWFUpload.UPLOAD_ERROR.IO_ERROR:
        msgText += "IO错误";
        break;
      case SWFUpload.UPLOAD_ERROR.SECURITY_ERROR:
        msgText += "安全性错误\n" + errorMsg;
        break;
      case SWFUpload.UPLOAD_ERROR.UPLOAD_LIMIT_EXCEEDED:
        msgText += "每次最多上传 " + this.settings.uploadLimit + "个";
        break;
      case SWFUpload.UPLOAD_ERROR.UPLOAD_FAILED:
        msgText += errorMsg;
        break;
      case SWFUpload.UPLOAD_ERROR.SPECIFIED_FILE_ID_NOT_FOUND:
        msgText += "找不到指定文件,请重新操作";
        break;
      case SWFUpload.UPLOAD_ERROR.FILE_VALIDATION_FAILED:
        msgText += "参数错误";
        break;
      default:
        msgText += "文件:" + file.name + "\n错误码:" + errorCode + "\n"
            + errorMsg + "\n" + errorString;
    }
    alert(msgText);
  }
  // return parameters;
//}


var uploadify_onUploadSuccess = function(file, data, response) {
  alert(file.name + "\n\n上传成功");
};
收工!
原文链接:http://blog.csdn.net/hwt_211/articlehttps://img.qb5200.com/download-x/details/36888763
加载全部内容