第一次接触神奇的Bootstrap基础排版
smartbetter 人气:0Bootstrap是Twitter推出的一个简单灵活的,基于HTML5和CSS3的用于搭建WEB前端页面的html、css、javascript工具集。拥有友好的学习曲线,卓越的兼容性,响应式设计,12列格网,样式向导文档,自定义JQuery插件,完整的类库,基于Less等特点。Bootstrap让Web开发更迅速、更简单。
1.Bootstrap下载
官网:http://getbootstrap.com/;新手入门:http://getbootstrap.com/getting-started/
我们可以在官网下载到Bootstrap,Bootstrap的源码,如果不想下载,还可以使用Bootstrap提供的CDN。
2.Bootstrap文件结构
bootstrap/
├── css/
│ ├── bootstrap.css
│ ├── bootstrap.css.map
│ ├── bootstrap.min.css
│ ├── bootstrap.min.css.map
│ ├── bootstrap-theme.css
│ ├── bootstrap-theme.css.map
│ ├── bootstrap-theme.min.css
│ └── bootstrap-theme.min.css.map
├── js/
│ ├── bootstrap.js
│ └── bootstrap.min.js
└── fonts/
├── glyphicons-halflings-regular.eot
├── glyphicons-halflings-regular.svg
├── glyphicons-halflings-regular.ttf
├── glyphicons-halflings-regular.woff
└── glyphicons-halflings-regular.woff2
3.Bootstrap的HTML标准模板
<!DOCTYPE html>
<html lang="en">
 <head>
 <meta charset="utf-8">
 <!-- 在IE运行最新的渲染模式 -->
 <meta http-equiv="X-UA-Compatible" content="IE=edge">
 <!-- 初始化移动浏览显示,width=device-width宽度等于移动设备的宽度,initial-scale=1设置缩放比例 -->
 <meta name="viewport" content="width=device-width, initial-scale=1">
 <title>Bootstrap的HTML标准模板</title>
 <!-- 引入Bootstrap的核心CSS -->
 <link rel="stylesheet" href="http://netdna.bootstrapcdn.com/bootstrap/3.1.1/css/bootstrap.min.css">
 <!-- 你自己的样式文件 -->
 <link href="css/your-style.css" rel="stylesheet">
 <!-- 以下两个插件用于在IE8以及以下版本浏览器支持HTML5元素和媒体查询,如果不需要用可以移除 -->
 <!--[if lt IE 9]>
 <script src="https://oss.maxcdn.com/libs/html5shiv/3.7.0/html5shiv.js"></script>
 <script src="https://oss.maxcdn.com/libs/respond.js/1.4.2/respond.min.js"></script>
 <![endif]-->
 </head>
 <body>
 <h1>Hello, world!</h1>
 <!-- 放置在文档的结尾,使页面加载速度更快 -->
 <!-- 如果要使用Bootstrap的js插件,必须先调入jQuery -->
 <script src="http://libs.baidu.com/jquery/1.9.0/jquery.min.js"></script>
 <!-- 包括所有bootstrap的js插件或者可以根据需要使用的js插件调用 -->
 <script src="http://maxcdn.bootstrapcdn.com/bootstrap/3.2.0/js/bootstrap.min.js"></script>
 </body>
</html>
4.Bootstrap的标题
和普通的HTML页面一样,Bootstrap定义标题也是使用标签h1到h6,只不过Bootstrap覆盖了其默认的样式,使其在所有浏览器下显示的效果是一样的,定义的具体规则如下表所示:

<!--Bootstrap中的标题-->
<h1>标题一</h1>
<h2>标题二</h2>
<!--Bootstrap中使用了<small>标签来制作副标题-->
<h1>标题一<small>副标题</small></h1>
<h2>标题二<small>副标题</small></h2>

<!--Bootstrap中让非标题元素和标题使用相同的样式-->
<div class="h1">标题一</div>
<div class="h2">标题二</div>
<div class="h3">标题三</div>
注意:副标题行高都是1,font-weight不加粗,颜色为灰色(#999);h1~h3的副标题,大小为标题的65%,h4~h6的副标题,大小为标题的75%;详细代码请参阅bootstrap.css文件中第407行~第443行。
5.Bootstrap的内容
1)强调内容
在实际项目中,对于一些重要的文本,希望突出强调的部分都会做另外的样式处理。Bootstrap同样对这部分做了一些轻量级的处理。
通过添加类名“.lead”让一个段落p突出显示,其作用就是增大文本字号,加粗文本,而且对行高和margin也做相应的处理。用法如下:
<p>普通文本</p>
<p class="lead">强调文本</p>
2)通过颜色来表示强调

例如:
<!--下面普通文本为褐色-->
<p class="text-danger">普通文本</p>
3)粗体和斜体
粗体使用b标签或strong标签来实现;斜体使用em标签或i标签来实现。
<!--粗体-->
<p>普通文本<b>粗体</b>普通文本</p>
<p>普通文本<strong>粗体</strong>普通文本</p>

<!--斜体-->
<p>普通文本<em>斜体</em>普通文本</p>
<p>普通文本<i>斜体</i>普通文本</p>
4)文本对齐
Bootstrap通过定义四个类名来控制文本的对齐风格:
<p class="text-left">我居左</p>
<p class="text-center">我居中</p>
<p class="text-right">我居右</p>
<p class="text-justify">我两端对齐</p>
6.Bootstrap的列表
Bootstrap根据平时的使用情形提供了六种形式的列表:普通列表、有序列表、去点列表、内联列表、定义列表、水平定义列表。
1)普通列表
<!--普通列表-->
<ul>
 <li>普通列表1</li>
 <li>普通列表2</li>
</ul>
2)有序列表
<!--有序列表-->
<ol>
 <li>有序列表1</li>
 <li>有序列表2</li>
</ol>
<!--有序列表嵌套-->
<ol>
 <li>有序列表1</li>
 <li>有序列表2
 <ol>
 <li>有序列表2.1</li>
 <li>有序列表2.2</li>
 </ol>
 </li>
 <li>有序列表3</li>
</ol>
3)去点列表
给无序列表添加一个类名“.list-unstyled”,这样就可以去除默认的列表样式的风格。
<ol class="list-unstyled">
 <li>有序列表1</li>
 <li>有序列表2</li>
</ol>
4)内联列表(为制作水平导航而生)
像去点列表一样,通过添加类名“.list-inline”来实现内联列表,把垂直列表换成水平列表,而且去掉项目符号(编号),保持水平显示。
<ul class="list-inline">
 <li>导航栏条目1</li>
 <li>导航栏条目2</li>
</ul>
5)定义列表
Bootstrap定义列表只是调整了行间距,外边距和字体加粗效果。
<dl>
 <dt>北京<https://img.qb5200.com/download-x/dt>
 <dd>中国的首都。<https://img.qb5200.com/download-x/dd>
 <dt>上海<https://img.qb5200.com/download-x/dt>
 <dd>国家中心城市,超大城市。<https://img.qb5200.com/download-x/dd>
<https://img.qb5200.com/download-x/dl>
6)水平定义列表
水平定义列表就像内联列表一样,Bootstrap可以给dl标签添加类名“.dl-horizontal”给定义列表实现水平显示效果。
<dl class="dl-horizontal">
 <dt>北京<https://img.qb5200.com/download-x/dt>
 <dd>中国的首都。<https://img.qb5200.com/download-x/dd>
 <dt>上海<https://img.qb5200.com/download-x/dt>
 <dd>国家中心城市,超大城市。<https://img.qb5200.com/download-x/dd>
<https://img.qb5200.com/download-x/dl>
7.Bootstrap的表格
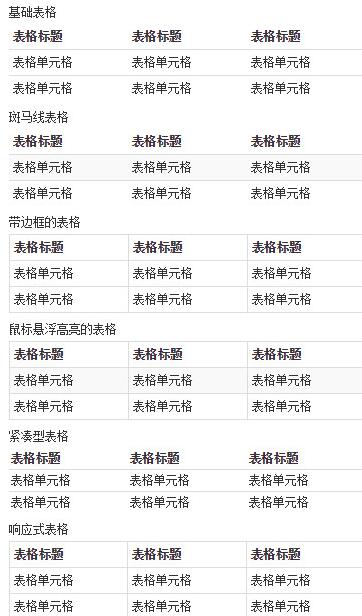
Bootstrap为表格提供了1种基础样式和4种附加样式以及1个支持响应式的表格。具体如下:
<!DOCTYPE HTML>
<html>
<head>
 <meta charset="utf-8">
 <title>基础表格</title>
 <link rel="stylesheet" href="http://netdna.bootstrapcdn.com/bootstrap/3.1.1/css/bootstrap.min.css">
</head>
<body>
 <h3>基础表格</h3>
 <!-- 主要源码查看bootstrap.css文件第1402行~第1441行 -->
 <table class="table">
 <thead>
 <tr><th>表格标题</th><th>表格标题</th><th>表格标题</th></tr>
 </thead>
 <tbody>
 <tr><td>表格单元格</td><td>表格单元格</td><td>表格单元格</td></tr>
 <tr><td>表格单元格</td><td>表格单元格</td><td>表格单元格</td></tr>
 </tbody>
 </table>

 <h3>斑马线表格</h3>
 <!-- 主要源码查看bootstrap.css文件第1465行~第1468行 -->
 <table class="table table-striped">
 <thead>
 <tr><th>表格标题</th><th>表格标题</th><th>表格标题</th></tr>
 </thead>
 <tbody>
 <tr><td>表格单元格</td><td>表格单元格</td><td>表格单元格</td></tr>
 <tr><td>表格单元格</td><td>表格单元格</td><td>表格单元格</td></tr>
 </tbody>
 </table>

 <h3>带边框的表格</h3>
 <!-- 主要源码查看bootstrap.css文件第1450行~第1464行 -->
 <table class="table table-bordered">
 <thead>
 <tr><th>表格标题</th><th>表格标题</th><th>表格标题</th></tr>
 </thead>
 <tbody>
 <tr><td>表格单元格</td><td>表格单元格</td><td>表格单元格</td></tr>
 <tr><td>表格单元格</td><td>表格单元格</td><td>表格单元格</td></tr>
 </tbody>
 </table>

 <h3>鼠标悬浮高亮的表格</h3>
 <!-- 主要源码查看bootstrap.css文件第1469行~第1472行 -->
 <table class="table table-striped table-bordered table-hover">
 <thead>
 <tr><th>表格标题</th><th>表格标题</th><th>表格标题</th></tr>
 </thead>
 <tbody>
 <tr><td>表格单元格</td><td>表格单元格</td><td>表格单元格</td></tr>
 <tr><td>表格单元格</td><td>表格单元格</td><td>表格单元格</td></tr>
 </tbody>
 </table>

 <h3>紧凑型表格</h3>
 <!-- 主要源码查看bootstrap.css文件第1442行~第1449行 -->
 <table class="table table-condensed">
 <thead>
 <tr><th>表格标题</th><th>表格标题</th><th>表格标题</th></tr>
 </thead>
 <tbody>
 <tr><td>表格单元格</td><td>表格单元格</td><td>表格单元格</td></tr>
 <tr><td>表格单元格</td><td>表格单元格</td><td>表格单元格</td></tr>
 </tbody>
 </table>

 <h3>响应式表格</h3>
 <!-- Bootstrap提供了一个类名为.table-responsive的容器,置于此容器的表格就具有响应式效果 -->
 <div class="table-responsive">
 <table class="table table-bordered">
 <thead>
 <tr><th>表格标题</th><th>表格标题</th><th>表格标题</th></tr>
 </thead>
 <tbody>
 <tr><td>表格单元格</td><td>表格单元格</td><td>表格单元格</td></tr>
 <tr><td>表格单元格</td><td>表格单元格</td><td>表格单元格</td></tr>
 </tbody>
 </table>
 </div>
</body>
</html>
这部分代码包含了Bootstrap常用的表格,效果图如下所示:

Bootstrap还为表格的行元素tr提供了五种不同的类名(对应的源码,请查看bootstrap.css文件中第1484行~第1583行),每种类名控制了行的不同背景颜色,具体说明如下表所示:

其使用非常的简单,只需要在元素中添加上表对应的类名,就能达到效果:
<tr class="active"><td>…</td></tr>
注意:
1.要实现悬浮状态,需要在<table>标签上加入table-hover类。
2.除了”.active”之外,其他四个类名和”.table-hover”配合使用时,Bootstrap针对这几种样式也做了相应的悬浮状态的样式设置,所以如果需要给tr元素添加其他颜色样式时,在”.table-hover”表格中也要做相应的调整。
如果大家还想深入学习,可以点击这里进行学习,再为大家附两个精彩的专题:Bootstrap学习教程 Bootstrap实战教程
系列文章:
加载全部内容