Bootstrap前端开发案例一
rongyux 人气:0现在很多公司开发中都在使用bootstrap这个框架,bootstrap是Twitter公司的一个团队的作品,大大简化了我们的前端的开发。(后面会总结一些less的使用)
学习使用API我建议直接查看官网的API,地址:http://www.bootcss.com/
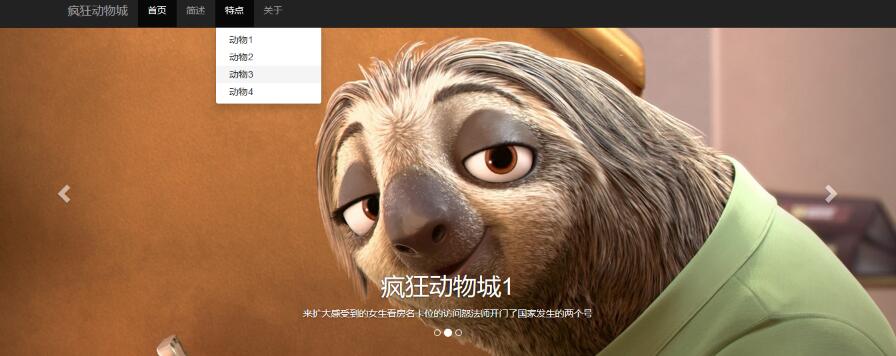
下面是部分目标效果图:

下面我就总结一个小Demo中的技巧和原理:
第一步、http://www.bootcss.com/下载bootstrap的压缩包,新建index.html,使用sublime或其它编辑器打开index页面,解压后目录是

第二步、拷贝官网http://v3.bootcss.com/getting-started/的一个基本模板,方便后续的开发,
<!DOCTYPE html>
<html lang="zh-CN">
 <head>
 <meta charset="utf-8">
 <meta http-equiv="X-UA-Compatible" content="IE=edge">
 <meta name="viewport" content="width=device-width, initial-scale=1">
 <!-- 上述3个meta标签*必须*放在最前面,任何其他内容都*必须*跟随其后! -->
 <title>Bootstrap 101 Template</title>

 <!-- Bootstrap -->
 <link href="css/bootstrap.min.css" rel="stylesheet">

 <!-- HTML5 shim and Respond.js for IE8 support of HTML5 elements and media queries -->
 <!-- WARNING: Respond.js doesn't work if you view the page via file:// -->
 <!--[if lt IE 9]>
 <script src="//cdn.bootcss.com/html5shiv/3.7.2/html5shiv.min.js"></script>
 <script src="//cdn.bootcss.com/respond.js/1.4.2/respond.min.js"></script>
 <![endif]-->
 </head>
 <body>
 <h1>你好,世界!</h1>

 <!-- jQuery (necessary for Bootstrap's JavaScript plugins) -->
 <script src="//cdn.bootcss.com/jquery/1.11.3/jquery.min.js"></script>
 <!-- Include all compiled plugins (below), or include individual files as needed -->
 <script src="js/bootstrap.min.js"></script>
 </body>
</html>
1)、注意:jquery.js的引用一定要在bootstrap.min.js的前面,并且最好手动下载一个jquery.js,放在js路径下,<script src="js/jquery.min.js"></script>
因为后来我在仿真的时候发现下拉和carousel的动画效果都没有了,发现基本模板的jquery文件是下载的,可能没有联网,所以没有下载下来,最好自己引用本地。
2)、注意:css引用放页面上方,js引用放页面下方,因为css需要先加载渲染页面,而js需要在页面渲染完毕后加载执行;并且适应移动设备的meta语句:<meta name="viewport" content="width=device-width, initial-scale=1">
第三步、导航条
1)居中效果:container-fluent需要改成container
2)白色改成反差效果的黑色: <nav class="navbar navbar-default navbar-inverse">
3)导航条固定到顶部,增加时类属性: navbar-fixed-top
 <nav class="navbar navbar-default navbar-fixed-top navbar-inverse ">
 <div class="container">
 <!-- Brand and toggle get grouped for better mobile display -->
 <div class="navbar-header">
 <button type="button" class="navbar-toggle collapsed" data-toggle="collapse" data-target="#bs-example-navbar-collapse-1" aria-expanded="false">
 <span class="sr-only">Toggle navigation</span>
 <span class="icon-bar"></span>
 <span class="icon-bar"></span>
 <span class="icon-bar"></span>
 </button>
 <a class="navbar-brand" href="#">疯狂动物城</a>
 </div>

 <!-- Collect the nav links, forms, and other content for toggling -->
 <div class="collapse navbar-collapse" id="bs-example-navbar-collapse-1">
 <ul class="nav navbar-nav">
 <li class="active"><a href="#">首页 <span class="sr-only">(current)</span></a></li>
 <li><a href="#">简述</a></li>
 <li><a href="#">特点</a></li>
 <li><a href="#">关于</a></li>

 </div><!-- /.navbar-collapse -->
 </div><!-- /.container-fluid -->
 </nav>
4)导航条会遮盖body的顶部,所以增加样式
<style type="text/css">
 body{
 padding-top: 50px;
 }
 </style>
5)特点的导航项目增加下拉菜单
<li class="dropdown"><a href="#" class="dropdown-toggle" data-toggle="dropdown">特点</a>
 <ul class="dropdown-menu">
 <li><a href="#">动物1</a></li>
 <li><a href="#">动物2</a></li>
 <li><a href="#">动物3</a></li>
 <li><a href="#">动物4</a></li>
 </ul>
 </li>
注意,子菜单的内容均嵌套在最外层的li标签里,并且li标签有类 dropdown,子菜单也是一个ul标签,类为dropdown-menu,具体映射关系见上面。
第四步、增加轮转效果,复制修改bootstrap组件的carousel模块:
<div id="carousel-example-generic" class="carousel slide" data-ride="carousel">
 <!-- Indicators -->
 <ol class="carousel-indicators">
 <li data-target="#carousel-example-generic" data-slide-to="0" class="active"></li>
 <li data-target="#carousel-example-generic" data-slide-to="1"></li>
 <li data-target="#carousel-example-generic" data-slide-to="2"></li>
 </ol>

 <!-- Wrapper for slides -->
 <div class="carousel-inner" role="listbox">
 <div class="item active">
 <img src="image/1.jpg" alt="...">
 <div class="carousel-caption">
 <h1>疯狂动物城1</h1>
 <p>来扩大感受到的女生看房名卡位的访问怒法师开门了国家发生的两个号</p>
 </div>
 </div>
 <div class="item">
 <img src="image/2.jpg" alt="...">
 <div class="carousel-caption">
 <h1>疯狂动物城1</h1>     <p>来扩大感受到的女生看房名卡位的访问怒法师开门了国家发生的两个号</p>
 </div>
 </div>
 <div class="item">
 <img src="image/3.jpg" alt="...">
 <div class="carousel-caption">
 <h1>疯狂动物城1</h1>     <p>来扩大感受到的女生看房名卡位的访问怒法师开门了国家发生的两个号</p>
 </div>
 </div>
 </div>

 <!-- Controls -->
 <a class="left carousel-control" href="#carousel-example-generic" role="button" data-slide="prev">
 <span class="glyphicon glyphicon-chevron-left" aria-hidden="true"></span>
 <span class="sr-only">上一页</span>
 </a>
 <a class="right carousel-control" href="#carousel-example-generic" role="button" data-slide="next">
 <span class="glyphicon glyphicon-chevron-right" aria-hidden="true"></span>
 <span class="sr-only">下一页</span>
 </a>
 </div>
1)为了轮转图片的时候没有留白或间隙,增加样式
 .carousel{
 height: 500px;
 background-color: #000;
 }

 .carousel .item{
 height: 500px;
 background-color: #000;
 } .carousel img{ width: 100%; }
2)为了文字设置样式,更加美观
 .casousel-caption p{
 margin-bottom: 20px;
 font-size: 20px;
 line-height: 1.8;
 }
目前的效果如下

咱们继续:(打码更新中。。。)
第二部分更新了,在基于bootstrap的前端开发案例Demo(二)
以上就是本文的全部内容,希望对大家的学习有所帮助,也希望大家多多支持。
如果大家还想深入学习,可以点击这里进行学习,再为大家附一个精彩的专题:Bootstrap学习教程
加载全部内容