基于Jquery插件Uploadify实现实时显示进度条上传图片
XuebinDing 人气:2先了解了解Uploadify,具体内容如下
Uploadify是一个简单易用的多文件上传方案。作为一个Jquery插件,Uploadify使用简单,并具有高度的定制性。
Uploadify特性:

Uploadify简单说来,是基于Jquery的一款文件上传插件。它的功能特色总结如下:
1)、支持单文件或多文件上传,可控制并发上传的文件数
2)、在服务器端支持各种语言与之配合使用,诸如PHP,.NET,Java……
3)、通过参数可配置上传文件类型及大小限制
4)、通过参数可配置是否选择文件后自动上传
5)、易于扩展,可控制每一步骤的回调函数(onSelect, onCancel……)
6)、通过接口参数和CSS控制外观
7)、提供上传进度的事件回调,实时显示上传进度
8)、开始之前要先下载插件安装包到本地并引用,详细实现请看代码注释,下面开始代码。
1、html代码
<div id="webApplogo_file" style="display: block; width: 800px; background-color: #fff;">
  <ul>
  <li style="margin-left: 213px;"><span class="black_blod14">LOGO图标:</span></li>
  <li style="margin-left: 3px;">
   <input type="text" readonly="readonly" id="text_webApplogo" name="app_logo" class="appipt1" value="<%=applogo %>" /></li>
  <li style="padding-top: 1px;">
   <input type="file" id="webApplogo" name="webApplogo" />
  </li>
  <li><span style="display: none; margin-left: 5px; padding-left: 20px; color: #EA5200;
   font-size: 12px; background: url('Images/icon_03.gif' ) no-repeat 0px 0px;" id="textporApplogo">
   请上传LOGO图标!</span></li>
  <li style="margin-left: 220px;"><span class="grey999" style="margin-left: 90px; float: left;">
   尺寸72px*72px,png格式,建议使用 图标PSD模板 制作</span>
   <div id="QID_webApplogo" class="fileQueue"></div>
   <table id="webApplogo_tab" width="50%" border="0" cellspacing="0" cellpadding="0"
   align="center" class="grey999" style="display: none; margin-left: 90px; float: left;">
   <tr>
    <td align="center" valign="bottom">
    <img style="width: 64px; height: 64px;" id="img_64" src="images/icon_02.gif" border="0" /><br />
    (64*64)
    </td>
    <td align="center" valign="bottom">
    <img style="width: 48px; height: 48px;" id="img_48" src="images/icon_02.gif" border="0" /><br />
    (48*48)
    </td>
    <td align="center" valign="bottom">
    <img style="width: 32px; height: 32px;" id="img_32" src="images/icon_02.gif" border="0" /><br />
    (32*32)
    </td>
    <td align="center" valign="bottom">
    <img style="width: 16px; height: 16px;" id="img_16" src="images/icon_02.gif" border="0" /><br />
    (16*16)
    </td>
   </tr>
   </table>
  </li>
  </ul>
 </div>
2、Javascript代码(关键部分)
$("#webApplogo").uploadify({
  'uploader': 'js/uploadify-v2.1.4/uploadify.swf',//进度条,Uploadify里面含有
  'script': 'UploadApplogo.ashx',//一般处理程序
  'cancelImg': 'js/uploadify-v2.1.4/cancel.png',//取消图片路径
  'folder': 'Imagelogo',//上传文件夹名
  'auto': true, //文件添加到上传队列后,自动进行上传。默认为false
  'multi': false,//是否允许多文件上传。默认为false
  'fileExt':'*.gif;*.jpg;*.jpeg;*.png',//允许上传的文件类型,使用分号(”;)”分割 例如:*.jpg;*.gif,默认为null(所有文件类型)
  'fileDesc':'不超过2M的图片 (*.gif;*.jpg;*.png)',
  'sizeLimit': 2048000, //允许上传的文件大小(kb) 此为2M
  'onSelectOnce': function(event,data) { //在单文件或多文件上传时,选择文件时触发
  //event 事件对象(the event object)
  /https://img.qb5200.com/download-x/data 选择的操作信息
  /https://img.qb5200.com/download-x/data.filesSelected 选择文件操作中选中的文件数量
  $('#status-message').text(data.filesSelected + ' 文件正在等待上传…….');
  },
  'onComplete': function(event, queueID, fileObj, response, data) {//当单个文件上传完成后触发
  //event:事件对象(the event object)
  //ID:该文件在文件队列中的唯一表示
  //fileObj:选中文件的对象,他包含的属性列表
  //response:服务器端返回的Response文本,我这里返回的是处理过的文件名称
  /https://img.qb5200.com/download-x/data:文件队列详细信息和文件上传的一般数据

  alert("文件:" + fileObj.name + " 上传成功!");
  //设置图片名称
  $("#applogo").attr("value",response);
  //设置输入框的值
  $("#text_webApplogo").attr("value",fileObj.name);
  //设置图片路径
  $("#img_64").attr("src","Imagelogo/64_"+response);
  $("#img_48").attr("src","Imagelogo/48_"+response);
  $("#img_32").attr("src","Imagelogo/32_"+response);
  $("#img_16").attr("src","Imagelogo/16_"+response);
  //图片路径设置完成后,显示图片
  $("#webApplogo_tab").css("display","block");
  },
  'onError': function(event, queueID, fileObj) {//当单个文件上传出错时触发
  alert("文件:" + fileObj.name + " 上传失败!");
  },
  'buttonImg':'Images/bn_04.gif',//浏览按钮的图片路径
  'width':60,//浏览按钮的宽和高
  'height':24
  ,'queueID':'QID_webApplogo'//页面上作为文件上传队列的元素的ID
 });
3、服务器端处理文件上传
/// <summary>
 /// 上传文件
 /// </summary>
 public class UploadApplogo : IHttpHandler
 {
 System.Drawing.Image image, image64, image48, image32, image16; //定义image类的对象
 protected string imagePath;//图片路径
 protected string imageType;//图片类型
 protected string imageName;//图片名称
 protected string fileName;//图片名称
 //提供一个回调方法,用于确定Image对象在执行生成缩略图操作时何时提前取消执行
 //如果此方法确定 GetThumbnailImage 方法应提前停止执行,则返回 true;否则返回 false
 System.Drawing.Image.GetThumbnailImageAbort callb = null;

 public void ProcessRequest(HttpContext context)
 {
  context.Response.ContentType = "text/plain";
  HttpPostedFile UploadImage = context.Request.Files["FileData"];
  //物理路径
  string uploadpath = HttpContext.Current.Server.MapPath(context.Request["folder"] + "\\");

  if (UploadImage != null)
  {
  //是否有目录,如没有就创建
  if (!Directory.Exists(uploadpath))
  {
   Directory.CreateDirectory(uploadpath);
  }
  //客户端文件完全名称
  string filename = UploadImage.FileName;
  string extname = filename.Substring(filename.LastIndexOf(".") + 1);
  //为不重复,设置文件名
  fileName = Guid.NewGuid().ToString() + "." + extname;

  //context.Response.Write("1");
  context.Response.Write(fileName);
  }
  else
  {
  context.Response.Write("0");
  }

  string mPath;

  imagePath = UploadImage.FileName;
  //取得图片类型
  imageType = imagePath.Substring(imagePath.LastIndexOf(".") + 1);
  //取得图片名称
  imageName = imagePath.Substring(imagePath.LastIndexOf("\\") + 1);
  Stream imgStream = UploadImage.InputStream;//流文件,准备读取上载文件的内容
  int imgLen = UploadImage.ContentLength;//上载文件大小

  //建立虚拟路径
  mPath = HttpContext.Current.Server.MapPath(context.Request["folder"]);
  //保存到虚拟路径
  UploadImage.SaveAs(mPath + "\\" + fileName);
  ////显示原图
  //imageSource.ImageUrl = "upFile/" + imageName;
  //为上传的图片建立引用
  image = System.Drawing.Image.FromFile(mPath + "\\" + fileName);

  //生成缩略图
  image64 = image.GetThumbnailImage(64, 64, callb, new System.IntPtr());
  //把缩略图保存到指定的虚拟路径
  image64.Save(HttpContext.Current.Server.MapPath(context.Request["folder"]) + "\\64_" + fileName);
  //释放image64对象的资源
  image64.Dispose();

  //生成缩略图
  image48 = image.GetThumbnailImage(48, 48, callb, new System.IntPtr());
  image48.Save(HttpContext.Current.Server.MapPath(context.Request["folder"]) + "\\48_" + fileName);
  image48.Dispose();

  //生成缩略图
  image32 = image.GetThumbnailImage(32, 32, callb, new System.IntPtr());
  image32.Save(HttpContext.Current.Server.MapPath(context.Request["folder"]) + "\\32_" + fileName);
  image32.Dispose();

  //生成缩略图
  image16 = image.GetThumbnailImage(16, 16, callb, new System.IntPtr());
  image16.Save(HttpContext.Current.Server.MapPath(context.Request["folder"]) + "\\16_" + fileName);
  image16.Dispose();

  //释放image对象占用的资源
  image.Dispose();
 }

 public bool IsReusable
 {
  get
  {
  return false;
  }
 }
 }
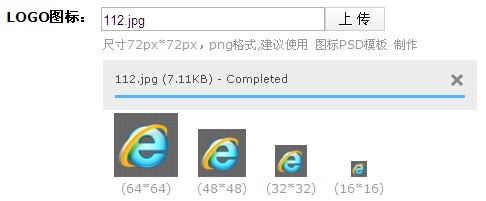
4、效果如下

更多精彩内容,请点击《jQuery上传操作汇总》,进行深入学习和研究。
以上就是本文的全部内容,希望对大家的学习有所帮助。
加载全部内容