JS实现完全语义化的网页选项卡效果代码
企鹅 人气:0本文实例讲述了JS实现完全语义化的网页选项卡效果代码。分享给大家供大家参考。具体如下:
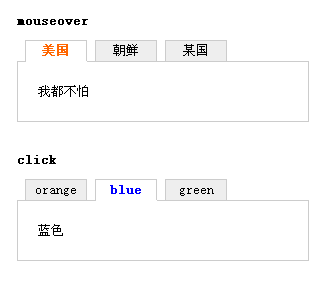
这是一款完全语义化的JS网页选项卡,包括了两种用法,一种是点击式,另一种是滑动门式,具体用哪一种要根据你自己的需要了,滑动门是在鼠标经过时触发,选项卡则是需要鼠标点击的。
运行效果截图如下:

在线演示地址如下:
http:/https://img.qb5200.com/download-x/demo.jb51.net/js/2015/js-yyh-web-tab-cha-nav-codes/
具体代码如下:
<!DOCTYPE html PUBLIC "-//W3C//DTD XHTML 1.0 Transitional//EN"
"http://www.w3.org/TR/xhtml1/DTD/xhtml1-transitional.dtd">
<html xmlns="http://www.w3.org/1999/xhtml">
<head>
<title>语义化的网页选项卡</title>
<style type="text/css">
 *{margin:0;padding:0;font-size:13px;line-height:1.5;}
 body{padding:20px;}
 .cur{color:#f60;border-bottom:1px solid #fff;font-weight:bold;background:#fff;cursor:default;}
 #tab_,dl{position:relative;float:left;height:100px;width:300px;}
 h4,dt{float:left;height:20px;margin:0 0 0 8px;display:inline;line-height:20px;width:60px;border:1px solid #ccc;position:relative;z-index:11;text-align:center;font-weight:normal;cursor:pointer;background:#eee;}
 .c,dd{position:absolute;top:21px;border:1px solid #ccc;left:0;width:250px;padding:20px;overflow:hidden;display:block;}
 #tab_{clear:left;}
 h1{clear:left;padding:10px 0}
 #tab_1.cur{color:#f60}
 #tab_2.cur{color:blue}
 #tab_3.cur{color:green}
</style>
</head>
<body>
<h1>mouseover</h1>
<dl id="tab">
 <dt>美国<https://img.qb5200.com/download-x/dt>
 <dd>我都不怕<https://img.qb5200.com/download-x/dd>
 <dt>朝鲜<https://img.qb5200.com/download-x/dt>
 <dd>谁都怕我<https://img.qb5200.com/download-x/dd>
 <dt>某国<https://img.qb5200.com/download-x/dt>
 <dd>我谁都怕<https://img.qb5200.com/download-x/dd>
<https://img.qb5200.com/download-x/dl>
<h1>click</h1>
<div id="tab_">
 <h4>orange</h4>
 <div class="c">桔红</div>
 <h4>blue</h4>
 <div class="c">蓝色</div>
 <h4>green</h4>
 <div class="c">绿色</div>
</div>
<script type="text/javascript">
function id(elem) {return document.getElementById(elem)}
function show(elem) {elem.style.display = "";}
function hide(elem) {elem.style.display = "none";}
function next( elem ) {
 do {
 elem = elem.nextSibling;
 } while ( elem && elem.nodeType != 1 );
 return elem;
}
function tab(a, p) {
 var p = (p === undefined) ? {e:"onclick",n:1} : p,
  node = id(a).firstChild,
  x = [];
 p.e = (p.e === undefined) ? "onclick" : p.e;
 p.n = (p.n === undefined) ? 1 : p.n;
 node=(node.nodeType !== 1)?next(node):node;
 for (var i = 1, node; node; i++, node = next(node)) {
  x[i] = node;
 }
 for (var i = 1; x[i]; i++) {
  if(i % 2 == 0){hide(x[i]);x[i-1].id=a+(i/2)}
  x[p.n*2-1].className = "cur";
  show(x[p.n*2]);
  temp = function (i) {
   if (i % 2 == 1) {
    x[i][p.e] = function () {
     for (var j = 1; x[j]; j++) {
      if (j % 2 == 0) {
       hide(x[j]);
       x[j-1].className = ""
      }
     }
     show(x[i+1]);
     x[i].className = "cur"
    }
   } else {
    return null
   }
  }(i)
 }
}
tab("tab",{e:"onmouseover",n:2});
tab("tab_")
</script>
</body>
</html>
希望本文所述对大家的JavaScript程序设计有所帮助。
加载全部内容