js和css写一个可以自动隐藏的悬浮框
人气:0
今天写一个小实例,用js和css写一个可以自动隐藏的悬浮框。css肯定是用来控制样式的,js用来控制器显示与隐藏的。显示与隐藏通常有两种方法实现:1,用js控制其显示属性;2,用js控制其大小。
今天要说的就是通过控制其大小来实现元素的显隐,原理:为其注册鼠标移入、移出的事件,当鼠标移出对象范围,将其宽度设为1,当鼠标再次移入该对象,将其宽度还原。很简单,我们一起看看吧!
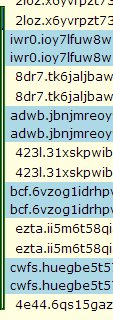
隐藏状态:

左边那一条窄线就是隐藏以后的悬浮框。
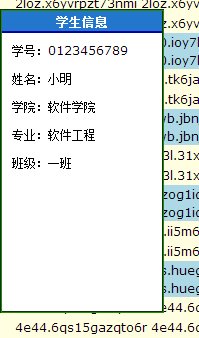
显示状态:

当鼠标滑到左边的悬浮框上,悬浮框就又显示出来了。
CSS样式:
<style>
* { font-size:12px; font-family:Verdana,宋体; }
html, body { margin:0px; padding:0px; overflow:hidden; }
.b { margin:0px; padding:0px; overflow:auto; }
.line0 { line-height:20px; background-color:lightyellow; padding:0px 15px; }
.line1 { line-height:18px; background-color:lightblue; padding:0px 10px; }
.w { position:absolute; lift:10px; top:10px; width:1px; height:300px; overflow:hidden; border:2px groove #281; cursor:default; -moz-user-select:none; }
.t { line-height:20px; height:20px; width:160px; overflow:hidden; background-color:#27C; color:white; font-weight:bold; border-bottom:1px outset blue; text-align:center; }
.winBody { height:270px; width:160px; overflow-x:auto; overflow-y:auto; border-top:1px inset blue; padding:10px; background-color:white; }
</style>
JS代码:
<script type="text/javascript">
function myshow(){
/https://img.qb5200.com/download-x/document.getElementById('mydiv').style.display = "none";
document.getElementById('mydiv').style.width = "160px";
} //block
function myhide(){
/https://img.qb5200.com/download-x/document.getElementById('mydiv').style.display = "block";
document.getElementById('mydiv').style.width="1px";
}
//测试用,随机生成一些内容,便于测试效果。
for(var i=0; i<400; i++)document.write("<div class=\"line"+(i%2)+"\">"+(new Array(20)).join((Math.random()*1000000).toString(36)+" ")+"<\https://img.qb5200.com/download-x/div>");
new function(w,b,c,d,o){
d=document;b=d.body;o=b.childNodes;c="className";
b.appendChild(w=d.createElement("div"))[c]= "b";
for(var i=0; i<o.length-1; i++)if(o[i][c]!="w")w.appendChild(o[i]),i--;
(window.onresize = function(){
w.style.width = d.documentElement.clientWidth + "px";
w.style.height = d.documentElement.clientHeight + "px";
})();
<span style="white-space:pre"> </span>}
</script>
HTML代码:
<body >
<div class="w" id="mydiv" onmousemove="myshow()" onmouseout="myhide()">
<div class="t">学生信息</div>
<div class="winBody">
学号:<label>0123456789 </label><br><br>
姓名:<label>小明 </label><br><br>
学院:<label>软件学院 </label><br><br>
专业:<label>软件工程</label><br><br>
班级:<label>一班</label><br><br>
</div>
</div>
</body>
用悬浮框来显示一些信息,当需要看的时候,指向它,它就会乖乖的出来,很方便;当不需要的时候鼠标移开,它又会很识趣的自己默默离开。虽然很简单,但是却有不错的用户体验,做出让用户用着舒服的东西,是我们不变的追求。
今天要说的就是通过控制其大小来实现元素的显隐,原理:为其注册鼠标移入、移出的事件,当鼠标移出对象范围,将其宽度设为1,当鼠标再次移入该对象,将其宽度还原。很简单,我们一起看看吧!
隐藏状态:

左边那一条窄线就是隐藏以后的悬浮框。
显示状态:

当鼠标滑到左边的悬浮框上,悬浮框就又显示出来了。
CSS样式:
复制代码 代码如下:
<style>
* { font-size:12px; font-family:Verdana,宋体; }
html, body { margin:0px; padding:0px; overflow:hidden; }
.b { margin:0px; padding:0px; overflow:auto; }
.line0 { line-height:20px; background-color:lightyellow; padding:0px 15px; }
.line1 { line-height:18px; background-color:lightblue; padding:0px 10px; }
.w { position:absolute; lift:10px; top:10px; width:1px; height:300px; overflow:hidden; border:2px groove #281; cursor:default; -moz-user-select:none; }
.t { line-height:20px; height:20px; width:160px; overflow:hidden; background-color:#27C; color:white; font-weight:bold; border-bottom:1px outset blue; text-align:center; }
.winBody { height:270px; width:160px; overflow-x:auto; overflow-y:auto; border-top:1px inset blue; padding:10px; background-color:white; }
</style>
JS代码:
复制代码 代码如下:
<script type="text/javascript">
function myshow(){
/https://img.qb5200.com/download-x/document.getElementById('mydiv').style.display = "none";
document.getElementById('mydiv').style.width = "160px";
} //block
function myhide(){
/https://img.qb5200.com/download-x/document.getElementById('mydiv').style.display = "block";
document.getElementById('mydiv').style.width="1px";
}
//测试用,随机生成一些内容,便于测试效果。
for(var i=0; i<400; i++)document.write("<div class=\"line"+(i%2)+"\">"+(new Array(20)).join((Math.random()*1000000).toString(36)+" ")+"<\https://img.qb5200.com/download-x/div>");
new function(w,b,c,d,o){
d=document;b=d.body;o=b.childNodes;c="className";
b.appendChild(w=d.createElement("div"))[c]= "b";
for(var i=0; i<o.length-1; i++)if(o[i][c]!="w")w.appendChild(o[i]),i--;
(window.onresize = function(){
w.style.width = d.documentElement.clientWidth + "px";
w.style.height = d.documentElement.clientHeight + "px";
})();
<span style="white-space:pre"> </span>}
</script>
HTML代码:
复制代码 代码如下:
<body >
<div class="w" id="mydiv" onmousemove="myshow()" onmouseout="myhide()">
<div class="t">学生信息</div>
<div class="winBody">
学号:<label>0123456789 </label><br><br>
姓名:<label>小明 </label><br><br>
学院:<label>软件学院 </label><br><br>
专业:<label>软件工程</label><br><br>
班级:<label>一班</label><br><br>
</div>
</div>
</body>
用悬浮框来显示一些信息,当需要看的时候,指向它,它就会乖乖的出来,很方便;当不需要的时候鼠标移开,它又会很识趣的自己默默离开。虽然很简单,但是却有不错的用户体验,做出让用户用着舒服的东西,是我们不变的追求。
加载全部内容