JavaScript 高级篇之DOM文档,简单封装及调用、动态添加、删除样式(六)
人气:0
http://www.cnblogs.com/TomXu/archive/2012/02/16/2351331.html , 在回来看这里文章,你一定会有更深刻的认识。因为我在这里介绍概念上的东西比较少,看下面的例子,对初学的朋友可能会有些吃力!
1、DOM的架构
<html>
<head>
<title>document</title>
</head>
<body>
<h1>CSS Demo</h1>
<p>我喜欢美女,特别是高个的美女</p>
</body>
</html>
<style type="text/css">
body{ margin:0px; padding:0px; }
#container{font-family:tahoma;font-size:14px;border:solid 1px #99ffcc; width:200px;height:140px; float:left; }
#container ul{list-style:none;padding:1px 0px 0px 0px; margin:0px;}
#container ul li{ border-bottom:solid 1px #99ffcc; margin:0px;height:27px;}
#container ul li a{background-color:gray;text-decoration:none;display:block; border-left:solid 10px red;margin:0px; padding:5px 0px 5px 10px;}
#container ul li a:hover{background-color:red; color:#000000; }
</style>
2、加一个div 元素.
<div id="container">
<ul id="list">
<li><a href="#">Home</a></li>
<li id="myblog"><a href="#">MyBlog</a></li>
<li><a href="#">Sport</a></li>
<li><a href="#">News</a></li>
<li><a href="#">Contane</a></li>
</ul>
</div>
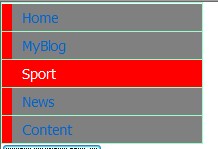
3、你现在应该看到如下图:
var Tools = {};
Tools.getElementCount = function(e){
var count =0;
elementTotal(e);
document.table.txt.value = "element:"+ count;
function elementTotal(e)
{
if(e.nodeType == 1) count++;
var children = e.childNodes;
for(var i = 0;i<children.length;i++)
{
elementTotal(children[i]);
}
}
};
备注:大家使用可以再body加入<button type ="button" onclick = "alert(Tools.getElementCount(document))">获取元素个数</button>
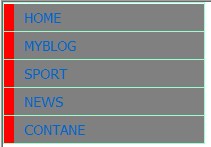
5、将文本全部大写
Tools.ModifyElement = function modify(e){
if(e.nodeType == 3)
e.data = e.data.toUpperCase();
else
{
for(var i = e.firstChild;i!=null;i=i.nextSibling)
modify(i);
}
};
备注:大家使用可以再body加入<button type ="button" onclick = "Tools.ModifyElement(document)">大写</button>
效果:
Tools.documentSort = function(e){
var textArray = [];
if(typeof e =="string") e = document.getElementById(e);
for(var x = e.firstChild; x!= null;x=x.nextSibling)
if(x.nodeType == 1) textArray.push(x);
textArray.sort(function(n,m){
var s = n.firstChild.firstChild.data;
var t = m.firstChild.firstChild.data;
if(s>t) return -1;
else if(s<t) return 1;
else return 0;
});
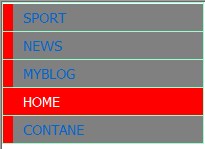
备注:大家使用可以再body加入<button type ="button" onclick = "Tools.documentSort('list')">排序</button>
效果:
Tools.insertElement = function(n,e){
if(typeof n == "string") n = document.getElementById(n);
var li = document.createElement(e);
var a = document.createElement("a");
a.setAttribute("href","#");
var txt = document.createTextNode("HotBlog");
a.appendChild(txt);
li.appendChild(a);
var parent = n.parentNode;
parent.insertBefore(li,n);
};
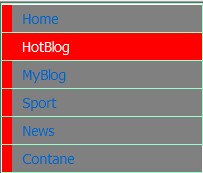
备注:大家使用可以再body加入<button type ="button" onclick="Tools.insertElement('myblog','li');">插入</button>
效果:
1、样式表
.tooltip{background:url('2.jpg'); border:solid 1px #99ffcc; width:200px;height:200px;}//这里的图片大家要该一下
.toolcontent{background-color:#ffffff; border:solid 1px #99ff00; padding:5px; font:tahoma 12px; color:#000000;}
2、javascript类
function Tooltip()
{
this.tooltip = document.createElement("div");
this.tooltip.style.position = "absolute";
this.tooltip.className = "tooltip";
this.content = document.createElement("div");
this.content.style.position = "relative";
this.content.className = "toolcontent";
this.tooltip.appendChild(this.content);
}
Tooltip.prototype.show = function(text,x,y)
{
this.content.innerHTML = text;
this.tooltip.style.left = x+"px";
this.tooltip.style.top = y+"px";
this.tooltip.style.visibility = "visible";
if(this.tooltip.parentNode != document.body)
document.body.appendChild(this.tooltip);
};
Tooltip.prototype.hide = function(){ this.tooltip.style.visibility ="hidden";};
var t = new Tooltip();
function hide()
{
t.hide();
}
function show()
{
t.show("hello ",300,0);
}
function init()
{
document.operator.show.onclick = show;
document.operator.hide.onclick = hide;
}
备注:配合上面使用必须还完成以下步骤:1、将body中的onload=init();2 在body中添加 :
<form name = "operator">
<input type = "button" value = "隐藏" name = "hide"/>
<input type = "button" value = "显示" name = "show">
</form>
效果:(隐藏看到什么了)
1、样式表
.container{font-family:tahoma;font-size:14px;border:solid 1px #99ffcc; width:200px;height:140px;float:left;}
.container ul{list-style:none;padding:1px 0px 0px 0px; margin:0px;}
.container ul li{ border-bottom:solid 1px #99ffcc; margin:0px;height:27px;}
.container ul li a{background-color:gray;text-decoration:none;display:block; border-left:solid 10px red;margin:0px; padding:5px 0px 5px 10px;}
.container ul li a:hover{background-color:red; color:#ffffff; }
2、工具函数(动态添加、删除样式)
var CSSclass = {};
CSSclass.is = function(e,c){
if(typeof e == "string") e = document.getElementById(e);
var classes = e.className;
if(!classes) return false;
if(classes == c) return true;
return e.className.search("\\b" +c +"\\b*") != -1;
};
CSSclass.add = function(e,c){
if(typeof e == "string") e = document.getElementById(e);
if(CSSclass.is(e,c))return;
//if(e.className) c=""+c;
e.className += c;
};
CSSclass.remove = function(e,c){
if(typeof e == "string") e = document.getElementById(e);
//e.id = e.id.replace(new RegExp("\\b" +e.id +"\\b\\s*","g"),"");
e.className = e.className.replace(new RegExp("\\b"+c+"\\b\\s*","g"),"");
};
3、在body中加入如下元素
<div id="con">
<ul id="list">
<li><a href="#">Home</a></li>
<li id="myblog"><a href="#">MyBlog</a></li>
<li><a href="#">Sport</a></li>
<li><a href="#">News</a></li>
<li><a href="#">Content</a></li>
</ul>
<button type="button" name ="add" onclick = "CSSclass.add('con','container');">动态添加样式</button>
<button type="button" name ="remove" onclick ="CSSclass.remove('con','container');">动态删除样式</button>
效果:
(很多没有备注,大家有问题可以给我留言!)
1、DOM的架构
复制代码 代码如下:
<html>
<head>
<title>document</title>
</head>
<body>
<h1>CSS Demo</h1>
<p>我喜欢美女,特别是高个的美女</p>
</body>
</html>
这个文档的DOM表示如下图:

图片表示一个HTML文档的树.
所有DOM树结构表现为不同种类的Node对象的一个数,firstChild,lastChild,nextSibling,previousSibling和ParentNode属性提供遍历节点的树的一种办法,appendChild,removeChild,replaceChildh和insertBefore这样的方法可以像文档中添加节点或者从文档中删除节点。不明白没关系接下来我将用大量的例子让你明白。
1、先创建一个使用CSS美化的列表复制代码 代码如下:
<style type="text/css">
body{ margin:0px; padding:0px; }
#container{font-family:tahoma;font-size:14px;border:solid 1px #99ffcc; width:200px;height:140px; float:left; }
#container ul{list-style:none;padding:1px 0px 0px 0px; margin:0px;}
#container ul li{ border-bottom:solid 1px #99ffcc; margin:0px;height:27px;}
#container ul li a{background-color:gray;text-decoration:none;display:block; border-left:solid 10px red;margin:0px; padding:5px 0px 5px 10px;}
#container ul li a:hover{background-color:red; color:#000000; }
</style>
2、加一个div 元素.
复制代码 代码如下:
<div id="container">
<ul id="list">
<li><a href="#">Home</a></li>
<li id="myblog"><a href="#">MyBlog</a></li>
<li><a href="#">Sport</a></li>
<li><a href="#">News</a></li>
<li><a href="#">Contane</a></li>
</ul>
</div>
3、你现在应该看到如下图:
复制代码 代码如下:
var Tools = {};
Tools.getElementCount = function(e){
var count =0;
elementTotal(e);
document.table.txt.value = "element:"+ count;
function elementTotal(e)
{
if(e.nodeType == 1) count++;
var children = e.childNodes;
for(var i = 0;i<children.length;i++)
{
elementTotal(children[i]);
}
}
};
备注:大家使用可以再body加入<button type ="button" onclick = "alert(Tools.getElementCount(document))">获取元素个数</button>
5、将文本全部大写
复制代码 代码如下:
Tools.ModifyElement = function modify(e){
if(e.nodeType == 3)
e.data = e.data.toUpperCase();
else
{
for(var i = e.firstChild;i!=null;i=i.nextSibling)
modify(i);
}
};
备注:大家使用可以再body加入<button type ="button" onclick = "Tools.ModifyElement(document)">大写</button>
效果:
复制代码 代码如下:
Tools.documentSort = function(e){
var textArray = [];
if(typeof e =="string") e = document.getElementById(e);
for(var x = e.firstChild; x!= null;x=x.nextSibling)
if(x.nodeType == 1) textArray.push(x);
textArray.sort(function(n,m){
var s = n.firstChild.firstChild.data;
var t = m.firstChild.firstChild.data;
if(s>t) return -1;
else if(s<t) return 1;
else return 0;
});
备注:大家使用可以再body加入<button type ="button" onclick = "Tools.documentSort('list')">排序</button>
效果:
复制代码 代码如下:
Tools.insertElement = function(n,e){
if(typeof n == "string") n = document.getElementById(n);
var li = document.createElement(e);
var a = document.createElement("a");
a.setAttribute("href","#");
var txt = document.createTextNode("HotBlog");
a.appendChild(txt);
li.appendChild(a);
var parent = n.parentNode;
parent.insertBefore(li,n);
};
备注:大家使用可以再body加入<button type ="button" onclick="Tools.insertElement('myblog','li');">插入</button>
效果:
1、样式表
复制代码 代码如下:
.tooltip{background:url('2.jpg'); border:solid 1px #99ffcc; width:200px;height:200px;}//这里的图片大家要该一下
.toolcontent{background-color:#ffffff; border:solid 1px #99ff00; padding:5px; font:tahoma 12px; color:#000000;}
2、javascript类
复制代码 代码如下:
function Tooltip()
{
this.tooltip = document.createElement("div");
this.tooltip.style.position = "absolute";
this.tooltip.className = "tooltip";
this.content = document.createElement("div");
this.content.style.position = "relative";
this.content.className = "toolcontent";
this.tooltip.appendChild(this.content);
}
Tooltip.prototype.show = function(text,x,y)
{
this.content.innerHTML = text;
this.tooltip.style.left = x+"px";
this.tooltip.style.top = y+"px";
this.tooltip.style.visibility = "visible";
if(this.tooltip.parentNode != document.body)
document.body.appendChild(this.tooltip);
};
Tooltip.prototype.hide = function(){ this.tooltip.style.visibility ="hidden";};
var t = new Tooltip();
function hide()
{
t.hide();
}
function show()
{
t.show("hello ",300,0);
}
function init()
{
document.operator.show.onclick = show;
document.operator.hide.onclick = hide;
}
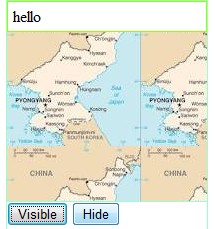
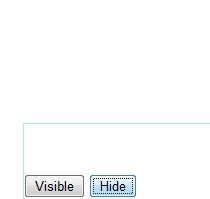
备注:配合上面使用必须还完成以下步骤:1、将body中的onload=init();2 在body中添加 :
<form name = "operator">
<input type = "button" value = "隐藏" name = "hide"/>
<input type = "button" value = "显示" name = "show">
</form>
效果:(隐藏看到什么了)
1、样式表
复制代码 代码如下:
.container{font-family:tahoma;font-size:14px;border:solid 1px #99ffcc; width:200px;height:140px;float:left;}
.container ul{list-style:none;padding:1px 0px 0px 0px; margin:0px;}
.container ul li{ border-bottom:solid 1px #99ffcc; margin:0px;height:27px;}
.container ul li a{background-color:gray;text-decoration:none;display:block; border-left:solid 10px red;margin:0px; padding:5px 0px 5px 10px;}
.container ul li a:hover{background-color:red; color:#ffffff; }
2、工具函数(动态添加、删除样式)
复制代码 代码如下:
var CSSclass = {};
CSSclass.is = function(e,c){
if(typeof e == "string") e = document.getElementById(e);
var classes = e.className;
if(!classes) return false;
if(classes == c) return true;
return e.className.search("\\b" +c +"\\b*") != -1;
};
CSSclass.add = function(e,c){
if(typeof e == "string") e = document.getElementById(e);
if(CSSclass.is(e,c))return;
//if(e.className) c=""+c;
e.className += c;
};
CSSclass.remove = function(e,c){
if(typeof e == "string") e = document.getElementById(e);
//e.id = e.id.replace(new RegExp("\\b" +e.id +"\\b\\s*","g"),"");
e.className = e.className.replace(new RegExp("\\b"+c+"\\b\\s*","g"),"");
};
3、在body中加入如下元素
复制代码 代码如下:
<div id="con">
<ul id="list">
<li><a href="#">Home</a></li>
<li id="myblog"><a href="#">MyBlog</a></li>
<li><a href="#">Sport</a></li>
<li><a href="#">News</a></li>
<li><a href="#">Content</a></li>
</ul>
<button type="button" name ="add" onclick = "CSSclass.add('con','container');">动态添加样式</button>
<button type="button" name ="remove" onclick ="CSSclass.remove('con','container');">动态删除样式</button>
效果:
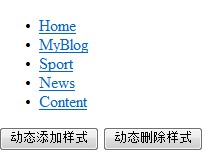
没添加样式的样子
加了样式之后。
(很多没有备注,大家有问题可以给我留言!)
加载全部内容