整理项目中vue.config.js打包优化配置方法
牛先森家的牛奶 人气:0整理项目中vue.config.js打包优化
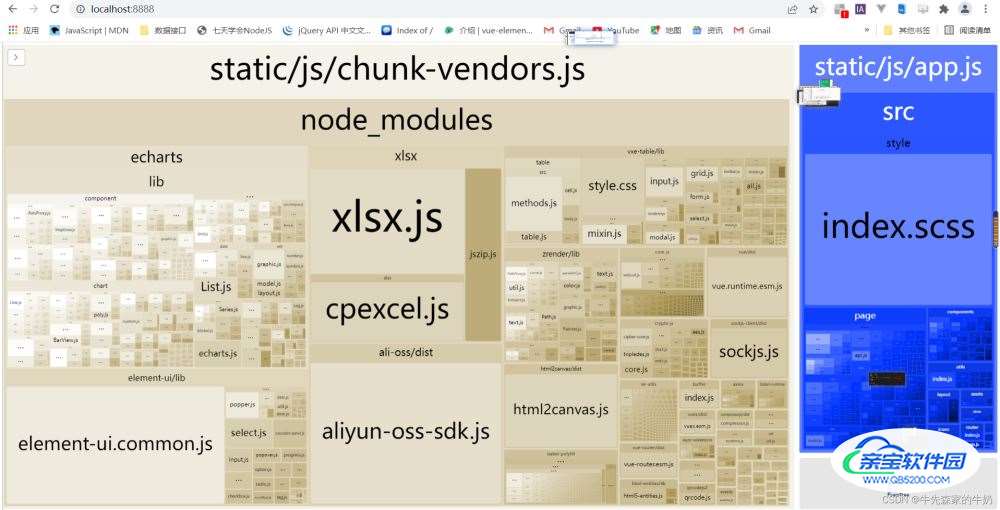
配置 webpack-bundle-analyzer 插件查看文件大小
安装:
npm intall webpack-bundle-analyzer –save-dev
使用:
// 1、第一种 运行时可以查看
module.exports = {
    chainWebpack: config => {
        config
            .plugin('webpack-bundle-analyzer')
            .use(require('webpack-bundle-analyzer').BundleAnalyzerPlugin)
    }
}

// 2、第二种 打包完可以查看
module.exports = {
	// 配置
	chainWebpack: config => {
			// 添加可视化工具 - 查看打包后的文件大小!
			if (process.env.NODE_ENV === 'production') {
			if (process.env.npm_config_report) {
				config
					.plugin('webpack-bundle-analyzer')
					.use(require('webpack-bundle-analyzer').BundleAnalyzerPlugin)
					.end();
				config.plugins.delete('prefetch')
			}
		}
	},
}
运行:
npm run build --report

// 不同环境
npm run build:test --report
npm run build:prod --report
效果:


配置compression-webpack-plugin 用gzip压缩打包的文件大小
安装:
npm i compression-webpack-plugin@5.0.1 // 版本问题注意
使用
var path = require('path')
var webpack = require('webpack')
// 压缩
const CompressionPlugin = require('compression-webpack-plugin');
const productionGzipExtensions = /\.(js|css|json|txt|html|ico|svg)(\?.*)?$/i;
function resolve (dir) {
	return path.join(__dirname, dir)
}
module.exports = {
	chainWebpack: config => {
		if (process.env.NODE_ENV === 'production') {
			config.plugin('compressionPlugin')
				.use(new CompressionPlugin({
					filename: '[path].gz[query]',
					algorithm: 'gzip', // 使用gzip压缩
					test: productionGzipExtensions, // 匹配文件名
					threshold: 10240, // 对超过10k的数据压缩
					minRatio: 0.8, // 压缩率小于0.8才会压缩
					deleteOriginalAssets: true // 是否删除未压缩的源文件,谨慎设置,如果希望提供非gzip的资源,可不设置或者设置为false(比如删除打包后的gz后还可以加载到原始资源文件)
				}));
		}
	},
}
配置uglifyjs-webpack-plugin 压缩js代码
安装:
npm i uglifyjs-webpack-plugin --save-dev
使用:
// 代码压缩
const UglifyJsPlugin = require('uglifyjs-webpack-plugin')

module.exports = {
	configureWebpack: {
		// 优化
		optimization: {
			minimizer: [
				new UglifyJsPlugin({
					uglifyOptions: {
						output: { // 删除注释
							comments: false
						},
						//生产环境自动删除console
						compress: {
							//warnings: false, // 若打包错误,则注释这行
							drop_debugger: true,  //清除 debugger 语句
							drop_console: true,   //清除console语句
							pure_funcs: ['console.log']
						}
					},
					sourceMap: false,
					parallel: true
				})
			]
		},
	},
}
配置 image-webpack-loader 图片的压缩
安装:
npm i image-webpack-loader -D
使用:
module.exports = {
	chainWebpack: config => {
		// 图片压缩
		config.module
			.rule('images')
			.exclude.add(resolve('src/assets/icons')) // 排除icons目录,这些图标已用 svg-sprite-loader 处理,打包成 svg-sprite 了
			.end()
			.use('url-loader')
			.tap(options => ({
				limit: 10240, // 稍微改大了点
				fallback: {
					loader: require.resolve('file-loader'),
					options: {
						// 在这里修改file-loader的配置
						// 直接把outputPath的目录加上,虽然语义没分开清晰但比较简洁
						name: 'static/img/[name].[hash:8].[ext]',
						esModule: false, //低版本默认为false,高版本默认为true 这里为6.2.0为高本版本所以要手动设置为false
					}
				}
			}))
			.end()
			.use('image-webpack-loader')
			.loader('image-webpack-loader')
			.options({
				mozjpeg: { progressive: true, quality: 50 }, // 压缩JPEG图像
				optipng: { enabled: true }, // 压缩PNG图像
				pngquant: { quality: [0.5, 0.65], speed: 4 }, // 压缩PNG图像
				gifsicle: { interlaced: false } // 压缩GIF图像
			})
			.end()
			.enforce('post') // 表示先执行配置在下面那个loader,即image-webpack-loader
	},
}
配置 css
参考文章:
vue-cli4之vue.config.js打包优化
vue-cli3.0配置 webpack-bundle-analyzer 插件
vue-cliI 中CSS 相关配置项
加载全部内容