react项目中使用react-dnd实现列表的拖拽排序功能
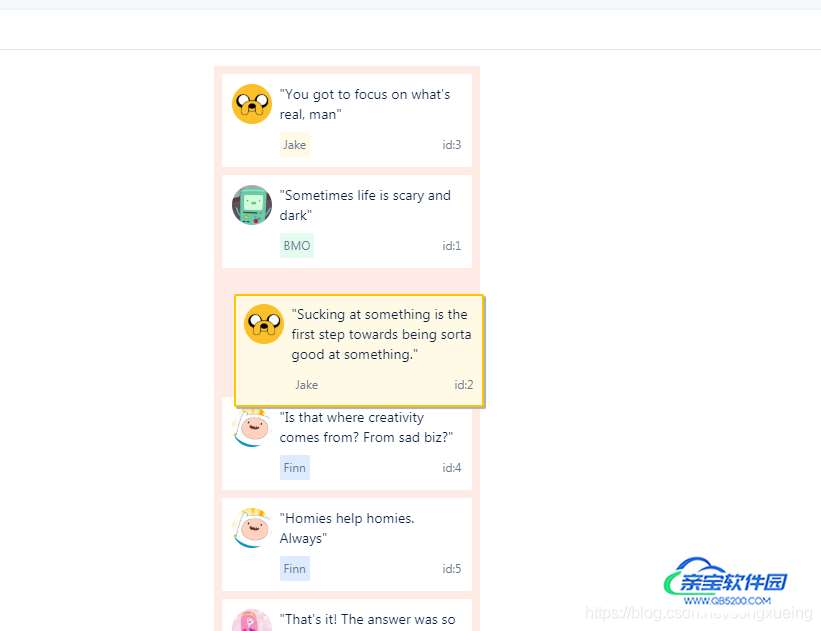
songxueing 人气:0现在有一个新需求就是需要对一个列表,实现拖拽排序的功能,要实现的效果如下图:

可以通过 react-dnd 或者 react-beautiful-dnd 两种方式实现,今天先讲下使用react-dnd是如何实现的,github地址:
https://react-dnd.github.io/react-dnd/docs/api/dnd-provider
1.先安装依赖
npm i react-dnd
npm i react-dnd-html5-backend
2.创建一个 index.js 文件
DndProvider 组件为您的应用程序提供 React-DnD 功能。这必须通过 backend 支柱注入后端,但也可以注入 window 物体。
backend:必填。一个React DnD后端。除非您正在编写自定义的,否则您可能希望使用React DnD附带的HTML5后端。context: 可选的。用于配置后端的后端上下文。这取决于后端实现。options: 可选的。用于配置后端的选项对象。这取决于后端实现。
import React from 'react'
import Example from './example'
import { DndProvider } from 'react-dnd'
import HTML5Backend from 'react-dnd-html5-backend'

class App extends React.Component{

    /**
    * 获取排序后的新数据回调函数
    */
    handlePreviewList = (previewList) => {
        this.setState({
             previewList
        })
    }
	return (
		<div className="App">
			<DndProvider backend={HTML5Backend}>
				<Example previewList={previewList}
                    handlePreviewList={this.handlePreviewList}/>
			</DndProvider>
		</div>
	)
}

export default App;
3.新建example.js文件
previewList是 index.js组件传入的数据。
handlePreviewList 是保存排序后的新数据。
import React, { useState } from 'react'
import TopicList from './TopicList';

const Container = ({ previewList, handlePreviewList }) => {
    {
        const [topic] = useState(previewList)
        const handleDND = (dragIndex, hoverIndex) => {
            let tmp = previewList[dragIndex] //临时储存文件
            previewList.splice(dragIndex, 1) //移除拖拽项
            previewList.splice(hoverIndex, 0, tmp) //插入放置项
            handlePreviewList(previewList)
        };
        const renderCard = (item, index) => {
            return (
                <TopicList
                    key={item.questionTuid}
                    index={index}
                    id={item.questionTuid}
                    text={item.questionContent}
                    moveCard={handleDND}
                />
            )
        }
        return (
            <div>
                {
                    topic.map((item, i) => renderCard(item, i))
                }
            </div>
        )
    }
}
export default Container
4.新建TopicLis.js文件
useDrag 一个钩子,用于将当前组件用作拖动源。
参数
spec规范对象
返回值数组
Index 0:包含collect函数中收集的属性的对象。如果collect未定义任何函数,则返回空对象。Index 1:拖动源的连接器功能。这必须附加到DOM的可拖动部分。Index 2:拖动预览的连接器功能。这可以附加到DOM的预览部分。
规范对象成员
item:必填。一个简单的JavaScript对象,描述被拖动的数据。这是关于拖动源的放置目标可用的唯一信息,因此选择他们需要知道的最小数据非常重要。你可能想在这里放一个复杂的引用,但是你应该尽量避免这样做,因为它耦合了拖动源和放下目标。返回类似于{ type, id }此方法的东西是个好主意。item.type必须设置,它必须是字符串,ES6符号。只有为相同类型注册的放置目标才会对此项目做出反应。阅读概述以了解有关项目和类型的更多信息。previewOptions: 可选的。描述拖动预览选项的纯JavaScript对象。options: 可选的。一个普通的对象。如果组件的某些道具不是标量(即,不是原始值或函数),则arePropsEqual(props, otherProps)在options对象内指定自定义函数可以提高性能。除非您遇到性能问题,否则不要担心。begin(monitor): 可选的。拖动操作开始时触发。不需要返回任何内容,但如果返回一个对象,它将覆盖item规范的默认属性。end(item, monitor): 可选的。当拖动停止时,end被调用。对于每个begin呼叫,end保证相应的呼叫。您可以调用monitor.didDrop()以检查丢弃是否由兼容的放置目标处理。如果它被处理,并且放置目标通过从其方法返回普通对象来指定放置结果drop(),则它将可用作monitor.getDropResult()。此方法是触发Flux动作的好地方。注意:如果在拖动时卸载组件,则component参数设置为null。canDrag(monitor): 可选的。用它来指定当前是否允许拖动。如果您想要始终允许它,只需省略此方法即可。如果您想基于某些谓词禁用拖动,则指定它很方便props。注意:您可能无法调用monitor.canDrag()此方法。isDragging(monitor): 可选的。默认情况下,仅启动拖动操作的拖动源被视为拖动。您可以通过定义自定义isDragging方法来覆盖此行为。它可能会返回类似的东西props.id === monitor.getItem().id。如果在拖动过程中可以卸载原始组件并在以后使用其他父级“复活”,则执行此操作。例如,当在卡片板中的列表中移动卡时,您希望它保留拖动的外观 - 即使在技术上,组件也会被卸载,并且每次将其移动到另一个列表时都会安装另一个组件。注意:您可能无法调用monitor.isDragging()此方法。collect: 可选的。收集功能。它应该返回一个普通的道具对象返回注入你的组件。它接收两个参数,monitor和props。阅读概述,了解监视器和收集功能的介绍。请参阅下一节中详细描述的收集功能。
useDrop 一个钩子,用于将当前组件用作放置目标。
参数
spec规范对象
返回值数组
Index 0:包含collect函数中收集的属性的对象。如果collect未定义任何函数,则返回空对象。Index 1:放置目标的连接器功能。这必须附加到DOM的drop-target部分。
规范对象成员
accept:必填。一个字符串,一个ES6符号,一个数组或一个返回给定组件的函数的函数props。此放置目标仅对指定类型的拖动源生成的项目作出反应。options: 可选的。一个普通的对象。如果组件的某些道具不是标量(即,不是原始值或函数),则arePropsEqual(props, otherProps)在options对象内指定自定义函数可以提高性能。除非您遇到性能问题,否则不要担心。drop(item, monitor): 可选的。在目标上放置兼容项目时调用。您可以返回undefined或普通对象。如果返回一个对象,它将成为放置结果,并且可以在其endDrag方法中作为拖动源使用monitor.getDropResult()。如果您希望根据接收到丢弃的目标执行不同的操作,这非常有用。如果您有嵌套的放置目标,则可以drop通过检查monitor.didDrop()和测试是否已经处理了嵌套目标monitor.getDropResult()。此方法和源endDrag方法都是触发Flux操作的好地方。如果canDrop()已定义并返回,则不会调用此方法false。hover(item, monitor): 可选的。当项目悬停在组件上时调用。您可以检查monitor.isOver({ shallow: true })以测试悬停是仅发生在当前目标上还是嵌套上。与drop()此不同,即使canDrop()定义并返回,也会调用此方法false。您可以检查monitor.canDrop()以测试是否是这种情况。canDrop(item, monitor): 可选的。使用它来指定放置目标是否能够接受该项目。如果您想要始终允许它,只需省略此方法即可。如果你想基于某个谓词overprops或者禁用删除,那么指定它是很方便的monitor.getItem()。注意:您可能无法调用monitor.canDrop()此方法。collect: 可选的。收集功能。它应该返回一个普通的道具对象返回注入你的组件。它接收两个参数,monitor和props,了解监视器和收集功能的介绍。请参阅下一节中详细描述的收集功能。
import React, { useRef } from 'react'
import { useDrag, useDrop } from 'react-dnd'
import ItemTypes from './ItemTypes';
const style = {
  padding: '0.5rem 1rem',
  marginBottom: '.5rem',
  backgroundColor: 'white',
  cursor: 'move',
}
const TopicList = ({ id, text, index, moveCard }) => {
  const ref = useRef(null)
  const [, drop] = useDrop({
    //定义拖拽的类型
    accept: ItemTypes.TOPIC,
    hover(item, monitor) {
      //异常处理判断
      if (!ref.current) {
        return
      }
      //拖拽目标的Index
      const dragIndex = item.index;
      //放置目标Index
      const hoverIndex = index;
      // 如果拖拽目标和放置目标相同的话,停止执行
      if (dragIndex === hoverIndex) {
        return
      }
      //如果不做以下处理,则卡片移动到另一个卡片上就会进行交换,下方处理使得卡片能够在跨过中心线后进行交换.
      //获取卡片的边框矩形
      const hoverBoundingRect = ref.current.getBoundingClientRect();
      //获取X轴中点
      const hoverMiddleY =
        (hoverBoundingRect.bottom - hoverBoundingRect.top) / 2;
      //获取拖拽目标偏移量
      const clientOffset = monitor.getClientOffset();
      const hoverClientY = clientOffset.y - hoverBoundingRect.top
      // 从上往下放置
      if (dragIndex < hoverIndex && hoverClientY < hoverMiddleY) {
        return
      }
      // 从下往上放置
      if (dragIndex > hoverIndex && hoverClientY > hoverMiddleY) {
        return
      }
      moveCard(dragIndex, hoverIndex);  //调用方法完成交换
      item.index = hoverIndex;  //重新赋值index,否则会出现无限交换情况
    },
  })
  const [{ isDragging }, drag] = useDrag({
    item: { type: ItemTypes.TOPIC, id, index },
    collect: monitor => ({
      isDragging: monitor.isDragging(),
    }),
  })
  const opacity = isDragging ? 0 : 1
  drag(drop(ref))
  return (
    <div ref={ref} style={{ ...style, opacity }}>
      <span style={{ float: 'left' }}>{index + 1}.</span>
      <div className='stem' dangerouslySetInnerHTML={{ __html: text }}></div>
    </div>
  )
}
export default TopicList
5.新建 ItemTypes.js
export default {
  TOPIC: 'topic'
}
注意:react的版本需要是react16的新版本,否则会报如下图所示的错误,具体兼容到几,未测试,但是之前的react 16.4.2是实现不了当前功能的,所以在开发前请确认react版本

加载全部内容