Spring AOP实现用户登录统一验证功能
Moon Bay 人气:0一. 用户登陆统一验证功能
1.1 用户登录验证的几种方法
第一版的用户登陆验证: 在每个方法里获取 session 和 session 中的用户信息,如果用户存在,那么就认为登陆成功了,否则就失败了
第二版的用户登陆验证: 提供统一的方法,在每个需要验证用户登陆的方法调用统一验证用户登陆的方法来进行判断
第二版的用户登陆验证: 使用Spring AOP 来使用统一的用户登陆检验
遇到的问题:
● 没有办法获取到HttpSession 和 Request 对象
● 实际拦截规则很复杂,使用简单的 aspect j 表达式无法满足拦截的需求
第二版的用户登陆验证: Spring 拦截器来实现用户的统一登陆验证功能
● 实现自定义拦截器 添加@Component注解,实现 Spring为我们提供的 HandlerInterceptor 接口中的 重写preHandler 方法
(一个项目中可以配置多个拦截器).
● 将自定义拦截器加入到框架的配置中去, 并且设置拦截规则如下:
(1) 给要将拦截器加入到的当前类中 叫@Configuration注解
(2) 实现 WebMvcConfigurer接口
(3) 重写 addInterceptors方法来实现需要拦截的页面,和不需要拦截的页面(白名单)
这里我们看到之前的代码里过于耦合,并且繁琐,接下来我们来学习Spring’为我们提供的框架
@RestController
@RequestMapping("/user")
public class UserController {
	/**
	 * 某⽅法 1
	 */
	@RequestMapping("/m1")
	public Object method(HttpServletRequest request) {
		// 有 session 就获取,没有不会创建
		HttpSession session = request.getSession(false);
		if (session != null && session.getAttribute("userinfo") != null) {
			// 说明已经登录,业务处理
			return true;
		} else {
			// 未登录
			return false;
		}
	}

	/**
	 * 某⽅法 2
	 */
	@RequestMapping("/m2")
	public Object method2(HttpServletRequest request) {
		// 有 session 就获取,没有不会创建
		HttpSession session = request.getSession(false);
		if (session != null && session.getAttribute("userinfo") != null) {
			// 说明已经登录,业务处理
			return true;
		} else {
			// 未登录
			return false;
		}
	}
	// 其他⽅法...
}
1.2 创建前端页面
登陆页面:
<!doctype html>
<html lang="en">
<head>
    <meta charset="UTF-8">
    <meta name="viewport"
          content="width=device-width, user-scalable=no, initial-scale=1.0, maximum-scale=1.0, minimum-scale=1.0">
    <meta http-equiv="X-UA-Compatible" content="ie=edge">
    <title>Document</title>
</head>
<body>
<h1>登录页面</h1>
</body>
</html>
欢迎页面:
<!doctype html>
<html lang="en">
<head>
    <meta charset="UTF-8">
    <meta name="viewport"
          content="width=device-width, user-scalable=no, initial-scale=1.0, maximum-scale=1.0, minimum-scale=1.0">
    <meta http-equiv="X-UA-Compatible" content="ie=edge">
    <title>Document</title>
</head>
<body>
<h1> index 页面</h1>
</body>
</html>
1.3 创建登陆方法和欢迎进入方法
package com.example.demo.controller;

import org.springframework.stereotype.Controller;
import org.springframework.util.StringUtils;
import org.springframework.web.bind.annotation.RequestMapping;
import org.springframework.web.bind.annotation.ResponseBody;
import org.springframework.web.bind.annotation.RestController;

import javax.servlet.http.HttpServletRequest;
import javax.servlet.http.HttpSession;

@RequestMapping("/user")
@RestController

public class UserController {

   // 登陆页面
    @RequestMapping("/login")
    public boolean login(HttpServletRequest request,String username, String password){
        boolean result = false;
        // 判断是否在登陆页面输入账号 和 密码
        if (StringUtils.hasLength(username) && StringUtils.hasLength(password)){
            // 验证输入的账号 和 密码 是否正确
            if (username.equals("admin") && password.equals("admin")){
                // 判断输入的账号和密码正确后 建立一个 session对象进行存储
                HttpSession session = request.getSession();
                session.setAttribute("userinfo","userinfo");
                return  true;
            }
        }
        return  result;
    }

    // 欢迎页面
    @RequestMapping("/index")
    public String index() {
          return "Hello,Index";
    }
1.4 自定义一个拦截器
对于以上问题 Spring 中提供了具体的实现拦截器:HandlerInterceptor,拦截器的实现分为以下两个步骤:
创建⾃定义拦截器,实现 HandlerInterceptor 接⼝的 preHandle(执⾏具体⽅法之前的预处理)⽅法
将⾃定义拦截器加⼊实现接口 WebMvcConfigurer 类的,重写 addInterceptors ⽅法中
具体实现如下:
创建⾃定义拦截器:
package com.example.demo.config;
import org.springframework.stereotype.Component;
import org.springframework.web.servlet.HandlerInterceptor;

import javax.servlet.http.HttpServletRequest;
import javax.servlet.http.HttpServletResponse;
import javax.servlet.http.HttpSession;

/**
 *  自定义登陆用户登陆拦截器
 */
@Component
public class LoginIntercept implements HandlerInterceptor {
    /**
     * 返回 ture 表示拦截判断通过, 可以访问后面的接口, 如果返回false 表示拦截未通过,直接返回结果给前端
     */
    @Override
    public boolean preHandle(HttpServletRequest request, HttpServletResponse response, Object handler) throws Exception {
     HttpSession session =  request.getSession(false);
     if (session != null && session.getAttribute("userinfo") != null ){
         // 表示已经登陆
         return true;
     }
     // 使用重定向方法 将表示未登录,就可以使用户跳转登陆页面
        response.sendRedirect("/login.html");
     return  false;
    }
}
将自定义拦截器加入到框架的配置中去
package com.example.demo.config;

import org.springframework.beans.factory.annotation.Autowired;
import org.springframework.context.annotation.Configuration;
import org.springframework.web.servlet.config.annotation.InterceptorRegistry;
import org.springframework.web.servlet.config.annotation.PathMatchConfigurer;
import org.springframework.web.servlet.config.annotation.WebMvcConfigurer;

import javax.annotation.Resource;

//配置存储
@Configuration
public class AppConfig implements WebMvcConfigurer {
    // 通过属性注入到拦截器
    // 通过注入拦截器来配置规则
    @Autowired
    private LoginIntercept loginIntercept;

    @Override
    public void addInterceptors(InterceptorRegistry registry) {
        //通过registry.addInterceptor可以得到拦截器

        // 登陆拦截 需要 通过属性注入来获取有loginIntercept拦截器对象执行拦截方法
           // addPathPatterns 是拦截方法
           // excludePathPatterns 不拦截方法是
        registry.addInterceptor(loginIntercept)
                .addPathPatterns("/**") //拦截所有 的url
                .excludePathPatterns("/user/login") //不拦截登陆
                .excludePathPatterns("/user/reg")   //不拦截注册页面
                .excludePathPatterns("/login.html") //不拦截登陆
                .excludePathPatterns("/reg.html")   //不拦截注册页面
                .excludePathPatterns("/**/*.js")    //所有的js都不拦截
                .excludePathPatterns("/**/*.css")   //所有的css都不拦截
                .excludePathPatterns("/**/*.png");  //所有的png照片都不拦截

    }
    // 给所有请求地址添加 访问页面 带有api 前缀
//    @Override
//    public void configurePathMatch(PathMatchConfigurer configurer) {
//        configurer.addPathPrefix("api",c -> true);
//    }
}
1.5 验证拦截功能
1.5.1 当没有进行登陆,进入欢迎页面
当我们在没有进行登陆时,直接输入欢迎页面时

我们通过重定向的方法就可以将用户引导到登陆页面中

1.5.2 当用户未成功输入正确用户名和密码
我们会返回一个 false结果来提醒用户输入的用户名和密码错误

1.5.3 当用户成功输入正确用户名和密码后登陆欢迎页面
我们先进行用户登陆成功操作

再次输入欢迎页面,我们就可以看到欢迎页面的内容啦!

1.5.4 使用前缀方法进行登陆
上文我们可以使用
    // 给所有请求地址添加 访问页面 带有api 前缀
    @Override
    public void configurePathMatch(PathMatchConfigurer configurer) {
        configurer.addPathPrefix("api",c -> true);
    }


1.6 小结
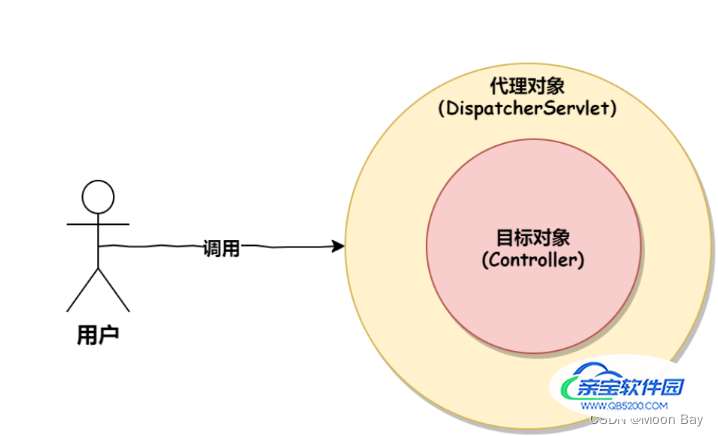
通过上⾯的源码分析,我们可以看出,Spring 中的拦截器也是通过动态代理和环绕通知的思想实现的,⼤体的调⽤流程如下:

加载全部内容