go性能分析工具pprof的用途及使用详解
我是等闲之辈 人气:0pprof的用途
- CPU Profiling:CPU 分析,按照一定的频率采集所监听的应用程序 CPU(含寄存器)的使用情况,可确定应用程序在主动消耗CPU 周期时花费时间的位置
- Memory Profiling:内存分析,在应用程序进行堆分配时记录堆栈跟踪,用于监视当前和历史内存使用情况,以及检查内存泄漏
- Block Profiling:阻塞分析,记录 goroutine 阻塞等待同步(包括定时器通道)的位置。阻塞分析对分析程序并发瓶颈非常有帮助。
- Mutex Profiling:互斥锁分析,报告互斥锁的竞争情况
所以当内存或者cpu飙升的时候,我们可以使用go自带的性能分析利器pprof来查找问题所在。
Go 语言自带的 pprof 库就可以分析程序的运行情况,并且提供可视化的功能。它包含两个相关的库:
runtime/pprof
对于只跑一次的程序,例如每天只跑一次的离线预处理程序,调用 pprof 包提供的函数,手动开启性能数据采集。
net/http/pprof
对于在线服务,对于一个 HTTP Server,访问 pprof 提供的 HTTP 接口,获得性能数据。当然,实际上这里底层也是调用的 runtime/pprof 提供的函数,封装成接口对外提供网络访问。
利用runtime/pprof包实现cpu分析的步骤
package main

import (
    "flag"
    "fmt"
    "log"
    "os"
    "runtime/pprof"
)

//执行 go run main -help 查看帮助信息
//执行 go run main -cpuprofile cpu.prof 生成cpu性能分析文件
func main() {
    var cpuprofile = flag.String("cpuprofile", "", "请输入 -cpuprofile 指定cpu性能分析文件名称")
    //在所有flag都注册之后,调用:flag.Parse()
    flag.Parse()
    f, err := os.Create(*cpuprofile)
    if err != nil {
        log.Fatal("could not create CPU profile: ", err)
    }
    // StartCPUProfile为当前进程开启CPU profile。
    if err := pprof.StartCPUProfile(f); err != nil {
        log.Fatal("could not start CPU profile: ", err)
    }
    // StopCPUProfile会停止当前的CPU profile(如果有)
    defer pprof.StopCPUProfile()

    sum := 0
    for i := 0; i < 100; i++ {
        sum += i
    }
    fmt.Printf("sum=%d\n", sum)
}
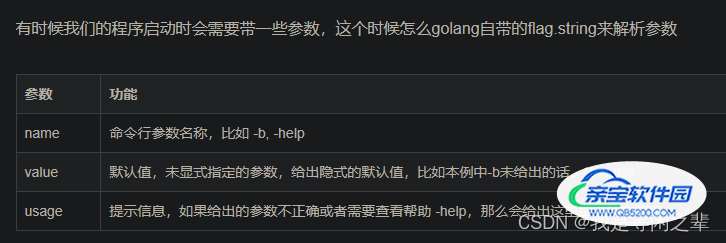
这里对flag.String参数的解释如下:


2、执行命令生成本地文件cpu.prof:
go run main.go -cpuprofile cpu.prof

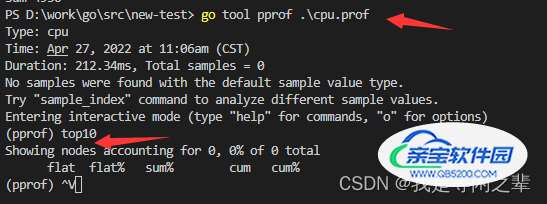
3、对文件进行分析:
go tool pprof cpu.prof

对应的参数说明:

利用runtime/pprof包实现内存分析的步骤:
package main

import (
    "flag"
    "fmt"
    "log"
    "os"
    "runtime"
    "runtime/pprof"
)

//执行 go run main -help 查看帮助信息
//执行 go run main -menprofile men.prof 生成内存性能分析文件
func main() {
    var menprofile = flag.String("menprofile", "", "请输入 -menprofile 指定内存性能分析文件名称")
    //在所有flag都注册之后,调用:flag.Parse()
    flag.Parse()
    f, err := os.Create(*menprofile)
    if err != nil {
        log.Fatal("could not create memory profile: ", err)
    }
    defer f.Close() // error handling omitted for example
    runtime.GC()    // get up-to-date statistics
    if err := pprof.WriteHeapProfile(f); err != nil {
        log.Fatal("could not write memory profile: ", err)
    }
    sum := 0
    for i := 0; i < 100; i++ {
        sum += i
    }
    fmt.Printf("sum=%d\n", sum)
}
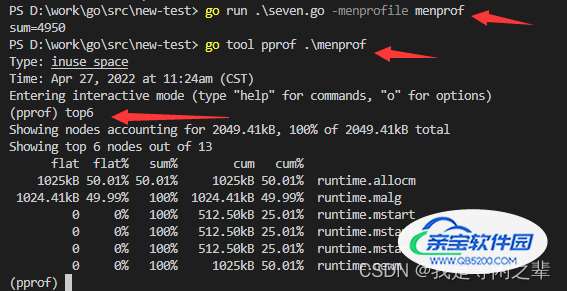
然后就是生成本地性能分析文件和查看文件:

总结:
其实,我们可以把上面两个代码合并,输入 go run main.go -cpuprofile cpu.prof -menprofile men.prof同时生成cpu和内存的性能分析文件。
利用net/http/pprof包进行性能分析
这个很简单,直接启动一个端口(和正常提供业务服务的端口不同)监听 pprof 请求:
package main

import (
    "fmt"
    "gin_pro/pkg/setting"
    "gin_pro/routers"
    "net/http"
    _ "net/http/pprof"
)

func main() {
    //用于pprof检测内存使用情况
    go func() {
        http.ListenAndServe("0.0.0.0:8080", nil)
    }()

    router := routers.InitRouter()

    s := &http.Server{
        Addr:           fmt.Sprintf(":%d", setting.HTTPPort),
        Handler:        router,
        ReadTimeout:    setting.ReadTimeout,
        WriteTimeout:   setting.WriteTimeout,
        MaxHeaderBytes: 1 << 20, // 1* 2^20 = 1*1024*1024 = 1M
    }
    s.ListenAndServe()
}
然后在终端执行以下命令就能查看对应的数据了:
#所有过去内存分配的采样
go tool pprof http://127.0.0.1:8080/debug/pprof/allocs

#对活动对象的内存分配进行采样(活动)
go tool pprof http://127.0.0.1:8080/debug/pprof/heap

# 下载 cpu profile,默认从当前开始收集 30s 的 cpu 使用情况,需要等待 30s
go tool pprof http://127.0.0.1:8080/debug/pprof/profile
# wait 120s
go tool pprof http://127.0.0.1:8080/debug/pprof/profile?seconds=120

#导致同步原语阻塞的堆栈跟踪
go tool pprof http://127.0.0.1:8080/debug/pprof/block

#所有当前goroutine的堆栈跟踪
go tool pprof http://127.0.0.1:8080/debug/pprof/goroutine

#争用互斥锁持有者的堆栈跟踪
go tool pprof http://127.0.0.1:8080/debug/pprof/mutex

#当前程序的执行轨迹。
go tool pprof http://127.0.0.1:8080/debug/pprof/trace
在可以直接在浏览器查看:
http://127.0.0.1:8080/debug/pprof/

总结
加载全部内容