uniapp打包安卓App的两种方式(云打包、本地打包)方法详解
千梦 人气:0在HBuilder上对APP提供了两种打包方式,云打包和本地打包,下面主要对这两种打包方式做个介绍
两者的区别:云打包相对简单,但是每天最多只能打包五次,而且在高峰期打包时间可能会很长,本地打包相对比较复杂,但是不限制次数,打包时间也短
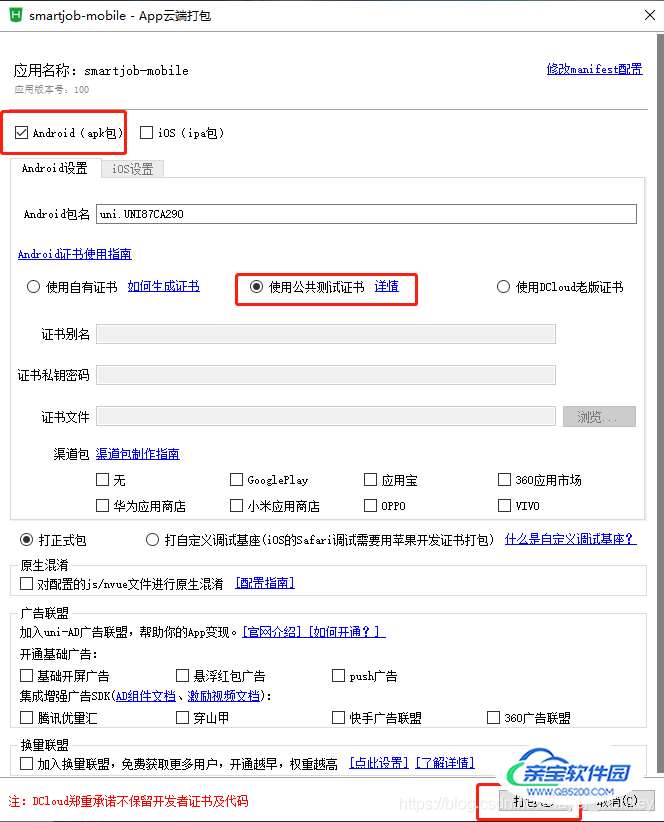
一. uniapp云打包安卓App:
只需要设置相应参数即可。比较复杂的地方可能就是证书,如果你是测试包,Android的话直接选择共用证书即可,ios则需要申请相应证书,申请证书的具体方法官方也介绍的很清楚了,就不赘述了。
二. uniapp本地打包安卓App:
本地打包相对比较麻烦,官网也做了详细介绍,但是感觉不太精简,设置一大堆,看起来也不清晰,所以我在这边大致整理了一下(uni-app安卓打包方式),大致分为底下几个步骤。
需要用到的软件:
Android Studio 下载地址:Android Studio官网 OR Android Studio中文社区
App离线SDK下载:最新android平台SDK下载
打包步骤
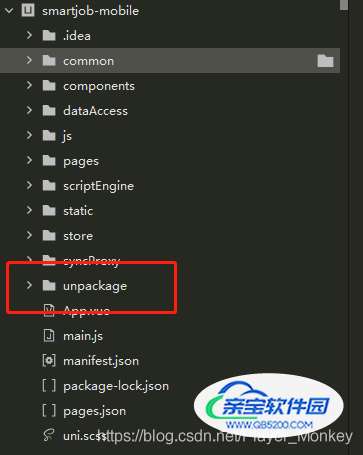
在 HBuilder 上选择发行 -> 原生App-本地打包 -> 生成本地App打包资源,会在项目里生成一个unpackage的文件夹
打开Android studio新建一个空白项目
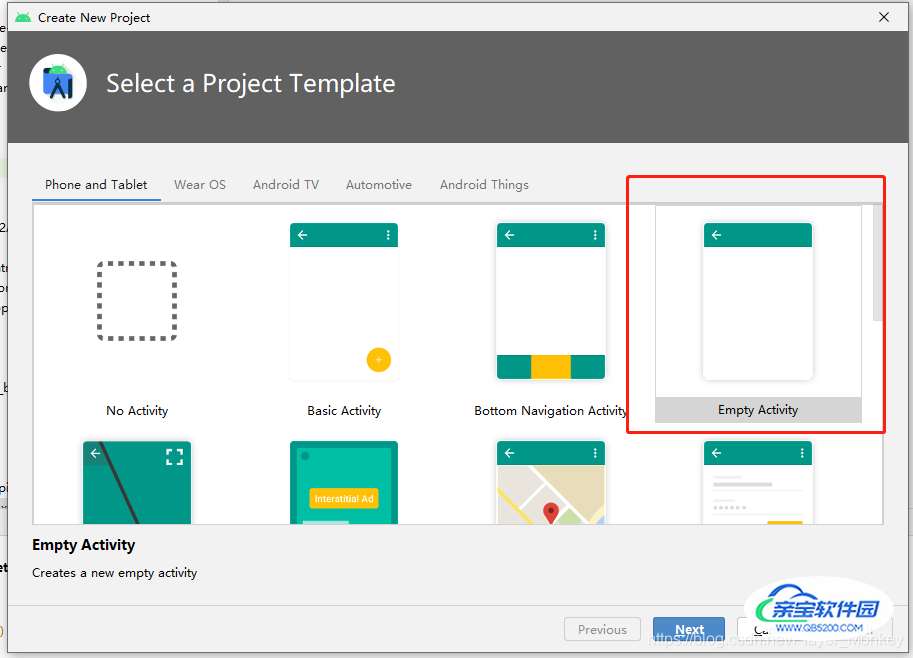
因为会自己生成默认属性,Minimum API Level也会选择最新的,所以一路next,Finish就行了
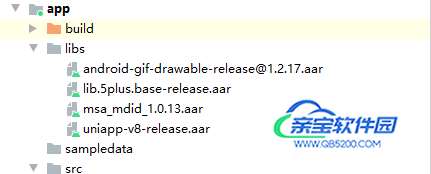
将lib.5plus.base-release.aar、android-gif-drawable-release@1.2.17.aar、uniapp-v8-release.aar和miit_mdid_1.0.13.aar拷贝到libs目录下(这几个包的地址:你下载的App离线SDK -> SDK -> libs)
注意:HBuilderX2.8.0以前需要将uniapp-v8-release.aar替换为uniapp-release.aar
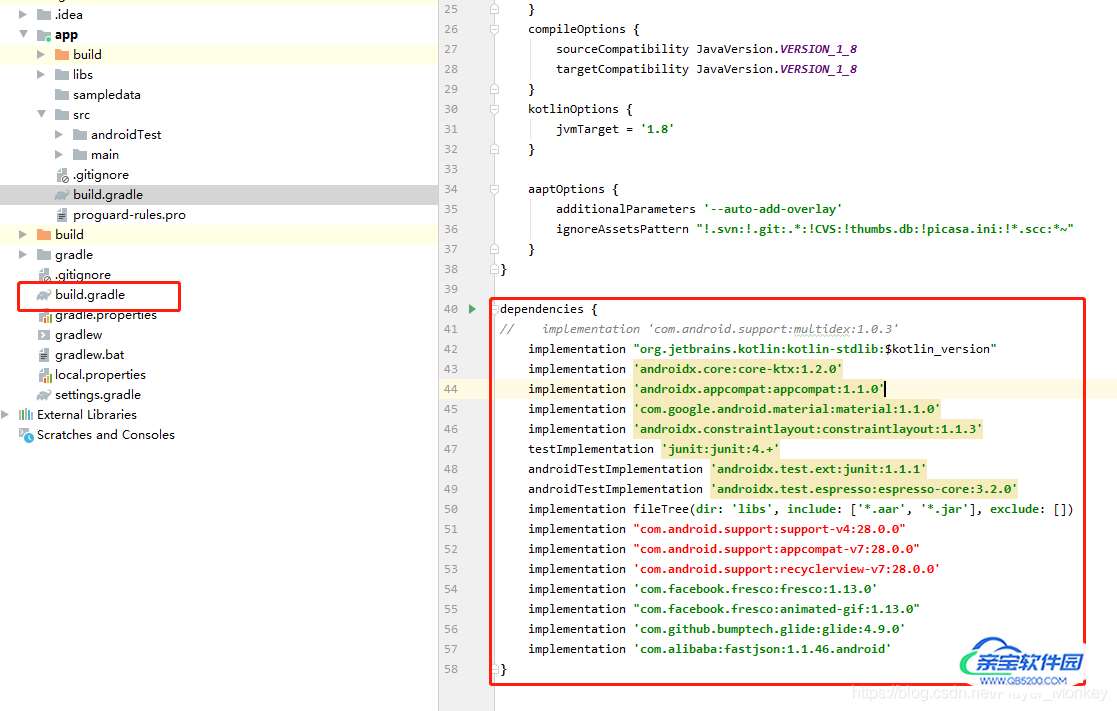
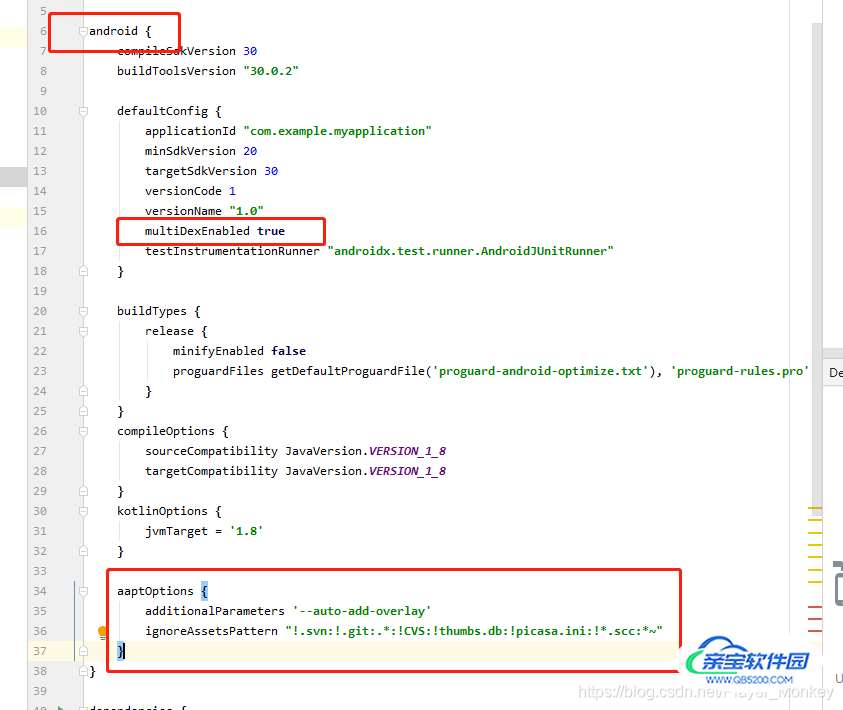
配置build.gradle
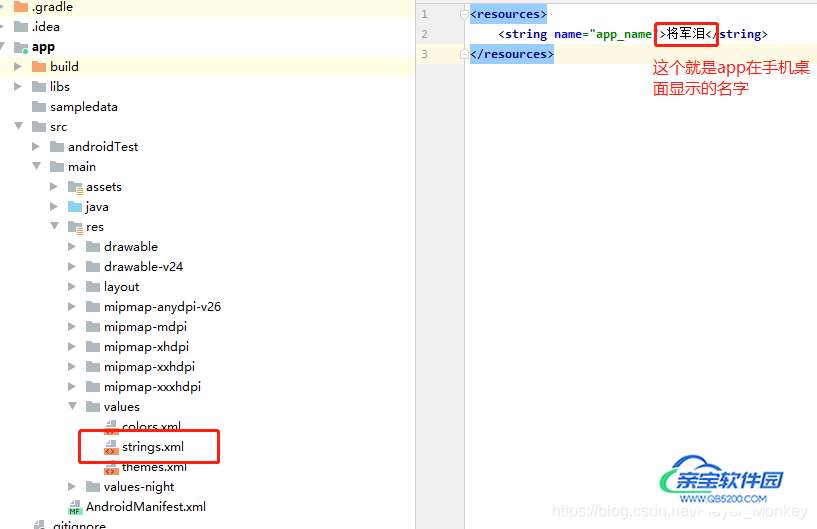
配置应用名称
打开app->src -> main -> values -> strings.xml文件,修改“app_name”字段值,该值为安装到手机上桌面显示的应用名称,建议与manifest.json中name(基础配置中的应用名称)对应。
配置应用启动页以及provider节点
将下面的代码添加到Androidmanifest.xml的application节点中(如果存在MainActivity的节点,必须删掉!)
将icon.png(图标)、ic_launcher.png(应用启动页图片)放置到drawable,drawalbe-ldpi,drawable-mdpi,drawable-hdpi,drawable-xhdpi,drawable-xxhdpi文件夹下,不同文件夹下对应不同图片尺寸,(这两个图片名字随意起,与配置处对应即可)
   <activity
            android:name="io.dcloud.PandoraEntryActivity"
            android:launchMode="singleTask"
            android:configChanges="orientation|keyboardHidden|screenSize|mcc|mnc|fontScale|keyboard"
            android:hardwareAccelerated="true"
            android:permission="com.miui.securitycenter.permission.AppPermissionsEditor"
            android:screenOrientation="user"
            android:theme="@style/DCloudTheme"
            android:windowSoftInputMode="adjustResize">
            <intent-filter>
                <category android:name="android.intent.category.DEFAULT" />
                <category android:name="android.intent.category.BROWSABLE" />
                <action android:name="android.intent.action.VIEW" />
                <data android:scheme="h56131bcf" />
            </intent-filter>
        </activity>
        <!--provider节点必须添加-->
        <provider
            android:name="io.dcloud.common.util.DCloud_FileProvider"
            android:authorities="com.example.myapplication.dc.fileprovider"
            android:exported="false"
            android:grantUriPermissions="true">
            <meta-data
                android:name="android.support.FILE_PROVIDER_PATHS"
                android:resource="@xml/dcloud_file_provider" />
        </provider>
配置后的图片以及属性内容
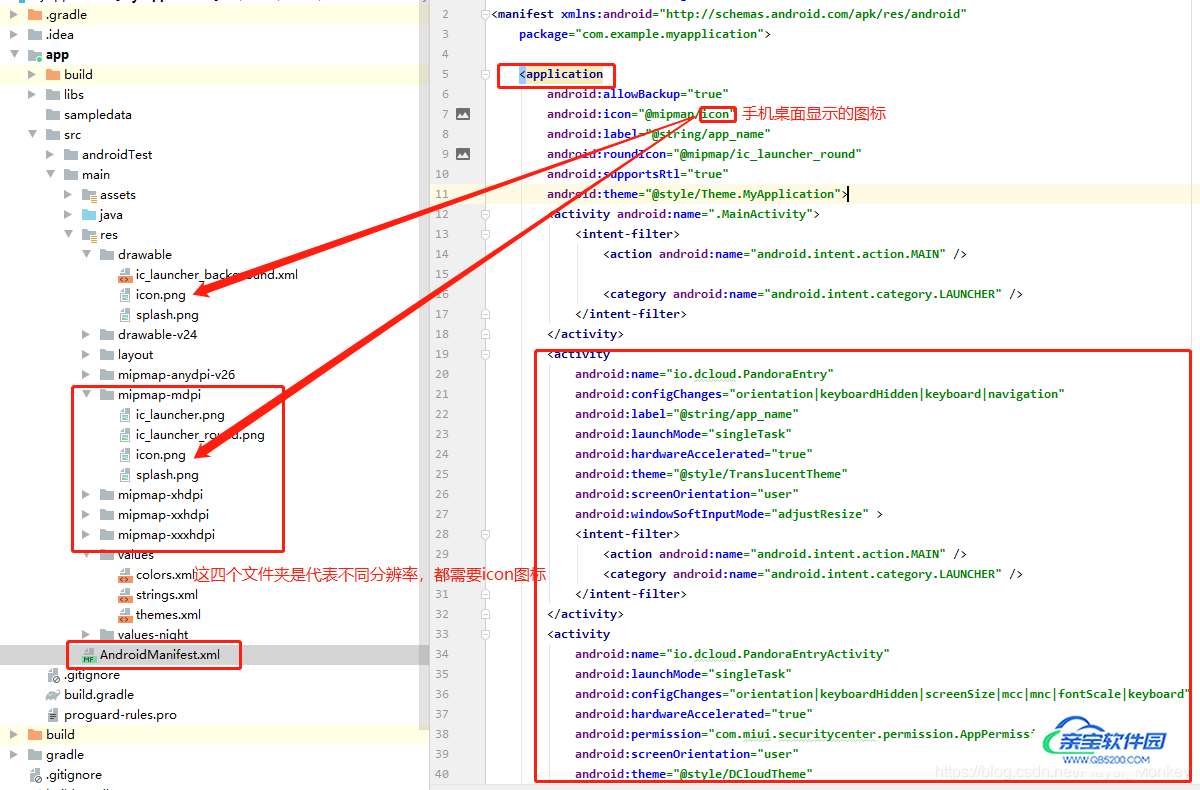
我这边完整的AndroidManifest.xml文件(仅供参考)
<?xml version="1.0" encoding="utf-8"?>
<manifest xmlns:android="http://schemas.android.com/apk/res/android"
    package="com.example.myapplication">

    <application
        android:allowBackup="true"
        android:icon="@mipmap/icon"
        android:label="@string/app_name"
        android:roundIcon="@mipmap/ic_launcher_round"
        android:supportsRtl="true"
        android:theme="@style/Theme.MyApplication">
        <activity android:name=".MainActivity">
            <intent-filter>
                <action android:name="android.intent.action.MAIN" />

                <category android:name="android.intent.category.LAUNCHER" />
            </intent-filter>
        </activity>
        <activity
            android:name="io.dcloud.PandoraEntry"
            android:configChanges="orientation|keyboardHidden|keyboard|navigation"
            android:label="@string/app_name"
            android:launchMode="singleTask"
            android:hardwareAccelerated="true"
            android:theme="@style/TranslucentTheme"
            android:screenOrientation="user"
            android:windowSoftInputMode="adjustResize" >
            <intent-filter>
                <action android:name="android.intent.action.MAIN" />
                <category android:name="android.intent.category.LAUNCHER" />
            </intent-filter>
        </activity>
        <activity
            android:name="io.dcloud.PandoraEntryActivity"
            android:launchMode="singleTask"
            android:configChanges="orientation|keyboardHidden|screenSize|mcc|mnc|fontScale|keyboard"
            android:hardwareAccelerated="true"
            android:permission="com.miui.securitycenter.permission.AppPermissionsEditor"
            android:screenOrientation="user"
            android:theme="@style/DCloudTheme"
            android:windowSoftInputMode="adjustResize">
            <intent-filter>
                <category android:name="android.intent.category.DEFAULT" />
                <category android:name="android.intent.category.BROWSABLE" />
                <action android:name="android.intent.action.VIEW" />
                <data android:scheme="h56131bcf" />
            </intent-filter>
        </activity>
        <!--provider节点必须添加-->
        <provider
            android:name="io.dcloud.common.util.DCloud_FileProvider"
            android:authorities="com.example.myapplication.dc.fileprovider"
            android:exported="false"
            android:grantUriPermissions="true">
            <meta-data
                android:name="android.support.FILE_PROVIDER_PATHS"
                android:resource="@xml/dcloud_file_provider" />
        </provider>
    </application>

</manifest>
资源配置
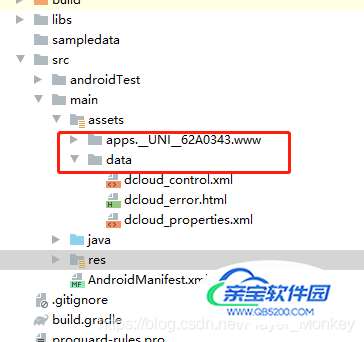
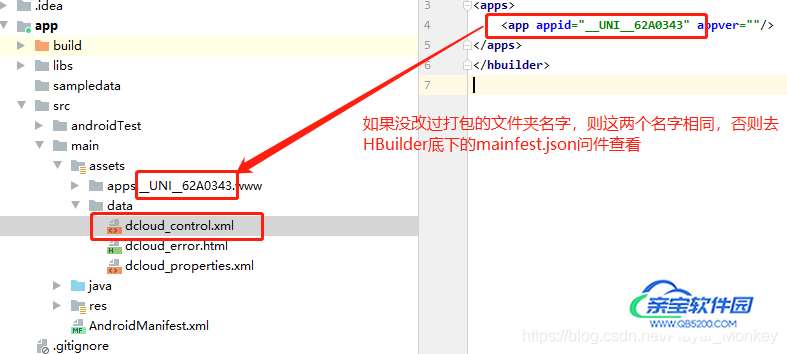
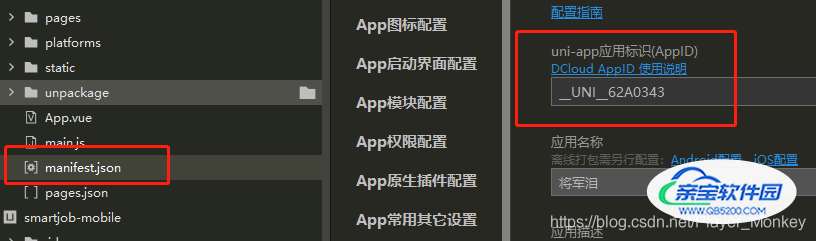
在main底下创建文件夹,main -> assets -> apps,将打包的文件放入apps文件夹下,将下载的SDK -> assets -> data文件夹拷贝到 main -> assets文件夹下
修改dcloud_control.xml文件
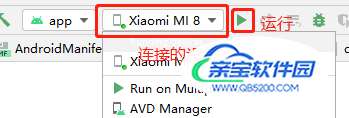
最后连接手机,点击运行按钮即可
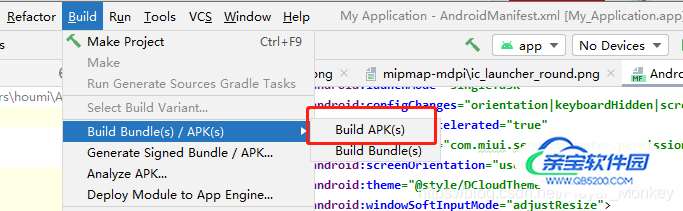
如果你想打一个APK的包出来,点击Build -> Build Bundle(s)/APK()s -> Build APK(s)即可
控制台会打印以下内容,看到successfully表示打包成功,点击locate可直接跳转打包好的APK存储的位置

加载全部内容