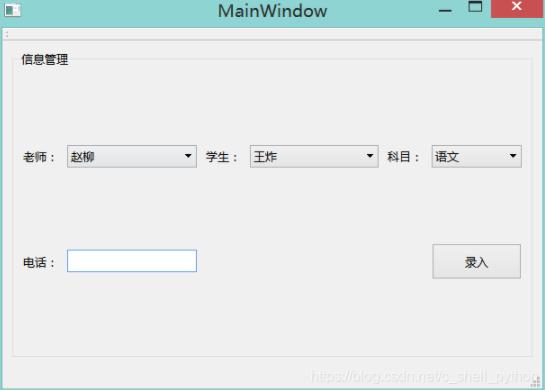
Qt栅格布局效果
梁光林 人气:0Qt提供QGridLayout类来实现栅格布局,所谓栅格,就是网格,拥有规律的行和列,通过QGridLayout可以很方便的对多个控件进行布局。
如果在设计师中进行拖拽绘制,一旦需求有变,需要增加或者删除控件,就被迫打破原来的布局,重新进行调整,这是一件很耗时的事件,
所以通过代码画,还能做到复用,往往是首选。
效果:

代码:
#include "mainwindow.h"
#include "ui_mainwindow.h"

MainWindow::MainWindow(QWidget *parent) :
    QMainWindow(parent),
    ui(new Ui::MainWindow)
{
    ui->setupUi(this);

    teacher=new QLabel(this);
    student=new QLabel(this);
    subject=new QLabel(this);
    phone=new QLabel(this);
    phoneInput=new QLineEdit(this);
    btnok=new QPushButton(this);

    teabox=new QComboBox(this);
    stubox=new QComboBox(this);
    subbox=new QComboBox(this);
    layout=new QGridLayout(this);   //栅格布局

    teacher->setText("老师:");
    student->setText("学生:");
    subject->setText("科目:");
    phone->setText("电话:");
    btnok->setText("录入");
    teabox->addItem("赵柳");  //QComboBox添加项
    teabox->addItem("李柏");
    stubox->addItem("王炸");
    stubox->addItem("茅台");
    subbox->addItem("语文");
    subbox->addItem("数学");

    btnok->setFixedSize(100,40); //设置固定宽高

    layout->addWidget(teacher,0,0,1,1); //将部件添加到单元格中,可以设置跨越多个行列
    layout->addWidget(teabox,0,1,1,1);

    layout->addWidget(student,0,2,1,1); //第1行第2列 占据一行一列的宽度
    layout->addWidget(stubox,0,3,1,1);  //第1行第3列 占据一行一列的宽度

    layout->addWidget(subject,0,4,1,1);
    layout->addWidget(subbox,0,5,1,1);

    layout->addWidget(phone,1,0,1,1);
    layout->addWidget(phoneInput,1,1,1,1);
    layout->addWidget(btnok,1,5,1,1);//第2行第5列 占据一行一列的宽度

    layout->setColumnStretch(1,1);  //设置列的拉伸因子
    layout->setColumnStretch(3,1);  //第1列和第3列、第5列的比例为1:1:1
    layout->setColumnStretch(5,1);

    layout->setSpacing(10); //将垂直和水平间距都设置为间距10
    ui->groupBox->setLayout(layout);
}

MainWindow::~MainWindow()
{
    delete ui;
}
通过QGridLayout类的addWidget函数,来添加需要放置的控件。
以addWidget(phone,1,0,1,1)为例,表示将phone控件放置在布局的第2行,第1列,占据1行一列。
删除指定的控件:
比如需要动态移除上面某个的控件时,就需要进行对应的处理,下面是移除电话相关的控件:
QLayoutItem *item;
while((item=layout->takeAt(0))!=0)
{
    if((item->widget()==phone)||(item->widget()==phoneInput)){
        item->widget()->setParent(NULL);
        delete item;
    }else{
        continue;
    }
}
this->update();    //刷新
通过takeAt()函数来依次拿到在layout上的控件,采用QLayoutItem的widget()函数来判断是不是对应的控件。
如果匹配,先将其父对象设置为空,然后删除即可。删除完毕后调用update刷新界面。
加载全部内容