idea docker一键部署
小丑的自我修养 人气:0在和前端联调的过程中,然后每次电脑使用IDEA将服务启动后不能动,然后自己想改变代码后重启可能导致前端那边报错,所以为了给前端提供联调的服务的同时,我自己还可以正常工作,于是便想到了使用docker的方式,这样就可以达到了两全其美,何乐而不为。
1.初识Docker
Docker的三个基本概念:
- Dockerfile:镜像构建的模板,描述镜像构建的步骤,通常是拉去一些文件和依赖;
- image:镜像,一个文件,用来创建容器。
- container:容器,一个可运行的镜像实例,里面运行着一个完整的操作系统,可以做一切你当前操作系统可以做的事情。
从我的理解对上述三者做一个类比:dockerfile就是一个混凝土配比说明书(原材料,步骤等),根据该说明书搅拌出混凝土(镜像),然后基于混凝土可以做成一个一个房间(容器),每个房间都是相互独立,生活着不同的人。
对于我们开发人员来说,Docker 可以做到:
- 编写本地代码
- 使用 Docker 将程序推送到测试环境
- 发现 bug 后在开发环境下修复,重新部署到测试环境测试
- 测试完成将代码合并到发布的代码分支
2.Docker基于Windows集成IDEA
2.1 在window上安装docker
注意一点:一定要把windows的WSL开启后再安装,否则会导致docker启动不成功。
2.2设置docker配置
- 开放2375端口,勾上该选项
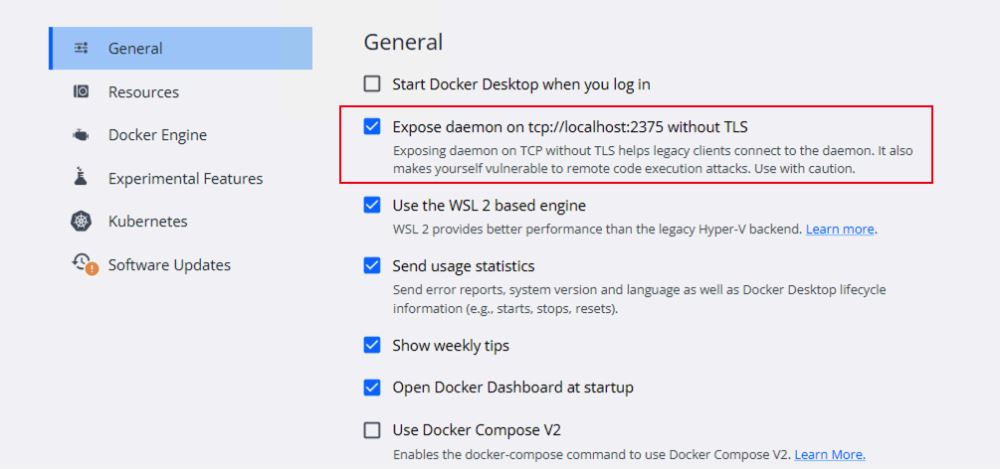
新增host:[ “0.0.0.0:2375”]
{
  "debug": false,
  "experimental": false,
  "features": {
    "buildkit": true
  },
  "hosts": [
    "tcp://0.0.0.0:2375"
  ],
  "insecure-registries": [],
  "registry-mirrors": [
    "https://hub-mirror.c.163.com",
    "https://mirror.baidubce.com"
  ]
}
2.3 IDEA 连接docker 测试
- 老版本IDEA需要安装docker的插件,新版本的话不用安装直接使用
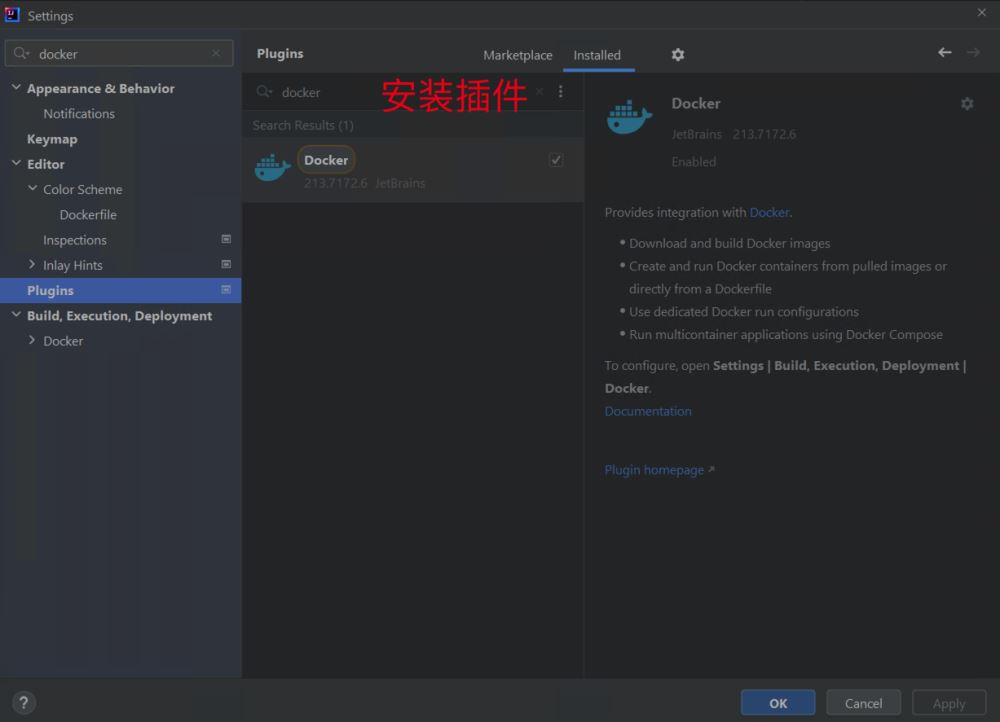
连接docker测试
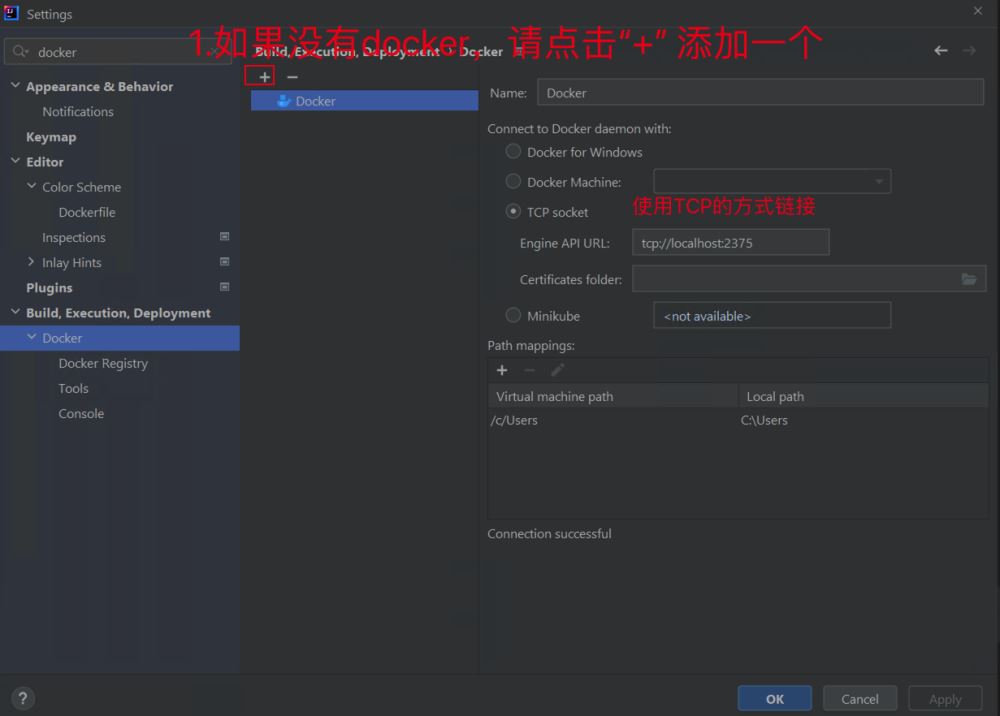
Note:如果是本地的应用可以使用tcp://localhost:2375连接;如果是局域网的其他机器可以使用局域网ipv4连接;如果是远程机器的话使用公网ip连接。
如上图中出现Connection successful为成功标志
// 当使用ip访问时连接不成功的话在windows的admin权限终端窗口执行如下命令,端口代理
netsh interface portproxy add v4tov4 listenport=2375 connectaddress=127.0.0.1 connectport=2375 listenaddress=<your ipv4> protocol=tcp

//对2375端口添加防火墙规则
netsh advfirewall firewall add rule name="docker_daemon" dir=in action=allow protocol=TCP localport=2375
说说小编的个人经历:完成了宿主机配置后,在局域网内的其他机器都是可以连接docker的,但是第二天早上再次连接就不行了,然后搞了好几天还是不行,突然一个偶然的机会又能重新连接上了。
//执行下述的命令 然后查看2375的端口
netsh interface portproxy show all

//删除所有的端口代理
netsh interface portproxy delete v4tov4   listenaddress=<your ipv4> listenport=2375

//重新执行端口代理
netsh interface portproxy add v4tov4 listenport=2375 connectaddress=127.0.0.1 connectport=2375 listenaddress=<your ipv4> protocol=tcp

在浏览器中访问yourip:2375/version测试,如果有数据返回那就是连接成功了。
2.4启动Springboot应用测试
- 构建测试项目
@RestController
public class TestController {

    @GetMapping("/get/hello")
    public String get(){
        return "Hello World";
    }
}

@SpringBootApplication
public class SpringBootWithDockerStarter {

    public static void main(String[] args) {
        SpringApplication.run(SpringBootWithDockerStarter.class, args);
    }
}
在项目中添加Dockerfile文件
#这是基础镜像
FROM java:8
VOLUME /tmp
#复制jar包到镜像中,并且将名字改成app.jar
ADD ./target/SpringBootWithDocker-1.0-SNAPSHOT.jar DemoApp.jar
#在容器启动的时候运行命令,来启动我们的项目(这其实就是一段Linux命令,该命令可以在服务启动时加一些参数)
ENTRYPOINT ["sh", "-c", "java -jar DemoApp.jar"]
上述注意一点:该文件的放置位置会影响ADD后面的寻找jar包的路径,因为我后面在build镜像时出现找不到jar的报错,原因就是我将该Dockerfile放在了该项目的某一个文件夹下了。
项目结构如下:

添加maven的docker打包插件
 <build>
        <plugins>
            <plugin>
                <groupId>org.springframework.boot</groupId>
                <artifactId>spring-boot-maven-plugin</artifactId>
            </plugin>
            <plugin><!--制作docker镜像的maven插件-->
                <groupId>com.spotify</groupId>
                <artifactId>docker-maven-plugin</artifactId>
                <version>1.2.2</version>
                <executions>
                    <execution>
                        <id>build-image</id>
                        <phase>package</phase>
                        <goals>
                            <goal>build</goal>
                        </goals>
                    </execution>
                </executions>
                <configuration>
                    <imageName>${project.artifactId}</imageName><!--镜像名,注意:这里的镜像名一定要小写,如果你的应用名字是大写会报错的-->
                    <imageTags>
                        <imageTag>latest</imageTag>
                    </imageTags>
                    <dockerDirectory>${project.basedir}</dockerDirectory><!--Dockerfile所在的目录-->
                    <dockerHost>http://127.0.0.1:2375</dockerHost><!--docker所在的宿主机地址,或者填写http://yourip:2375-->
                    <resources>
                        <resource><!--这里配置的就是打包后jar所在的位置-->
                            <targetPath>/</targetPath>
                            <directory>${project.build.directory}</directory><!--构建的class文件路径 一般是target-->
                            <include>${project.build.finalName}.jar</include>
                        </resource>
                    </resources>
                </configuration>
            </plugin>
        </plugins>
    </build>
打包该应用程序
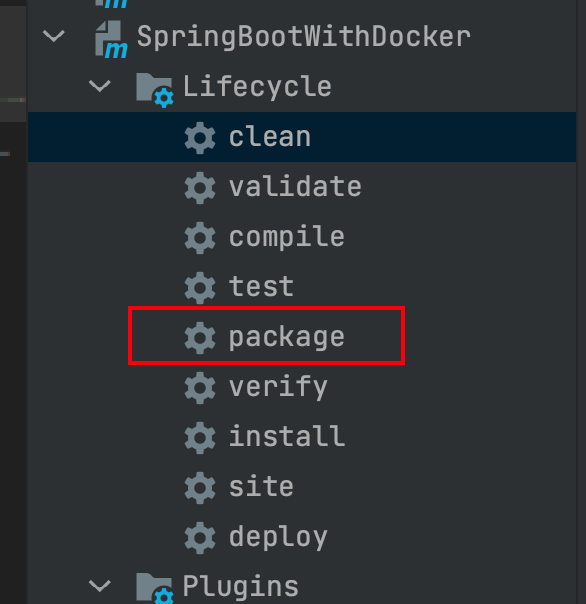
打包后会发现target目录下有jar包出现
配置Docker,此处配置要和pom文件最终生成的名字tag要保持一直
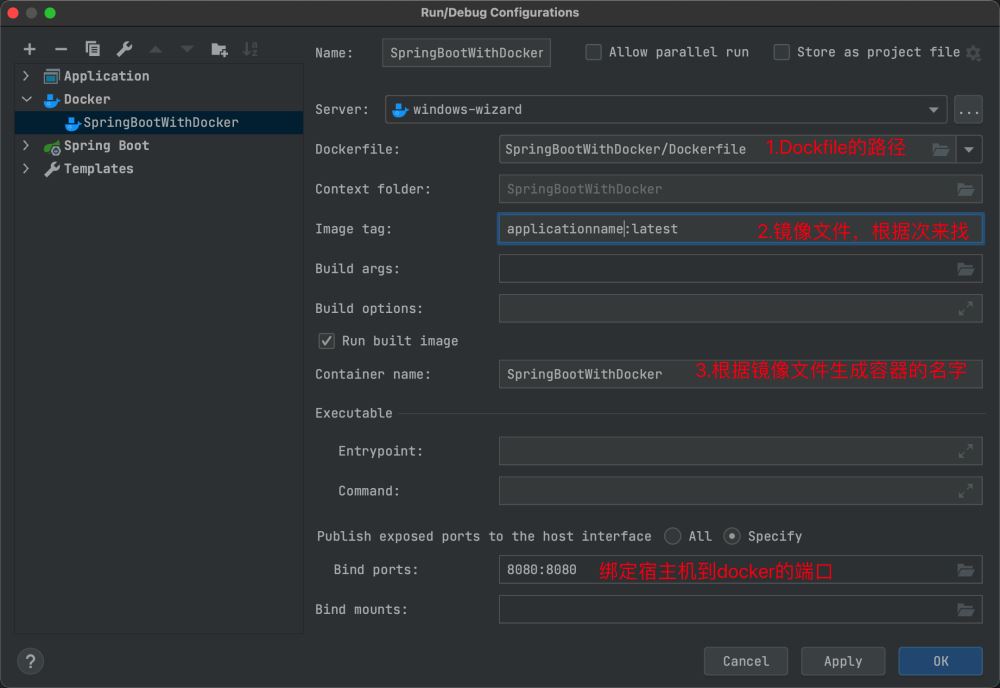
部署项目后使用localhost:8080/get/hello访问返回数据即为成功

docker控制台中文乱码修复[可选]
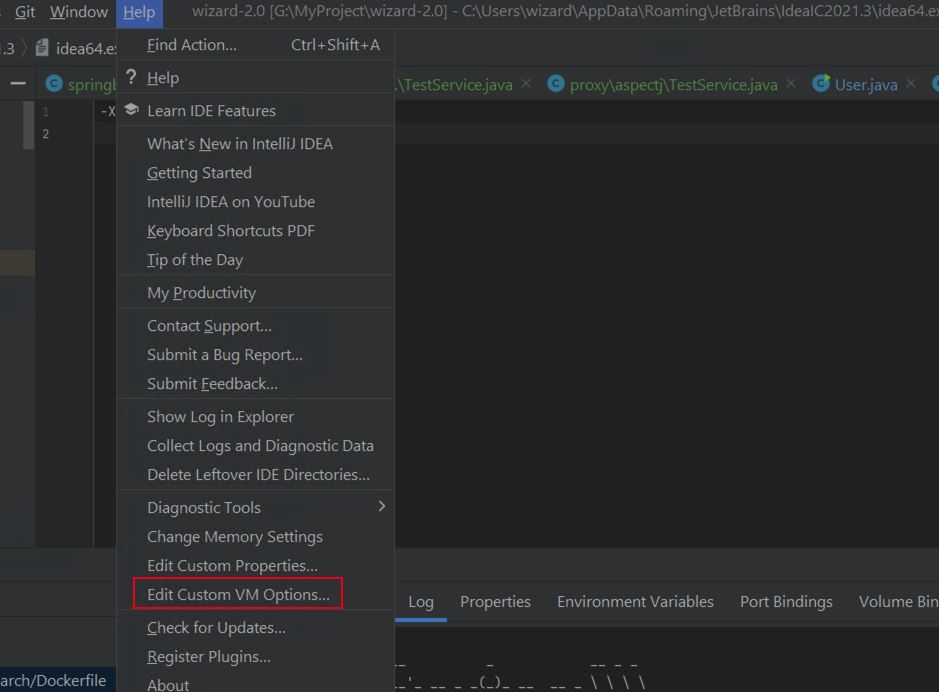
//添加字符参数后 重启IDEA
-Dfile.encoding=UTF-8
-Dsun.jnu.encoding=UTF-8
3.Docker基于Linux集成IDEA
待更新。。。
4.连接宿主机redis服务
//添加Redis依赖
       <dependency>
            <groupId>org.springframework.boot</groupId>
            <artifactId>spring-boot-starter-data-redis</artifactId>
        </dependency>
//添加Redis配置
# spring default config
spring.redis:
  host: your-ipv4 //宿主机的ip,如果你当前启动项目的docker没有安装redis,此处填localhost会报错
  port: 6379
  timeout: 5000
  lettuce.pool:
    # max connection number in connection poll, default number is 8
    max-active: 20
    # max wait time, default -1, this means there is no restrict. Unit: ms
    max-wait: -1
    # max idle connection number, default is 8
    max-idle: 8
    # min idle connection number, default is 0
    min-idle: 0

@Configuration
public class RedisConfig {

    @Bean(name = "redisTemplate")
    public StringRedisTemplate redisTemplate(RedisConnectionFactory redisConnectionFactory) {

        StringRedisTemplate stringRedisTemplate = new StringRedisTemplate();
        stringRedisTemplate.setConnectionFactory(redisConnectionFactory);
        return stringRedisTemplate;
    }
}

@RestController
@RequestMapping("/docker")
public class DockerController {
    @Autowired
    private StringRedisTemplate stringRedisTemplate;

    @GetMapping("/redis/set")
    public String setRedisData(@RequestParam("value") String value){
        String key = "docker";
        stringRedisTemplate.opsForValue().set(key, value);
        String strValue = stringRedisTemplate.opsForValue().get(key);
        return strValue;
    }
}

//重新打包然后点击docker进行运行
5.连接docker中redis服务
获取redis的密码
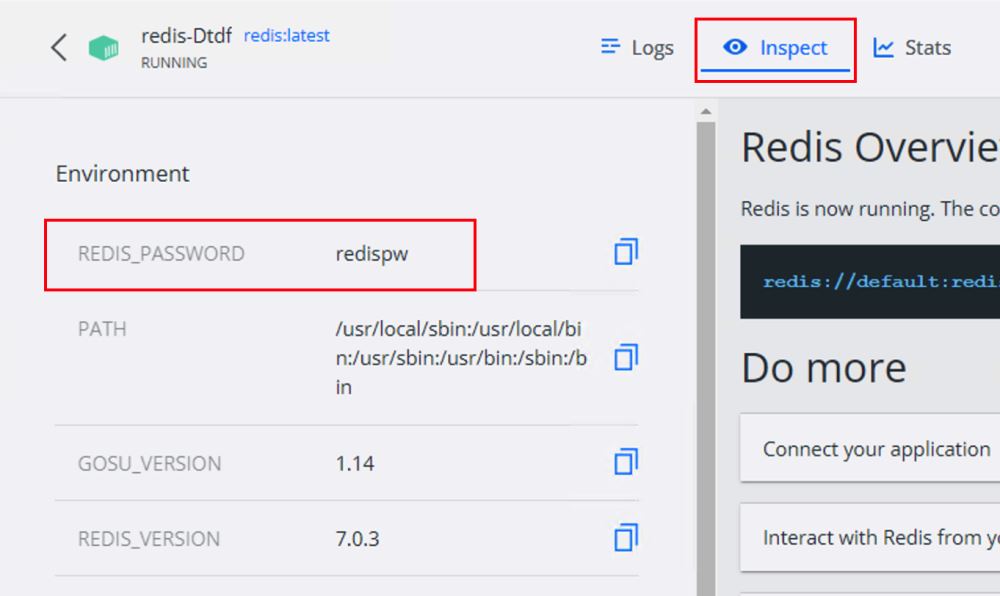
- 使用命令连接容器:docker exec -it containerName /bin/bash
- 使用命令连接redis客户端:redis-cli
- 使用auth {password} 授权成功 可以进行操作
在对spring-boot项目中修改配置之前,我们找到docker中redis在宿主机的端口号,这样我们才能保证连接成功。

修改项目中的配置
//添加Redis配置
# spring default config
spring.redis:
  host: your-ipv4 //宿主机的ip,如果你当前启动项目的docker没有安装redis,此处填localhost会报错
  port: 49153 //和上面图片的端口保持一致   <----第一处修改
  password: redispw //添加密码    <----第二处修改
  timeout: 5000
  lettuce.pool:
    # max connection number in connection poll, default number is 8
    max-active: 20
    # max wait time, default -1, this means there is no restrict. Unit: ms
    max-wait: -1
    # max idle connection number, default is 8
    max-idle: 8
    # min idle connection number, default is 0
    min-idle: 0

//重新打包进行部署
加载全部内容