Java web购物车案例
内涵神仙 人气:0一. 简介:
本项目使用jsp,js,Java,html,css,EL表达式,JSTL所实现
使用编辑器:idea
使用Oracle数据库
新增:
EL表达式
JSTL标签库
二. 前台
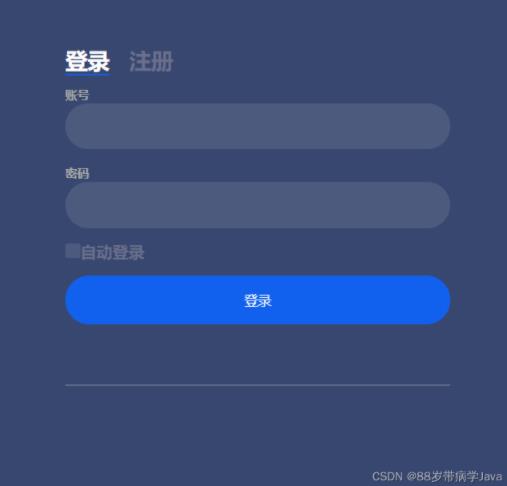
1.包括用户注册,登录
Html +js+jsp
效果展示

<body>
<div class="jq22-container" style="padding-top:100px">
    <div class="login-wrap">
        <div class="login-html">
            <input id="tab-1" type="radio" name="tab" class="sign-in" checked><label for="tab-1" class="tab">登录</label>
            <input id="tab-2" type="radio" name="tab" class="sign-up"><label for="tab-2" class="tab">注册</label>
            <div class="login-form">
                <div class="sign-in-htm">
                    <form action="${pageContext.request.contextPath }/LoginServlet.do" method="post" onsubmit="return checkAll()">
                        <div class="group">
                            <label for="user1" class="label">账号</label>
                            <input name="uname" id="uname" type="text" class="input">
                        </div>
                        <div class="group">
                            <label for="upwd" class="label">密码</label>
                            <input name="upwd" id="upwd" type="password" class="input" data-type="password">
                        </div>
                        <div class="group">
                            <input id="check" type="checkbox" class="check">
                            <label for="check"><span class="icon"></span>自动登录</label>
                        </div>
                        <div class="group">
                            <input type="submit" class="button" value="登录">
                        </div>
                    </form>
                    <div class="hr"></div>
                </div>
                <div class="sign-up-htm">
                    <form action="${pageContext.request.contextPath }/registerServlet.do" method="post">
                        <div class="group">
                            <label for="user1" class="label">账号</label>
                            <input id="user1" type="text" class="input">
                        </div>
                        <div class="group">
                            <label for="upwd" class="label">密码</label>
                            <input id="upwd1" type="password" class="input" data-type="password">
                        </div>
                        <div class="group">
                            <label for="pass3" class="label">确认密码</label>
                            <input id="pass3" type="password" class="input" data-type="password">
                        </div>
                        <div class="group">
                            <input type="submit" class="button" value="注册">
                        </div>
                        <div class="hr"></div>
                        <div class="foot-lnk">
                            <label for="tab-1"></label>
                        </div>

                    </form>
                </div>
            </div>
        </div>
    </div>
</div>

</body>
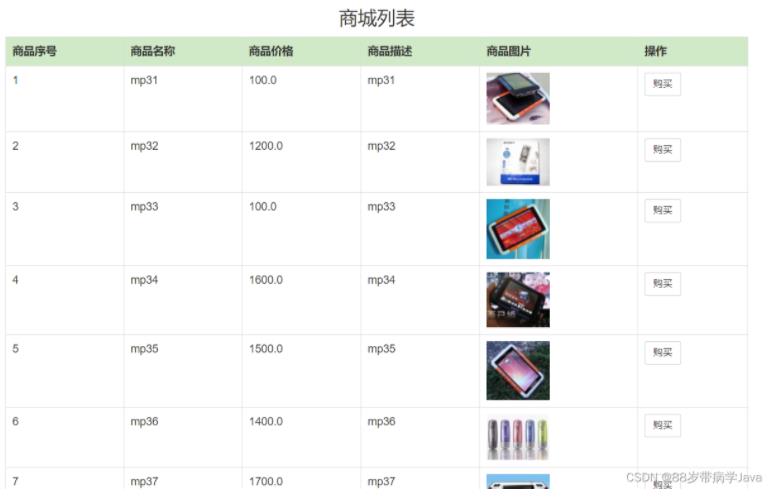
2.主界面(效果图);
使用了List集合保存数据并绑定页面

<body>
<div class="container">
    <h3 style="text-align: center">商城列表</h3>
            <form>

                <table border="1" class="table table-bordered table-hover">
                    <tr class="success">
                        <th>商品序号</th>
                        <th>商品名称</th>
                        <th>商品价格</th>
                        <th>商品描述</th>
                        <th>商品图片</th>
                        <th>操作</th>
                    </tr>
                    <c:forEach var="good" items="goods">
                        <tr>
                            <td>${good.gid()}</td>
                            <td>${good.gname()}</td>
                            <td>${good.gprice()}</td>
                            <td>${good.ginfo()}</td>
                            <td><img src="../static/${good.gpath()}"></td>
                            <td><a class="btn btn-default btn-sm" href="${pageContext.request.contextPath }/goodsServlet.do?nid=${good.gid()}" >购买</a> </td>

                        </tr>
                    </c:forEach>

                </table>

            </form>
</div>
</body>
3.购物车(效果图):
使用了session保存数据从主界面传参数

这是jsp代码,里面加入了EL表达式和jstl
<body>
<div class="container">
<h3 style="text-align: center">购物车列表</h3>
<table border="1" class="table table-bordered table-hover">
<tr class="success">
<th><input type="checkbox" id="chElt" onclick="checkOrCancelAll()"><span id="mySpan"></span></th>
<th>商品序号</th>
<th>商品名称</th>
<th>商品描述</th>
<th>商品图片</th>
<th>商品数量</th>
<th>商品总价</th>
<th>操作</th>
</tr>
<c:forEach var="s" items="listshopping">
<tr>
<td><input type="checkbox" class="interest"></td>
<td>${s.Sid()}</td>
<td>${s.Sname()}</td>
<td>${s.Sinfo()}</td>
<td><img src="../static/${s.Spath()}"></td>
<input id="${s.Sid()}" style="width: 40px;text-align: center;" type="text" value="${s.Count()}"/>
<td>总价钱</td>
<td>
<a class="btn btn-default btn-sm" href="${pageContext.request.contextPath }/goodsServlet.do" >购买</a> 
<a class="btn btn-default btn-sm" href="${pageContext.request.contextPath }/shoppingServlet.do?nid=${s.Sid()}" >删除</a>
<a class="btn btn-default btn-sm" href="/updateOrder.do?nid=${s.Sid()}" >修改</a>
</td>
</tr>
<tr>
<td colspan="8" align="left"><a href="${pageContext.request.contextPath }/admin/xmb.jsp" >返回商品页面</a></td>
<td colspan="8" align="right"><a href="${pageContext.request.contextPath }/closeServlet.do?nid=${s.Sid()}" >我要结账</a></td>
</tr>
</c:forEach>
</table>
</div>
</body>加载全部内容