pytest配置文件
邹邹很busy。 人气:0说到配置,大家可能想到的是不经常更改的内容,比如Django里的settings.py文件,或者我们做自动化的时候,把测试环境的域名和正式环境的域名放到一个配置文件里,所有的接口都从这个文件里读取。这样,如果有一天,我们的域名变了,我们只需要更改配置里的域名就可以了。pytest里也有几个配置文件。
- pytest.ini:pytest的主配置文件,可以改变pytest的默认行为,有很多可配置的选项。
- conftest.py:是本地的插件库,其中的hook函数和fixture将作用于该文件所在的目录以及所有子目录。
- __init__.py:每个测试子目录都包含该文件时,那么在多个测试目录中可以出现同名测试文件。
- tox.ini:它与pytest.ini类似,只不过是tox的配置文件,你可以把pytest的配置都写在tox.ini里,这样就不用同时使用tox.ini和pytest.ini两个文件
更改默认命令行选项
我们之前已经用过pytest命令行选项了,比如-v/--verbose可以输出详细信息,-l/--showlocals可以查看失败测试用例里堆栈中的局部变量。你也许经常要用到某些参数,又不想重复输入,这时可以使用pytest.ini文件里的addopts设置。
[pytest]
addopts = -rsxX -l --tb=short --strict
--rsxX表示pytest报告所有测试用例被跳过、预计失败、预计失败但实际通过的原因。-l表示pytest报告所有失败测试的堆栈中的局部变量。--tb=short表示简化堆栈回溯信息,只保留文件和行数。--strict选项表示禁止使用未在配置文件中注册的标记。
我们有个test_two.py文件,里面有如下代码
def inc(x):
    return x + 1

def test_answer():
    assert inc(3) == 55

def test_answer1():
    assert inc(4) == 5
我们没有添加如上命令执行一遍
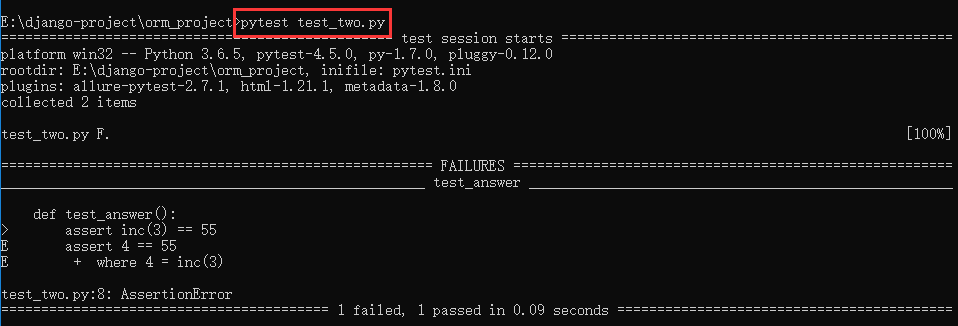
再去pytest.int里添加上上面的代码,在去执行一遍

注册标记来防止拼写错误
在前面我们学过,自定义标记可以简化测试工作,让我们用指定的标记运行某个测试子集。但是,标记很容易拼错,比如把@pytest.mark.smoke拼成@pytest.mark.somke,默认情况下。这不会引起程序错误。pytest会以为这是你创建的另一个标记。为了避免拼写错误。可以在pytest.ini文件里注册标记
[pytest]
markers =
    smoke: Run the smoke test functions for tasks project
    get: Run the test functions that test tasks.get()
修改test.two.py
import pytest
def inc(x):
    return x + 1

@pytest.mark.smoke
def test_answer():
    assert inc(3) == 55

@pytest.mark.post
def test_answer1():
    assert inc(4) == 5
标记注册好后,可以通过pytest --markers来查看
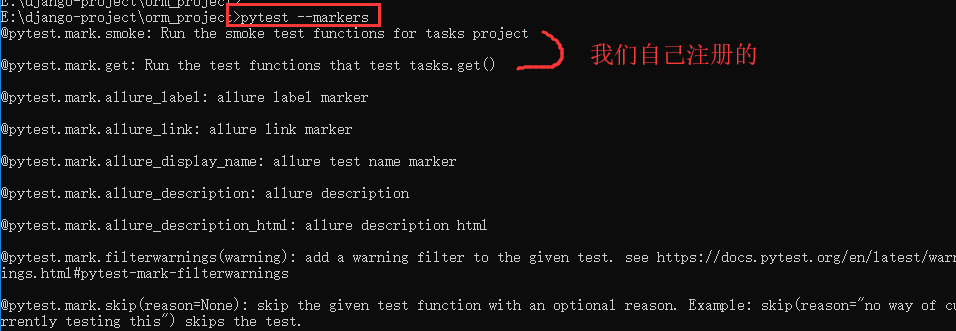
没有注册的标记不会出现在--markers列表里。如果使用了--strict选项,遇到拼写错误的标记或未注册的标记就会报错。
pytest.ini里写如下代码
[pytest]
markers =
    smoke: Run the smoke test functions for tasks project
    get: Run the test functions that test tasks.get()
上面的代码我们在执行的时候,把smoke故意写错了,也没有报错,只是给我们一个警告,只需要我们在ini里注册下就不会有警告了
在去修改pytest.ini里的代码
[pytest]
addopts = -rsxX -l --tb=short --strict
markers =
    smoke: Run the smoke test functions for tasks project
    get: Run the test functions that test tasks.get()
我们在ini里加上了addopts = -rsxX -l --tb=short --strict 这句代码之后,如果我们拼错了就会报错

指定pytest的最低版本号
有些功能是随着pytest版本的更新而加入到里面的,如果我们不想用比较低的版本,可以在配置里指定最低的版本号。
minversion选项可以指定运行测试用例的pytest的最低版本。
[pytest]
minversion = 4.0
如果使用了老版本的pytest运行该测试,就会得到一个错误信息。
指定pytest忽略某些目录
pytest执行测试搜索时,会递归遍历所有子目录,包括某些你明知道没必要遍历的目录。遇到这种情况,你可以使用norecurse选项简化pytest的搜索工作。
norecurse的默认设置是 .* build dist CVS -darcs {arch}和 *.egg。因为有 .*,所以将虚拟环境命名为.venv是一个好注意,所有以.(点)开头的目录都不会被访问。如果不是以.(点)开头,那么需要把它加入norecursedirs里。比如我想忽略test_001目录
[pytest]
norecursedirs = .* venv test_001 *.egg dist build
先来看下目录结构
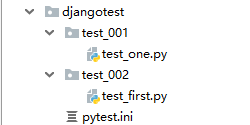
test_one.py
import pytest
def test_case_01():
    assert 0 == 0

def test_case_02():
    assert 0 == 0

test_one.py
test_first
import pytest
def inc(x):
    return x + 1

@pytest.mark.smoke
def test_answer():
    assert inc(3) == 55

@pytest.mark.post
def test_answer1():
    assert inc(4) == 5

test_first
如果我们不指定norecursedirs就会执行djangotest目录下的所有文件
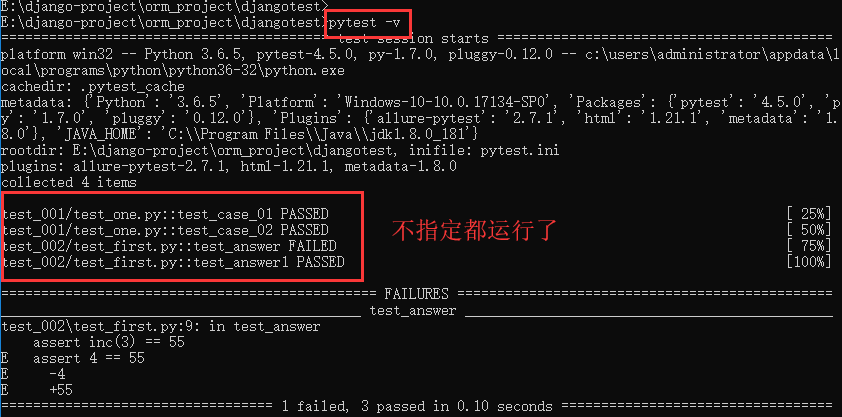
指定norecursedirs
[pytest]
norecursedirs = .* venv test_001 *.egg dist build
addopts = -rsxX -l --tb=short --strict
markers =
    smoke: Run the smoke test functions for tasks project
    get: Run the test functions that test tasks.get()
    smoek: run
    post: Run post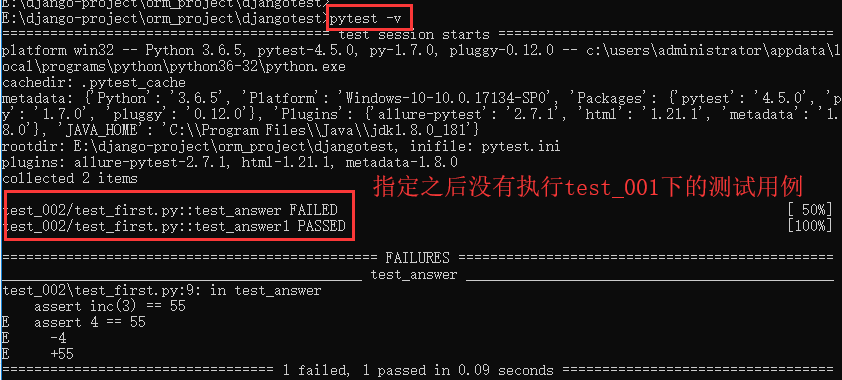
也可以指定多个目录
[pytest]
norecursedirs = .* venv test_001 test_002 *.egg dist build
指定测试目录
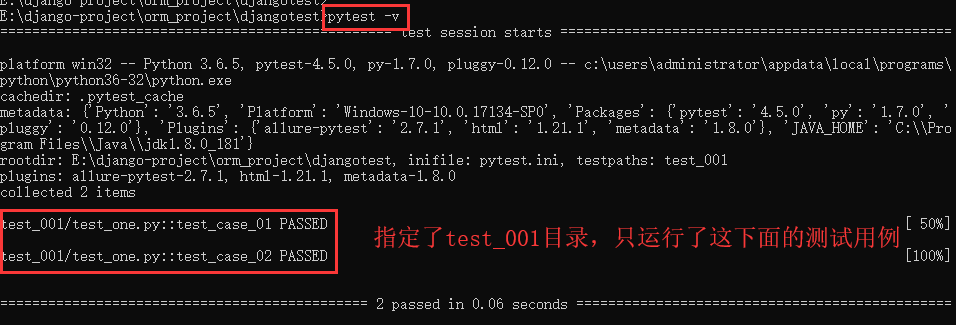
norecuredirs告诉pytest哪些路径不用访问,而testpaths则指示pytest去哪里访问。testpaths是一系列相对于根目录的路径,用于限定测试用例的搜索范围。只有在pytest未指定文件目录参数或测试用例标识符时,该选项才有作用
如果我们只想执行test_001下的测试用例,则可以把test_001放到testpaths里
[pytest]
testpaths = test_001
那如果我既指定了testpaths和norecursedirs ,而且两个是一样的,结果会怎样
[pytest]
testpaths = test_001
norecursedirs = .* venv test_001  *.egg dist build

从运行结果可以看出,如果两个都指定,且冲突的话,是按照指定的testpaths执行的,是不是因为testpaths在上面的原因导致的?我们换一下顺序
[pytest]
norecursedirs = .* venv test_001  *.egg dist build
testpaths = test_001

从上面两次的运行结果可以看出,如果既指定了testpaths和norecursedirs ,而且两个是一样的,则是按照testpaths执行的
更改测试搜索的规则
pytest根据一定的规则搜索并运行测试,标准的测试搜索规则如下。
- 从一个或多个目录开始查找。你可以在命令行指定文件名或目录名。如果未指定,则使用当前目录
- 在该目录和所有子目录下递归查找测试模块
- 测试模块是指文件名为test_*.py或*_test.py的文件
- 在测试模块中查找以test_开头的函数名。
- 查找名字以Test开头的类,其中,首先筛选掉包含__init__函数的类,在查找类中以Test_开头的类方法
以上是标准的测试搜索规则,你也可以更改它们
python_classes
通常pytest的测试搜索规则是寻找以Test*开头的测试类,而且这个类不能有__init__()函数。但是,如果把测试类命名为<something>Test或<something>Suite怎么办?python_classes就可以解决这个问题。
[pytest]
python_classes = *Test Test* *Suite
这个设置允许我们像下面这样给类取名
class DeleteSuite():
    def test_delete_1(self):
        pass
    def test_delete_2(self):
        pass
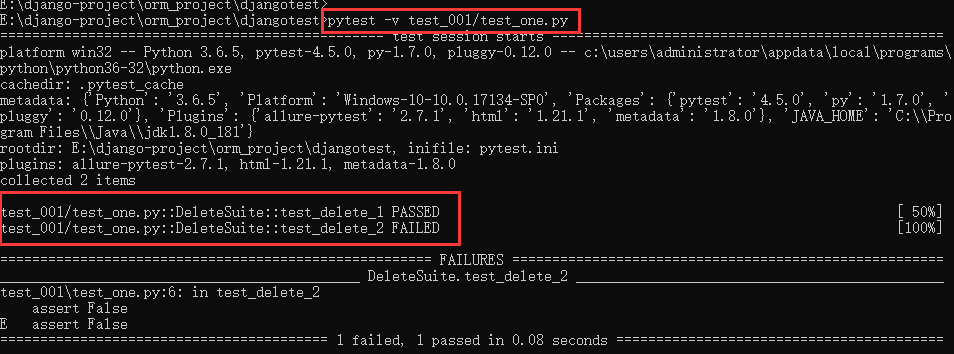
我们修改test_001目录下的test_onne.py文件
class DeleteSuite():
    def test_delete_1(self):
        assert True

    def test_delete_2(self):
        assert False
先不添加python_classes执行一下

然后我们添加上python_classes执行一下
[pytest]
python_classes = *Test Test* *Suite
python_files
像pytest_classes一样,python_files可以更改默认的测试搜索规则,而不是仅查找以test_*开头的文件和以*_test结尾的文件
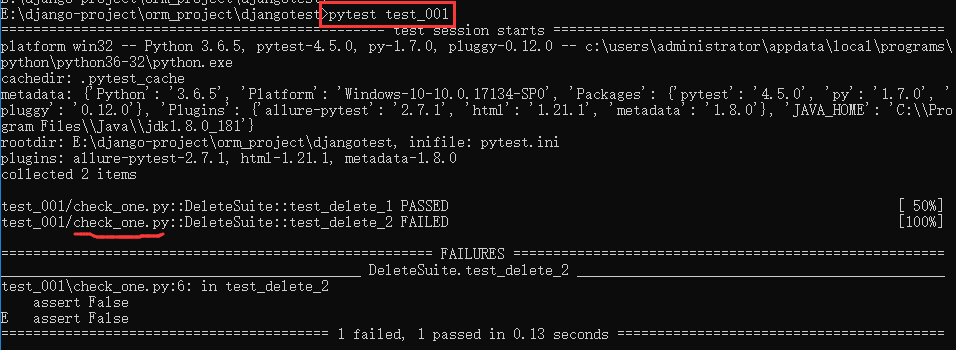
假设你的测试文件统一命名为check_<something>.py。你不必重命名所有的测试文件,只要在pytest.ini文件里增加一行配置即可
[pytest]
python_files = test_* *_test check_*
我们将test_one.py改为check_one.py在执行
[pytest]
python_files = test_* *_test check_*
python_classes = *Test Test* *Suite
python_functions
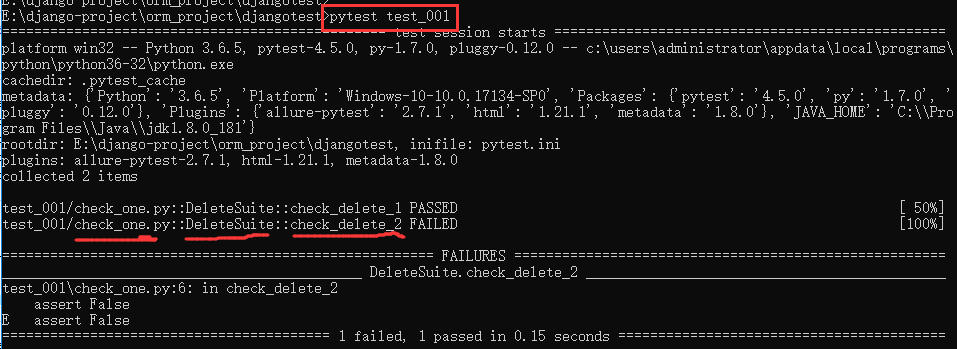
python_functions与之前的两个设置类似,它只是用来测试函数和方法的命名。more规则以test_*开头。如果想添加check_*,则只需要添加一行配置
[pytest]
python_functions = test_* check_*
修改test_one.py下的代码
class DeleteSuite():
    def check_delete_1(self):
        assert True

    def check_delete_2(self):
        assert False
[pytest] python_functions = test_* check_* python_files = test_* *_test check_* python_classes = *Test Test* *Suite addopts = -rsxX -l -v --tb=short --strict
禁用XPATH
设置xfail_strict = true将会使那些被标记为@pytest.mark.xfail但实际通过的测试用例也被报告为失败
[pytest]
xfail_strict = true
很难理解是吧!!!喝杯茶,我给你给个栗子吃
test_one.py代码如下,可以看到,我们有两个测试用例,都是标记的预期失败,但其中一个是会成功,一个是失败的,我们不加xfail_strict = true来执行一下
import pytest

@pytest.mark.xfail()
def test_answer():
    assert 5 == 5

@pytest.mark.xfail()
def test_answer1():
    assert 5 != 5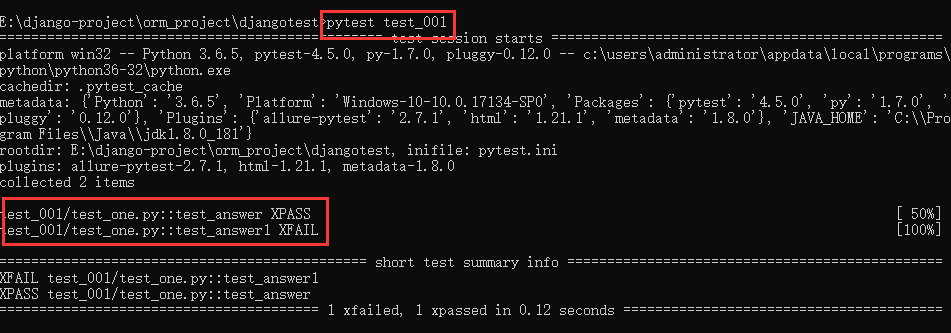
可以看到有一个通过了,有一个失败了,但是我们如果想把标记为预期失败的,不管结果是成功还是失败都标记为失败,则要在配置里加xfail_strict = true
[pytest]
xfail_strict = true
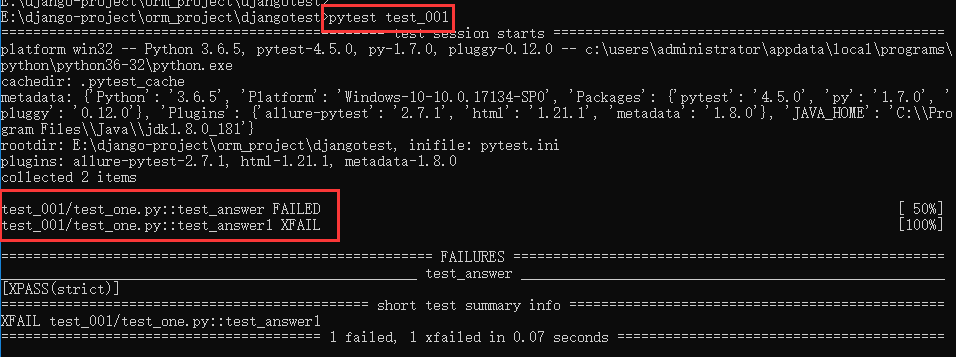
这样两个用例就都是失败的
加载全部内容