vue递归树形组件
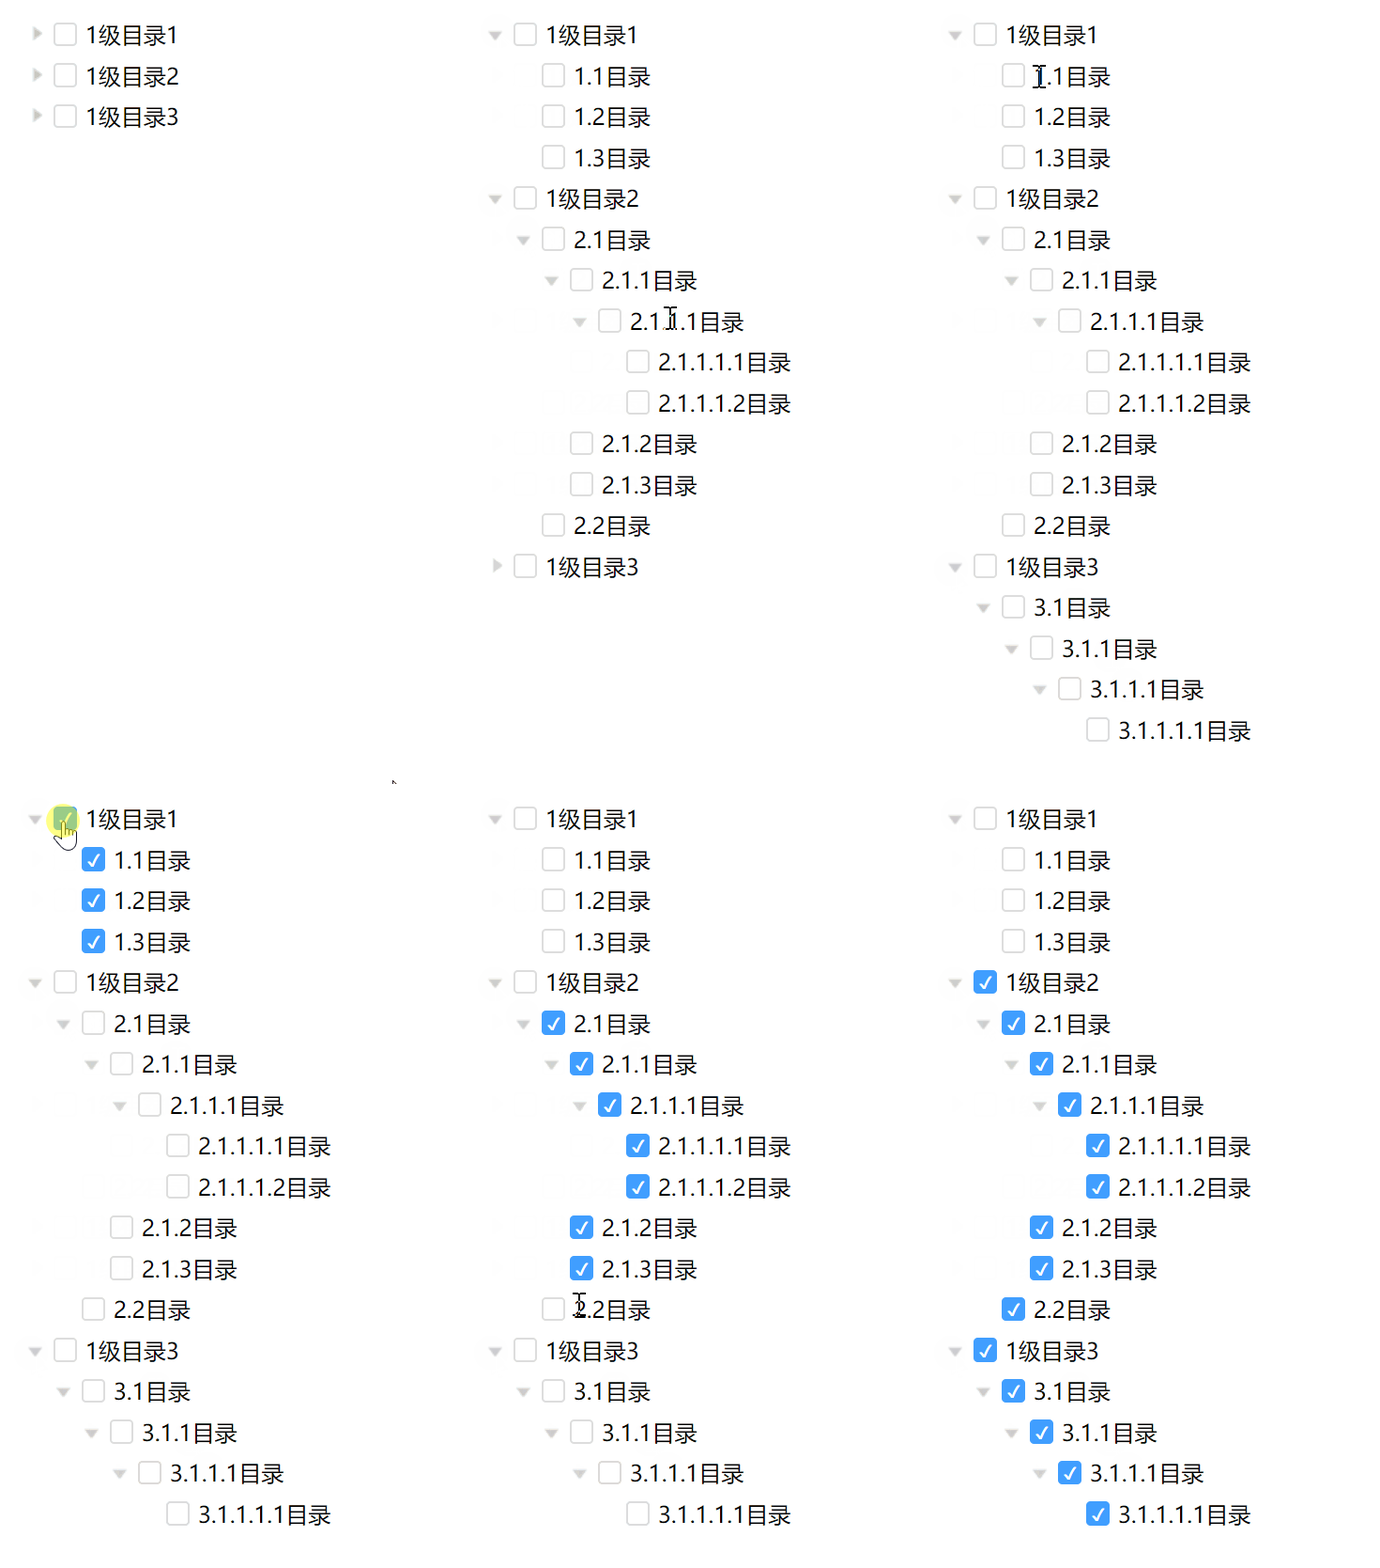
南方的森林 人气:01. 先来看一下效果:

2. 代码部分 (myTree.vue)
图片可以自己引一下自己的图片,或者使用iconfont的css引入。
<template>
    <div class="tree">
        <ul class="ul">
            <li v-for="(item,index) of treeMenu" :key="index">
                <div class="jiantou" @click="changeStatus(index)">
                    <img src="../../assets/right.png" v-if="!scopesDefault[index]===true && item.children">
                    <img src="../../assets/down.png" v-if="scopesDefault[index]===true && item.children ">
                </div>
                <input type="checkbox" @click="checkBox(item)" v-model="item.check">
                <span @click="changeStatus(index)">{{item.label}}</span>
                <div class="subtree">
                    <tree-menu :treeMenu='item.children' v-if="scopesDefault[index]" @selectnode = "selectnode"></tree-menu>
                </div>
            </li>
        </ul>
    </div>
</template>
<script>
    export default{
    name:'treeMenu',
     props:{
        treeMenu:{
            type:Array,
            default:[]
        },
    },
    data(){
        return{
            scopesDefault: [],
            scopes: [],
            node:[],
            flatTreeMenu:[],
            check:'',
        }
    },
    methods:{
        //展开
        scope() {
            this.treeMenu.forEach((item, index) => {
                this.scopesDefault[index] = false
                if ('children' in item) {
                    this.scopes[index] = true
                    //console.log(item, index)
                } else {
                    this.scopes[index] = false
                }
            })
        },
        changeStatus(index) {
            if (this.scopesDefault[index] == true) {
                this.$set(this.scopesDefault, index, false)
            } else {
                this.$set(this.scopesDefault, index, this.scopes[index])
            }
        },
        //nodelist 深度优先递归
        checkBox(node,nodelist=[]){
            //console.log("start:",node,nodelist)
            if(node!==null){
                nodelist.push(node);
                if(node.children){
                    let children=node.children;
                    for(let i=0;i<children.length;i++){
                        this.checkBox(children[i],nodelist)//递归调用
                        children[i].check = nodelist[0].check==false?true:false;//选中父节点,子节点全选,取消,子节点取消
                    }
                }
            }
            this.node=node;
            this.check=node.check
        },
        selectnode(node){
            this.$emit("selectnode",node);
        }
    },
    watch:{
        node:{
            handler(val){
                this.selectnode(val);
            },
            immediate: true
        },
        check:{
            handler(val){
                this.selectnode(this.node);
            },
            immediate: true
        }
    },
    mounted(){
        this.scope();
    }
}
</script>
<style lang = "scss" scoped>
.tree{
.ul{
margin: 5px 0 5px 0;
>li{
.jiantou{
display: inline-block;
width: 15px;
>img{
position: relative;
top: 2.0px;
left: 4px;
}
}
.subtree{
margin-left: 20px;
margin-top: 8px;
margin-bottom: 8px;
}
}
}
}
input[type=checkbox]{
visibility: hidden;
cursor: pointer;
position: relative;
width: 15px;
height: 15px;
font-size: 14px;
border: 1px solid #dcdfe6;
background-color: #fff !important;
&::after{
position: absolute;
top: 0;
background-color: #fff;
border: 1px solid #ddd;
color: #000;
width: 15px;
height: 15px;
display: inline-block;
visibility: visible;
padding-left: 0px;
text-align: center;
content: ' ';
border-radius: 3px;
transition: all linear .1s;
}
&:checked::after{
content: "\2713";
font-size: 12px;
background-color: #409eff;
border: 1px solid #409eff;
transition: all linear .1s;
color: #fff;
font-weight: bold;
}
}
.check{
&:checked::after{
content: "--" !important;
}
}
</style>讲解:
1、调用组件:
我这用来一个global.js来控制组件的使用(这个js附在文章末尾了),在component文件夹中建立一个myTree文件夹,里面放同名vue文件(myTree.vue),这样无论在哪里调用这个组件,都可以直接使用<my-tree></my-tree>的方式去调用。
2、组件的方法:
scope():会生成一个数组,里面有根节点是否有子节点,如本代码里设定的数据,会有scopes=[true,true,true]这样的结果。changeStatus():每点击标题或者箭头,如果当前下标的节点有没有子节点,再将结果动态赋值给scopesDefault[index],将这个值放于dom上控制开关,递归组件。checkBox():在组件内部实现了点击全选、点击取消全选的功能,递归调用当前方法,将子元素的状态随父元素一起变化。selectnode():将当前点击的node的节点内容上传到父组件。
3、监听:
同时监听:不同节点的切换、同一个节点的是否选中的切换,监听得到的结果都传到父组件中。
4、组件递归:调用时与父组件相同
3. 使用组件(useMyTree.vue)
<template>
    <div class = "loginModuel">
        <my-tree :treeMenu='tree' @selectnode="selectnode"></my-tree>
    </div>
</template>
<script>
export default{
    data(){
        return{
            msg:"这是登录页面",
            tree:[
                  {
                    id:1,
                    label:"1级目录1",
                    check:false,
                    children:[
                        {
                            id:"1-1",
                            pid:1,
                            label:"1.1目录",
                            check:false
                        },
                        {
                            id:"1-2",
                            pid:1,
                            label:"1.2目录",
                            check:false
                        },
                        {
                            id:"1-3",
                            pid:1,
                            label:"1.3目录",
                            check:false
                        },
                    ]
                },
                {
                  id:2,
                  label:"1级目录2",
                  check:false,
                  children:[
                      {
                          id:"2-1",
                          label:"2.1目录",
                          check:false,
                          pid:2,
                          children:[
                            {
                                id:"2-1-1",
                                pid:'2-1',
                                label:"2.1.1目录",
                                check:false,
                                children:[
                                    {
                                        id:"2-1-1-1",
                                        pid:'2-1-1',
                                        label:"2.1.1.1目录",
                                        check:false,
                                        children:[
                                            {
                                                id:"2-1-1-1-1",
                                                pid:'2-1-1-1',
                                                label:"2.1.1.1.1目录",
                                                check:false,
                                            },
                                            {
                                                id:"2-1-1-1-2",
                                                pid:'2-1-1-1',
                                                label:"2.1.1.1.2目录",
                                                check:false,
                                            },
                                        ]
                                    },
                                ]
                            },
                            {
                                id:"2-1-2",
                                pid:'2-1',
                                label:"2.1.2目录",
                                check:false,
                            },
                            {
                                id:"2-1-3",
                                pid:'2-1',
                                label:"2.1.3目录",
                                check:false,
                            },
                        ]
                      },
                      {
                          id:"2-2",
                          pid:2,
                          label:"2.2目录",
                          check:false
                      }
                  ]
              },//在此继续添加目录
              {
                id:3,
                label:"1级目录3",
                check:false,
                children:[
                    {
                        id:"3-1",
                        pid:3,
                        label:"3.1目录",
                        check:false,
                        children:[
                            {
                                id:"3-1-1",
                                pid:"3-1",
                                label:"3.1.1目录",
                                check:false,
                                children:[
                                    {
                                        id:"3-1-1-1",
                                        pid:"3-1-1",
                                        label:"3.1.1.1目录",
                                        check:false,
                                        children:[
                                            {
                                                id:"3-1-1-1-1",
                                                pid:"3-1-1-1",
                                                label:"3.1.1.1.1目录",
                                                check:false
                                            },
                                        ]
                                    },
                                ]
                            },
                        ]
                    }
                ]
            },
            ],
            plist:[],//此级以上所有父节点列表
            flatTree:[],//tree的平行数据
            node:'',//当前点击的node,
        }
    },
    methods:{
        //将tree树形数据转换为平行数据
        transformData(tree){
            tree.forEach(item=>{
                this.flatTree.push(item);
                item.children && item.children.length>0 ? this.transformData(item.children) : ""
            })
        },
        //子组件传递过来的点击的node的值
        selectnode(node){
            this.node=node;
            this.flatTree=[];
            this.transformData(this.tree);
            if(node.check==false){//这个节点已经被选中,正在点击取消选中
                this.plist=[];//每次点击一个新的节点都将原来plist的内容清空
                this.getParentnode(this.flatTree,node.pid)
            }else{//正在选中
                this.childAllToParent(node,this.flatTree,1);
            }
        },
        //子节点取消选中,拿到此子节点所有的父节点plist
        getParentnode(tree,pid){
            //this.plist=[]
            if(pid!==null){
                tree.forEach(item=>{
                    if(item.id==pid){
                        this.plist.push(item)
                        this.getParentnode(this.flatTree,item.pid)
                    }
                })
            }
            if(!pid){
                this.plist.forEach(item=>{
                    this.updateParentCheck(this.tree,item)
                })
            }
        },
        //将原数据tree对应id的项的check值改为false
        updateParentCheck(tree,plistItem){
            //console.log("方法updateParentCheck接收的plistItem参数:",plistItem)
            tree.forEach(item=>{
                if(item.id==plistItem.id){
                    item.check=false;
                }
                if(item.id!==plistItem.id && item.children){
                    this.updateParentCheck(item.children,plistItem)
                }
            })
        },
        //子节点全部选中后父节点选中
        childAllToParent(node,flatTree,j){
            let fatherNode='';
            let brotherNode=[];
            this.flatTree.forEach(item=>{
                if(node.pid && node.pid==item.id){
                    fatherNode=item;//找到了父节点--用于改变check的值
                }
            })
            //判断该结点所有的兄弟节点是否全部选中
            flatTree.forEach(item=>{
                if(item.pid && node.pid && item.pid==node.pid){
                    brotherNode.push(item)//找到所有的兄弟节点
                }
            })
            //i为被选中的兄弟节点的个数
            let i=0;
            this.flatTree.forEach(item=>{
                if(node.pid==item.pid && item.check==true){
                    i=i+1;
                }
            })
            //修改父节点的选中值
            if(i==brotherNode.length && fatherNode){
                fatherNode.check=true
            }
            // console.log(`第j次递归 j=${j}`)
            // console.log(`选中的bro=${i},brother的个数:${brotherNode.length}`)
            // console.log("父节点:",fatherNode,"兄弟节点",brotherNode)
            if(fatherNode.pid!==undefined){
                j=j+1;
                this.childAllToParent(fatherNode,this.flatTree,j)
            }
        }
    },
    mounted(){
        this.transformData(this.tree);//数据初始化:将tree树形数据转换为平行数据
        //console.log(this.flatTree)
    }
}
</script>
<style lang = "scss" scoped>
.loginModuel{
margin-left: 400px;
margin-top: 100px;
.tree{
.ul{
>li{
margin: 5px 0 5px 0;
>img{
position: relative;
top: 2.4px;
left: 4px;
}
}
.ul2{
>li{
position: relative;
left: 20px;
margin: 5px 0 5px 0;
>img{
//transition: all ease-in-out 1s;
position: relative;
top: 2.4px;
left: 4px;
}
}
}
}
}
}
input[type=checkbox]{
cursor: pointer;
position: relative;
width: 15px;
height: 15px;
font-size: 14px;
border: 1px solid #dcdfe6;
background-color: #fff !important;
&::after{
position: absolute;
top: 0;
background-color: #fff;
border: 1px solid #ddd;
color: #000;
width: 15px;
height: 15px;
display: inline-block;
visibility: visible;
padding-left: 0px;
text-align: center;
content: ' ';
border-radius: 3px;
transition: all linear .1s;
}
&:checked::after{
content: "✓";
font-size: 12px;
background-color: #409eff;
border: 1px solid #409eff;
transition: all linear .1s;
color: #fff;
font-weight: bold;
}
}
</style>子组件主要是实现全选和取消全选。由于递归组件的原因,子组件拿不到完整的数据,所以接下来的两个功能:全选后某一个子节点取消选中则父节点取消选中、子节点全选后父节点自觉选中的功能就要在父组件中完成了。
讲解:
1、设值:
树形数据必须有pid属性,用于向上遍历。
2、方法:
transformData():将层级数据转为平行数据,避免后期不停的递归调用消耗时间,平级数据使用一般的循环即可完成。selectnode():由子组件传递过来的方法,大致分为两个方向:选中、取消选中。选中时实现功能一:子节点全选后父节点自觉选中;取消选中实现功能二:全选后某一个子节点取消选中则父节点取消选中。getParentnode():用于实现功能二。子节点取消选中后,根据pid,将在它上面级别的所有父节点列表拿到,再由方法updateParentCheck()将父节点的check值全部改为false。childAllToParent():用于实现功能一。递归调用该方法,将操作节点的父节点拿到,根据兄弟节点有相同的pid,拿到兄弟节点的个数,如果兄弟节点中被选中的个数等于兄弟节点的个数,则修改父节点的check值为true,直到到了根节点结束递归。
- 这个组件实现起来不是很难,只要是心细就能很好的完成。
- 如果后期需要使用某些数据的话,直接挂到data里就可以。
- 如果有更好的方法或者存在某些疑问,欢迎小伙伴留言!
附: (global.js => 放于component文件夹下)
import Vue from 'vue';

function capitalizeFirstLetter(string){
    return string.charAt(0).toUpperCase() + string.slice(1);
}
const requireComponent = require.context(
    '.',true,/\.vue$/
    //找到components文件夹下以.vue命名的文件
)
requireComponent.keys().forEach(fileName => {
    const componetConfig = requireComponent(fileName);
    let a = fileName.lastIndexOf('/');
    fileName = '.' + fileName.slice(a);
    const componetName = capitalizeFirstLetter(
        fileName.replace(/^\.\//,'').replace(/\.\w+$/,'')
    )
    Vue.component(componetName,componetConfig.default || componetConfig)
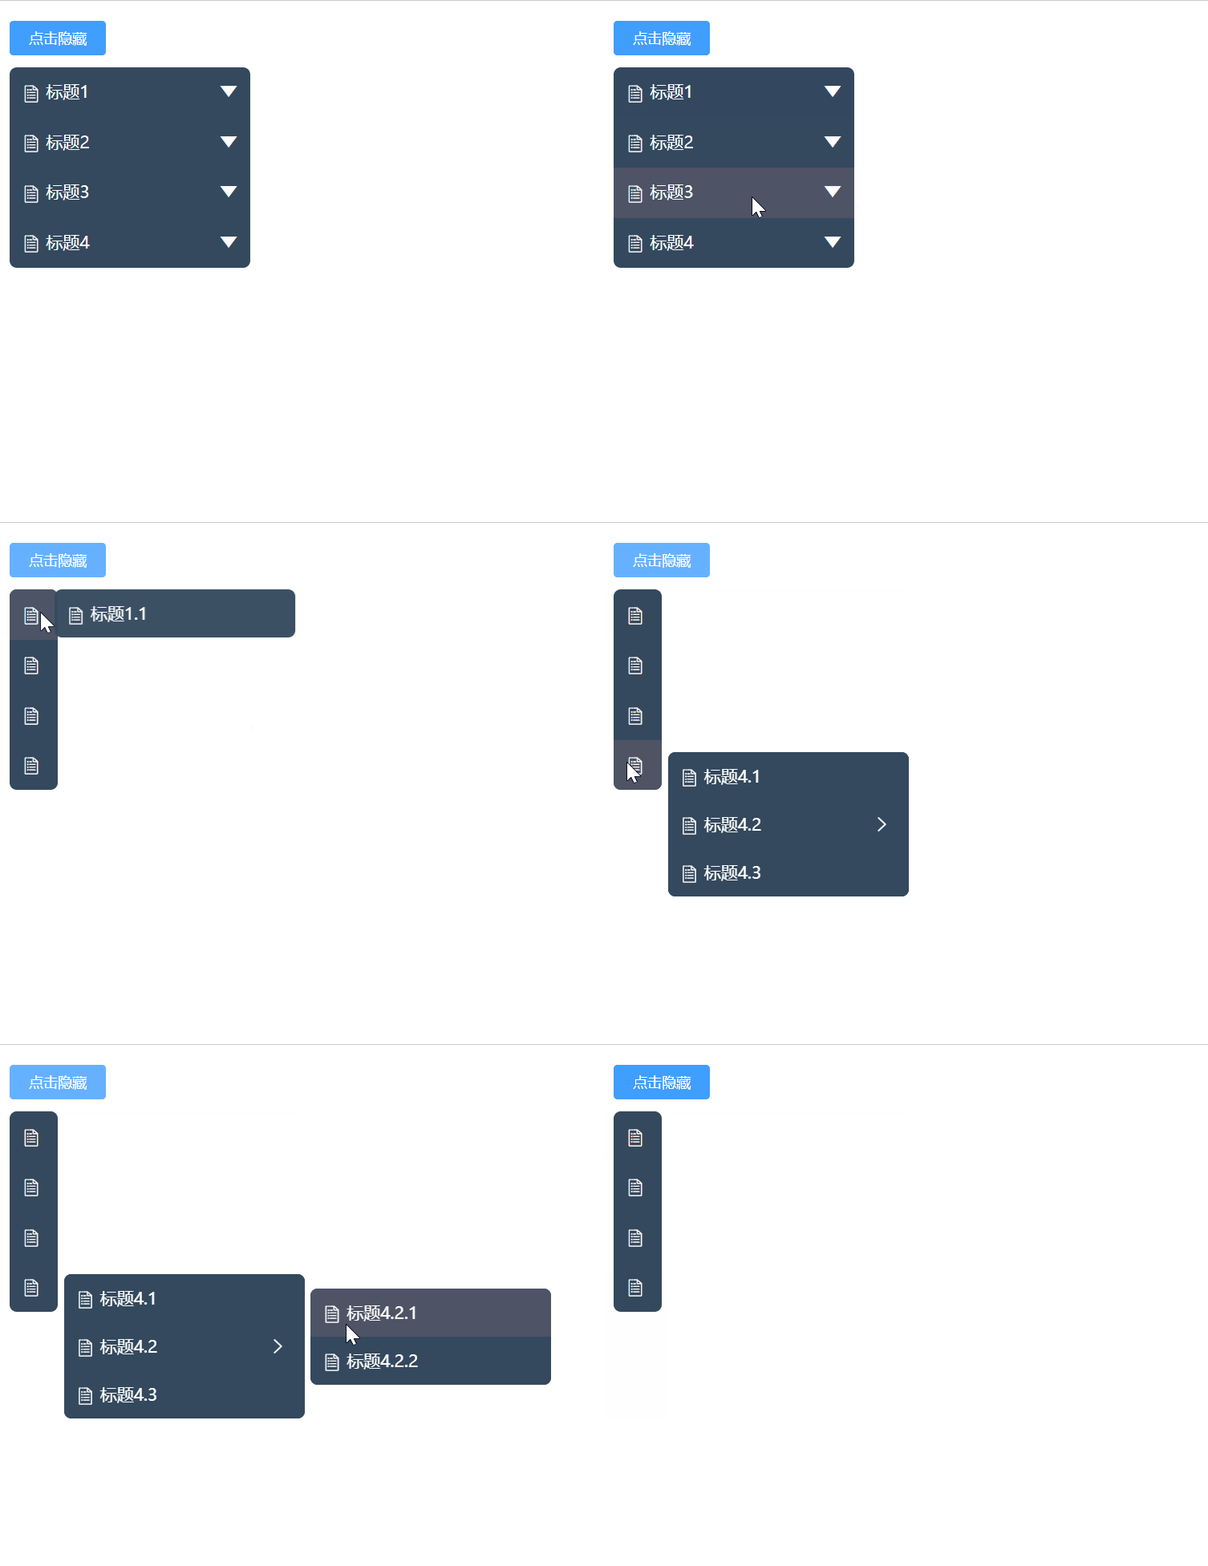
})- 由此其实可以实现很多递归组件,如侧边栏。
- 下面我放一个自己写的侧边栏的动图,方法比这个树形组件要简单些,毕竟不用考虑复选框的值。感兴趣的小伙伴们可以试着实践一下

加载全部内容