Vue项目打包部署nginx
这个名字还中 人气:0使用场景:
我们常使用前后端分离项目时,会需要将前端vue打包然后部署。
一.打包
vue项目其实可以直接通过一下语句进行打包:
npm run build
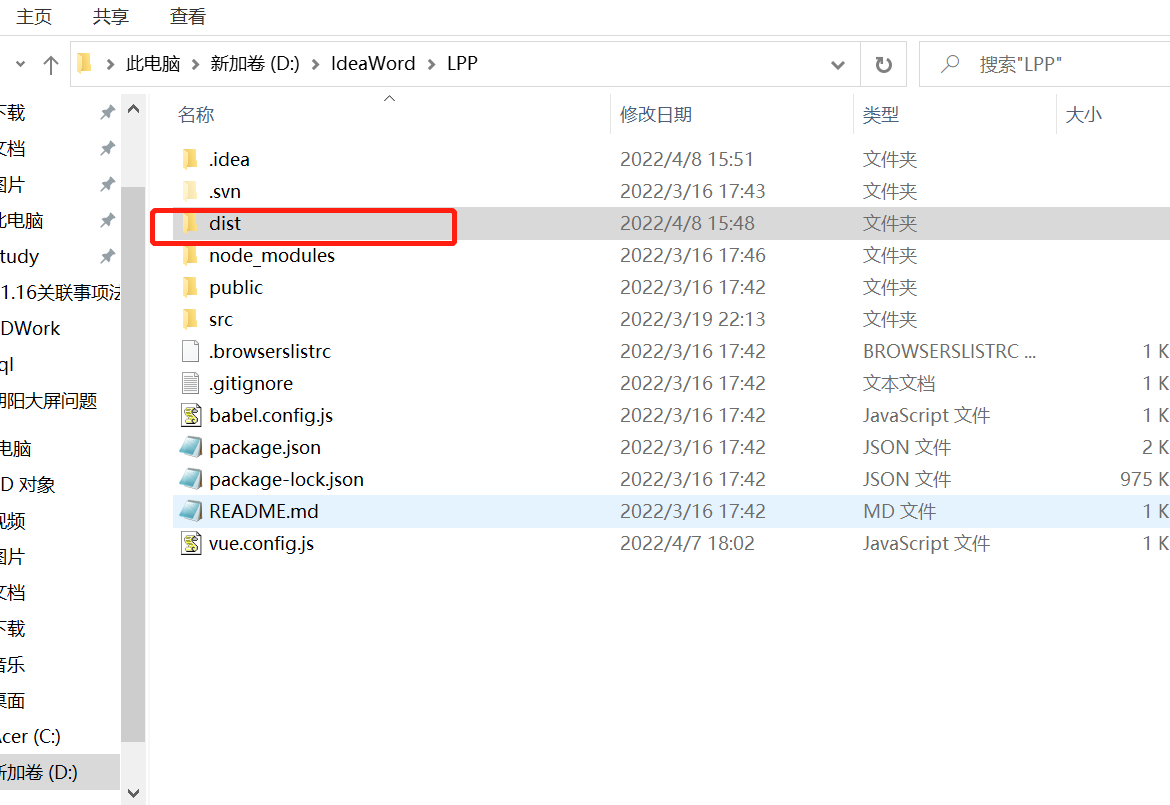
默认打包情况如下:


当我们需要将打包名称以及静态资源位置进行修改时便需要进行相应的配置:
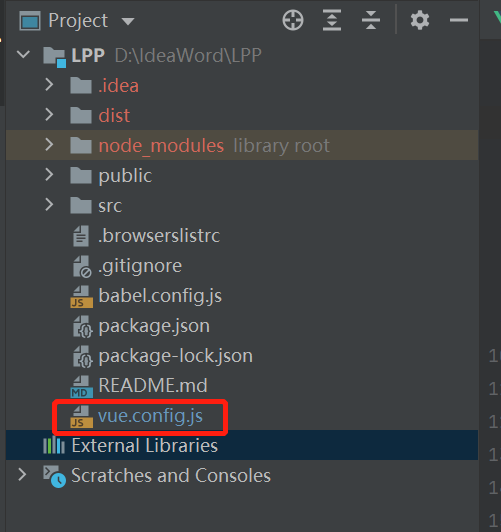
1.首先在项目根目录下创建vue.config.js文件

配置内容如下所示(附带跨域问题解决):
module.exports = {
    //打包
    publicPath: './',
    outputDir: 'test', //打包输出目录
    assetsDir: './static', //放置生成的静态资源
    filenameHashing: true, // 生成的静态资源在它们的文件名中包含了 hash 以便更好的控制缓存
    lintOnSave: false, //设置是否在开发环境下每次保存代码时都启用 eslint验证
    productionSourceMap: false,// 打包时不生成.map文件

    // 解决跨域配置
    devServer: {                //记住,别写错了devServer//设置本地默认端口  选填
        port: 8080,
        proxy: {                 //设置代理,必须填
            '/api': {              //设置拦截器  拦截器格式   斜杠+拦截器名字,名字可以自己定
                target: 'http://localhost:9090',     //代理的目标地址(后端设置的端口号)
                changeOrigin: true,              //是否设置同源,输入是的
                pathRewrite: {                   //路径重写
                    '/api': ''                     //选择忽略拦截器里面的单词
                }
                /*也就是在前端使用/api可以直接替换为(http://localhost:9090)*/
            }
        }
    },
}
2.查看路由中(router/index.js)是否使用history,是的话修改为hash。或者将mode直接注掉,因为默认使用hash。
const router = new VueRouter({
  /*mode: 'history',*/
  mode: 'hash',
  routes:[]
})

export default router
然后再次使用npm run build进行打包就会出现test文件夹,已经其中静态文件会放置到static中。
到此打包已经结束。
3.找到打包后文件的路径
双击打包好的index.html文件,就可以看到是首页了。
二.部署(nginx)
首先需要安装nignx,这个毋庸置疑这里就不介绍。(或者后续会在nginx板块放置具体安装步骤)
直接在nginx.conf中进行配置即可:
server {
    listen   8021;
    server_name  localhost;

    location /test{
        alias    /home/hyq/vue_file;
        index  index.shtml index.html index.htm;
    }
配置具体含义:
#user nobody;
worker_processes 1;
#error_log logs/error.log;
#error_log logs/error.log notice;
#error_log logs/error.log info;
#pid logs/nginx.pid;
events {
worker_connections 1024;
}
http {
include mime.types;
default_type application/octet-stream;
#log_format main '$remote_addr - $remote_user [$time_local] "$request" '
# '$status $body_bytes_sent "$http_referer" '
# '"$http_user_agent" "$http_x_forwarded_for"';
#access_log logs/access.log main;
sendfile on;
#tcp_nopush on;
#keepalive_timeout 0;
keepalive_timeout 65;
#gzip on;
ssi on;
ssi_silent_errors on;
ssi_types text/shtml;
#定义的服务器列表
upstream cms {
#这里代表代理的项目端口为127.0.0.1:8111端口(weight等配置自行查询)
server 127.0.0.1:8111 weight=5 max_fails=3 fail_timeout=20s;
}
server {
listen 8096; #nginx使用8096
server_name localhost; #服务名称
location /menhu/cms {
proxy_pass http://cms;
#请求转向cms 定义的服务器列表。也就是访问localhost:8096/menhu/cms 会转向到上方服务器列 #表中的127.0.0.1:8111
}
location /qgxzzfzhgljdpt {
root D:\BDWorkParce3\LPT_MENHU\wwwroot_release; #根目录
index index.shtml index.html index.htm; #设置默认页
#访问localhost:8096/qgxzzfzhgljdpt 会打开 D:\BDWorkParce3\LPT_MENHU\wwwroot_release\qgxzzfzhgljdpt下级中的index.shtml/index.html/index.htm默认页
}
location ^~ /template {
return 404;
}
location = /c/ {
return 404;
}
location = /css/ {
return 404;
}
location = /images/ {
return 404;
}
location = /include/ {
return 404;
}
location = /js/ {
return 404;
}
location = /style/ {
return 404;
}
location = /upload/ {
return 404;
}
location = /html/ {
return 404;
}
location = /root/ {
return 404;
}
location ~ .*.(svn|Git|git) {
return 404;
}
error_page 500 502 503 504 /50x.html;
location = /50x.html {
root html;
}
}
}
########### 每个指令必须有分号结束。#################
#user administrator administrators; #配置用户或者组,默认为nobody nobody。
#worker_processes 2; #允许生成的进程数,默认为1
#pid /nginx/pid/nginx.pid; #指定nginx进程运行文件存放地址
error_log log/error.log debug; #制定日志路径,级别。这个设置可以放入全局块,http块,server块,级别以此为:debug|info|notice|warn|error|crit|alert|emerg
events {
accept_mutex on; #设置网路连接序列化,防止惊群现象发生,默认为on
multi_accept on; #设置一个进程是否同时接受多个网络连接,默认为off
#use epoll; #事件驱动模型,select|poll|kqueue|epoll|resig|/dev/poll|eventport
worker_connections 1024; #最大连接数,默认为512
}
http {
include mime.types; #文件扩展名与文件类型映射表
default_type application/octet-stream; #默认文件类型,默认为text/plain
#access_log off; #取消服务日志
log_format myFormat '$remote_addr–$remote_user [$time_local] $request $status $body_bytes_sent $http_referer $http_user_agent $http_x_forwarded_for'; #自定义格式
access_log log/access.log myFormat; #combined为日志格式的默认值
sendfile on; #允许sendfile方式传输文件,默认为off,可以在http块,server块,location块。
sendfile_max_chunk 100k; #每个进程每次调用传输数量不能大于设定的值,默认为0,即不设上限。
keepalive_timeout 65; #连接超时时间,默认为75s,可以在http,server,location块。
upstream mysvr {
server 127.0.0.1:7878;
server 192.168.10.121:3333 backup; #热备
}
error_page 404 https://www.baidu.com; #错误页
server {
keepalive_requests 120; #单连接请求上限次数。
listen 4545; #监听端口
server_name 127.0.0.1; #监听地址
location ~*^.+$ { #请求的url过滤,正则匹配,~为区分大小写,~*为不区分大小写。
#root path; #根目录
#index vv.txt; #设置默认页
proxy_pass http://mysvr; #请求转向mysvr 定义的服务器列表
deny 127.0.0.1; #拒绝的ip
allow 172.18.5.54; #允许的ip
}
}
}然后启动或者重启nginx即可。
访问:服务器地址:8021/test 即可。
总结
加载全部内容