Spring事务控制
兴奋の大公猴 人气:0Spring的事务控制实现,供大家参考,具体内容如下
提示:这里使用的是xml的方式配置事务的
前言
例:当银行转账的时候,如果转账和收款的一方出现问题,那么这次的转账则不成功,此处如果没有事务管理,那么可能出现一方已经转账成功,另一方却没有收款的问题。为了避免此问题,应当使用到事务管理。
提示:以下是本篇文章正文内容,下面案例可供参考
一、Spring声明式事务控制
示例:
二、使用步骤
1.xml配置
配置如下(示例):
<?xml version="1.0" encoding="UTF-8"?>
<beans xmlns="http://www.springframework.org/schema/beans"
       xmlns:xsi="http://www.w3.org/2001/XMLSchema-instance"
       xmlns:aop="http://www.springframework.org/schema/aop"
       xmlns:tx="http://www.springframework.org/schema/tx"
       xmlns:context="http://www.springframework.org/schema/context"
       xsi:schemaLocation="
       http://www.springframework.org/schema/beans http://www.springframework.org/schema/beans/spring-beans.xsd
       http://www.springframework.org/schema/aop http://www.springframework.org/schema/aop/spring-aop.xsd
       http://www.springframework.org/schema/tx http://www.springframework.org/schema/tx/spring-tx.xsd
       http://www.springframework.org/schema/context http://www.springframework.org/schema/context/spring-context.xsd
">

    <!--  1.加载jdbc.properties  -->
    <context:property-placeholder location="classpath:jdbc.properties"></context:property-placeholder>

    <!--  2.配置数据源对象  -->
    <bean id="dataSource" class="com.alibaba.druid.pool.DruidDataSource">
        <property name="driverClassName" value="${driver}"></property>
        <property name="url" value="${url}"></property>
        <property name="username" value="${user}"></property>
        <property name="password" value="${password}"></property>
    </bean>

    <bean id="jdbcTemplate" class="org.springframework.jdbc.core.JdbcTemplate">
        <property name="dataSource" ref="dataSource"/>
    </bean>

    <bean id="accountDao" class="com.codejams.dao.impl.AccountDaoImpl">
        <property name="jdbcTemplate" ref="jdbcTemplate"/>
    </bean>

<!--    <bean class="com.codejams.controller.DemoTest">-->
<!--        <property name="accountService" ref="accountService"/>-->
<!--    </bean>-->

    <!--目标对象  内部的方法就是切点-->
    <bean id="accountService" class="com.codejams.service.impl.AccountServiceImpl">
        <property name="accountDao" ref="accountDao"/>
    </bean>

    <!--配置平台事务管理器-->
    <bean id="transactionManager" class="org.springframework.jdbc.datasource.DataSourceTransactionManager">
        <property name="dataSource" ref="dataSource"/>
    </bean>

    <!--通知  事务的增强-->
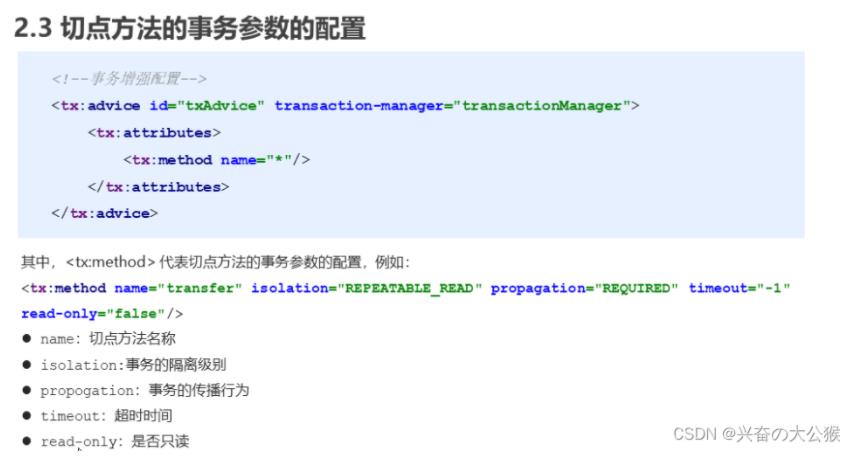
    <tx:advice id="txAdvice" transaction-manager="transactionManager">
        <!--设置事务的属性信息的-->
        <tx:attributes>
            <tx:method name="transfer" isolation="REPEATABLE_READ" propagation="REQUIRED" read-only="false"/>
            <tx:method name="save" isolation="REPEATABLE_READ" propagation="REQUIRED" read-only="false"/>
            <tx:method name="findAll" isolation="REPEATABLE_READ" propagation="REQUIRED" read-only="true"/>
            <tx:method name="update*" isolation="REPEATABLE_READ" propagation="REQUIRED" read-only="true"/>
            <tx:method name="*"/>
        </tx:attributes>
    </tx:advice>

    <!--配置事务的aop织入-->
    <aop:config>
        <aop:pointcut id="txPointcut" expression="execution(* com.codejams.service.impl.*.*(..))"/>
        <aop:advisor advice-ref="txAdvice" pointcut-ref="txPointcut"/>
    </aop:config>

</beans>
2.AccountDaoImpl代码
代码如下(示例):
package com.codejams.dao.impl;

import com.codejams.dao.AccountDao;
import org.springframework.jdbc.core.JdbcTemplate;

public class AccountDaoImpl implements AccountDao {

    private JdbcTemplate jdbcTemplate;

    public void setJdbcTemplate(JdbcTemplate jdbcTemplate) {
        this.jdbcTemplate = jdbcTemplate;
    }

    public void out(String outMan, double money) {
        jdbcTemplate.update("update account set money=money-? where name=?",money,outMan);
    }

    public void in(String inMan, double money) {
        jdbcTemplate.update("update account set money=money+? where name=?",money,inMan);
    }
}
3.AccountServiceImpl代码
代码如下(示例):
package com.codejams.service.impl;

import com.codejams.dao.AccountDao;
import com.codejams.service.AccountService;
import org.springframework.beans.factory.annotation.Autowired;

public class AccountServiceImpl implements AccountService {

    //@Autowired
    private AccountDao accountDao;
    public void setAccountDao(AccountDao accountDao) {
        this.accountDao = accountDao;
    }

    public void transfer(String outMan, String inMan, double money) {
        accountDao.out(outMan,money);
        int i = 1/0;
        accountDao.in(inMan,money);
    }
}
结果展示

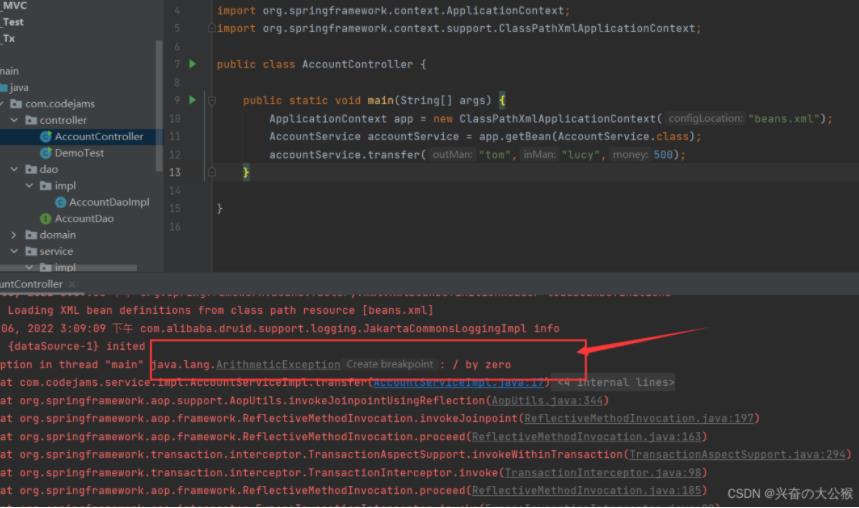
手动在这里制造一个异常

此时数据库的状态为两人均为5000

执行后,可以看见这里报了异常,并且数据库的两人的money都没有更改


加载全部内容