springboot CORS跨域
yzh_1346983557 人气:0一、实现WebMvcConfigurer接口
@Configuration
public class WebConfig implements WebMvcConfigurer {
    /**
     * 添加跨域支持
     */
    @Override
    public void addCorsMappings(CorsRegistry registry) {
        // 允许跨域访问的路径  '/**'表示应用的所有方法
        registry.addMapping("/**")
            // 允许跨域访问的来源 '*'表示所有域名来源
            .allowedOriginPatterns("*")
            // .allowedOrigins("*") // 允许跨域访问的来源 SpringBoot2.4.0之前的版本
            // 允许跨域请求的方法  '*'表示所有
            .allowedMethods("GET", "HEAD", "POST", "PUT", "DELETE", "OPTIONS")
            // 是否允许发送cookie true-允许 false-不允许 默认false。对服务器有特殊要求的请求,比如请求方法是PUT或DELETE,或者Content-Type字段的类型是application/json,这个值只能设为true
            .allowCredentials(true)
            // 预检间隔时间1小时,单位为秒。指定本次预检请求的有效期,在有效期间,不用发出另一条预检请求。
            // 浏览器发出CORS简单请求,只需要在头信息之中增加一个Origin字段
            // 浏览器发出CORS非简单请求,会在正式通信之前,增加一次OPTIONS查询请求,称为"预检"请求(preflight)。浏览器先询问服务器,当前网页所在的域名是否在服务器的许可名单之中,以及可以使用哪些HTTP动词和头信息字段。只有得到肯定答复,浏览器才会发出正式的XMLHttpRequest请求,否则就报错。
            .maxAge(3600)
            // 允许跨域请求可携带的header,'*'表所有header头。CORS请求时,XMLHttpRequest对象的getResponseHeader()方法只能拿到6个基本字段:Cache-Control、Content-Language、Content-Type、Expires、Last-Modified、Pragma。如果想拿到其他字段,就必须在Access-Control-Expose-Headers里面指定
            .allowedHeaders("*");
    }
}
二、实现filter过滤器方式
@WebFilter
@Configuration
public class CorsFilter implements Filter {
    @Override
    public void doFilter(ServletRequest req, ServletResponse res, FilterChain chain) throws IOException, ServletException {
        HttpServletResponse response = (HttpServletResponse) res;
        response.setHeader("Access-Control-Allow-Origin", "*");
        response.setHeader("Access-Control-Allow-Credentials", "true");
        response.setHeader("Access-Control-Allow-Methods", "POST, GET, PATCH, DELETE, PUT");
        response.setHeader("Access-Control-Max-Age", "3600");
        response.setHeader("Access-Control-Allow-Headers", "Origin, X-Requested-With, Content-Type, Accept");
        chain.doFilter(req, res);
    }
}
三、注解@CrossOrigin
@CrossOrigin(originPatterns = "*", allowCredentials = "true")
@CrossOrigin可配置在方法上,也可配置在类上。
四、实战
创建两个普通的SpringBoot项目A、B,A配置8081端口,B配置8082端口。
在A的resources/static目录下创建一个html文件index.html:
<!DOCTYPE html>
<html lang="en">
<head>
    <meta charset="UTF-8">
    <title>Title</title>
</head>

<!-- jquery库可百度jquery cdn -->
<script src="https://cdn.bootcdn.net/ajax/libs/jquery/3.6.0/jquery.js"></script>
<script>
    function btnClick() {
        $.get('http://localhost:8082/hello/hello', function (msg) {
            $("#app").html(msg);
        });
    }

    function btnClick2() {
        $.post('http://localhost:8082/hello/hello', function (msg) {
            $("#app").html(msg);
        });
    }
</script>

<body>

<div id="app"></div>
<input type="button" onclick="btnClick()" value="get_button">
<input type="button" onclick="btnClick2()" value="post_button">

</body>
</html>
B提供2个web接口:
@RestController
@RequestMapping("/hello")
public class HelloController {
    // @CrossOrigin(originPatterns = "*", allowCredentials = "true")
    @GetMapping("/hello")
    public String hello() {
        System.out.println("get hello");
        return "get hello";
    }

    // @CrossOrigin(originPatterns = "*", allowCredentials = "true")
    @PostMapping("/hello")
    public String hello2() {
        System.out.println("post hello");
        return "post hello";
    }
}分别启动A、B服务,浏览器访问A的index.html,点击按钮,浏览器控制台报错如下:http://localhost:8081/index.html
Access to XMLHttpRequest at 'http://localhost:8082/hello/hello' from origin 'http://localhost:8081' has been blocked by CORS policy: No 'Access-Control-Allow-Origin' header is present on the requested resource.

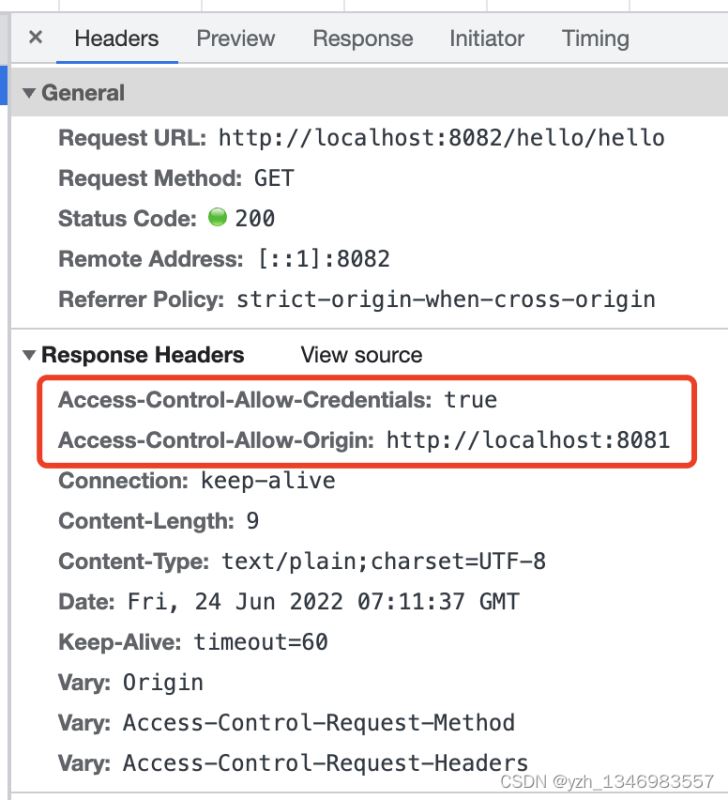
为B项目使用方式一,添加跨域支持,重启,再次点击按钮,可正常访问,观察响应头多了支持跨域的信息:

五、cookie的跨域
从Chrome51开始,浏览器cookie添加了一个新属性SameSite,以防止 CSRF 攻击和用户跟踪。
SameSite可取值:Strict、Lax、None。
Strict最为严格,完全禁止第三方 Cookie,跨站点时,任何情况下都不会发送 Cookie。换言之,只有当前网页的 URL 与请求目标一致,才会带上 Cookie。
Lax规则稍稍放宽,大多数情况也是不发送第三方 Cookie,但是导航到目标网址的 Get 请求除外。导航到目标 URL 的 GET 请求仅包括三种情况:链接、预加载请求和 GET 表单。
网站可以选择显式关闭SameSite属性,将其设为None。不过,前提是必须同时设置Secure属性(Cookie 只能通过 HTTPS 协议发送),否则无效。
SpringBoot 2.6及以上版本
网上查到可使用配置(但亲测无效!):
server.servlet.session.cookie.same-site=none
server.servlet.session.cookie.secure=true
SpringBoot 2.6以下版本
如果使用 Tomcat 作为服务器,则可以通过以下配置设置会话 cookie 的 SameSite 属性(亲测无效!)。
server.servlet.session.cookie.secure=true
@Configuration
public class TomcatCookieConfig {
    @Bean
    public TomcatContextCustomizer sameSiteCookiesConfig() {
        return context -> {
            final Rfc6265CookieProcessor cookieProcessor = new Rfc6265CookieProcessor();
            // SameSite
            cookieProcessor.setSameSiteCookies(SameSiteCookies.NONE.getValue());
            context.setCookieProcessor(cookieProcessor);
        };
    }
}
如果您使用的是 Spring-Session,那么您可以使用以下配置来设置 cookie 的 SameSite 属性。
        <dependency>
            <groupId>org.springframework.session</groupId>
            <artifactId>spring-session-core</artifactId>
        </dependency>
@Configuration
public class SpringSessionConfiguration {
@Bean
public CookieSerializer cookieSerializer() {
DefaultCookieSerializer cookieSerializer = new DefaultCookieSerializer();
// Strict-严格模式 Lax-松懈模式 None-无
cookieSerializer.setSameSite("None");
cookieSerializer.setUseSecureCookie(true);
return cookieSerializer;
}
}自己的解决方式
@Configuration
public class CookieConfig {
    private static String domain;

    @Value("${domain}")
    public void setDomain(String domain) {
        CookieConfig.domain = domain;
    }

    public static HttpCookie generateHttpCookie(String name, String value) {
        return ResponseCookie.from(name, value)
            .domain(domain)
            // cookie跨域设置
            .sameSite("None")
            // 在https下传输,配合sameSite=None使用
            .secure(true)
            .path("/")
            // 有效期24小时
            .maxAge(60 * 60 * 24)
            .build();
    }
}
@GetMapping("/hello")
public String hello(HttpServletResponse response) {
HttpCookie cookie2 = CookieConfig.generateHttpCookie("age", "18");
response.addHeader(HttpHeaders.SET_COOKIE, cookie2.toString());
HttpCookie cookie3 = CookieConfig.generateHttpCookie("id", "77");
response.addHeader(HttpHeaders.SET_COOKIE, cookie3.toString());
System.out.println("get hello");
return "get hello";
}加载全部内容