SpringBoot拦截器
北根娃 人气:01.SpringBoot版本
本文基于的Spring Boot的版本是2.6.7 。
2.什么是拦截器
Spring MVC中的拦截器(Interceptor)类似于ServLet中的过滤器(Filter),它主要用于拦截用户请求并作出相应的处理。例如通过拦截器可以进行权限验证、记录请求信息的日志、判断用户是否登录等。
3.工作原理
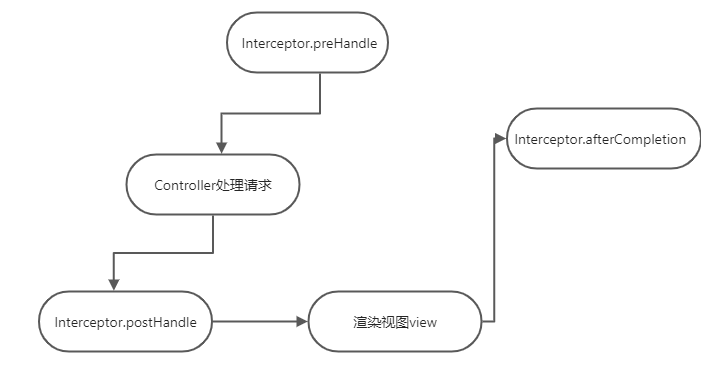
一个拦截器,只有preHandle方法返回true,postHandle、afterCompletion才有可能被执行;如果preHandle方法返回false,则该拦截器的postHandle、afterCompletion必然不会被执行。拦截器不是Filter,却实现了Filter的功能,其原理在于:
1.所有的拦截器(Interceptor)和处理器(Handler)都注册在HandlerMapping中。
2.Spring MVC中所有的请求都是由DispatcherServlet分发的。
3.当请求进入DispatcherServlet.doDispatch()时候,首先会得到处理该请求的Handler(即Controller中对应的方法)以及所有拦截该请求的拦截器。拦截器就是在这里被调用开始工作的。
4.拦截器的工作流程
4.1正常流程

4.2中断流程
如果在Interceptor1.preHandle中报错或返回false ,那么接下来的流程就会被中断,但注意被执行过的拦截器的afterCompletion仍然会执行。
5.应用场景
拦截器本质上是面向切面编程(AOP),符合横切关注点的功能都可以放在拦截器中来实现,主要的应用场景包括:
- 登录验证,判断用户是否登录。
- 权限验证,判断用户是否有权限访问资源,如校验token
- 日志记录,记录请求操作日志(用户ip,访问时间等),以便统计请求访问量。
- 处理cookie、本地化、国际化、主题等。
- 性能监控,监控请求处理时长等。
6.如何自定义一个拦截器
自定义一个拦截器非常简单,只需要实现HandlerInterceptor这个接口即可,该接口有三个可以实现的方法,如下:
preHandle()方法:改方法会在控制方法前执行,器返回值表示是否知道如何写一个接口。中断后续操作。当其返回值为true时,表示继续向下执行;当其返回值为false时,会中断后续的所有操作(包括调用下一个拦截器和控制器类中的方法执行等 )- postHandle()方法: 该方法会在控制器方法调用之后,且解析视图之前执行。可以通过此方法对请求域中的模型和视图作出进一步的修改。
- afterCompletion()方法:该方法会在整个请求完成,即视图渲染结束之后执行。可以通过此方法实现一些资源清理、记录日志信息等工作。
7.如何使其在Spring Boot中生效
其实想要在Spring Boot生效其实很简单,只需要定义一个配置类,实现WebMvcConfigurer这个接口,并且实现其中的addInterceptiors()方法即可,代码演示如下:
@Configuration
public class WebConfig implements WebMvcConfigurer {

    @Autowired
    private  XXX xxx;
    @Override
    public void addInterceptors(InterceptorRegistry registry) {
        //不需要拦截的url
        final  String[] commonExclude={};
        registry.addInterceptor(xxx).excludePathPatterns(commonExclude)
    }
}
8.实际使用
8.1场景模拟
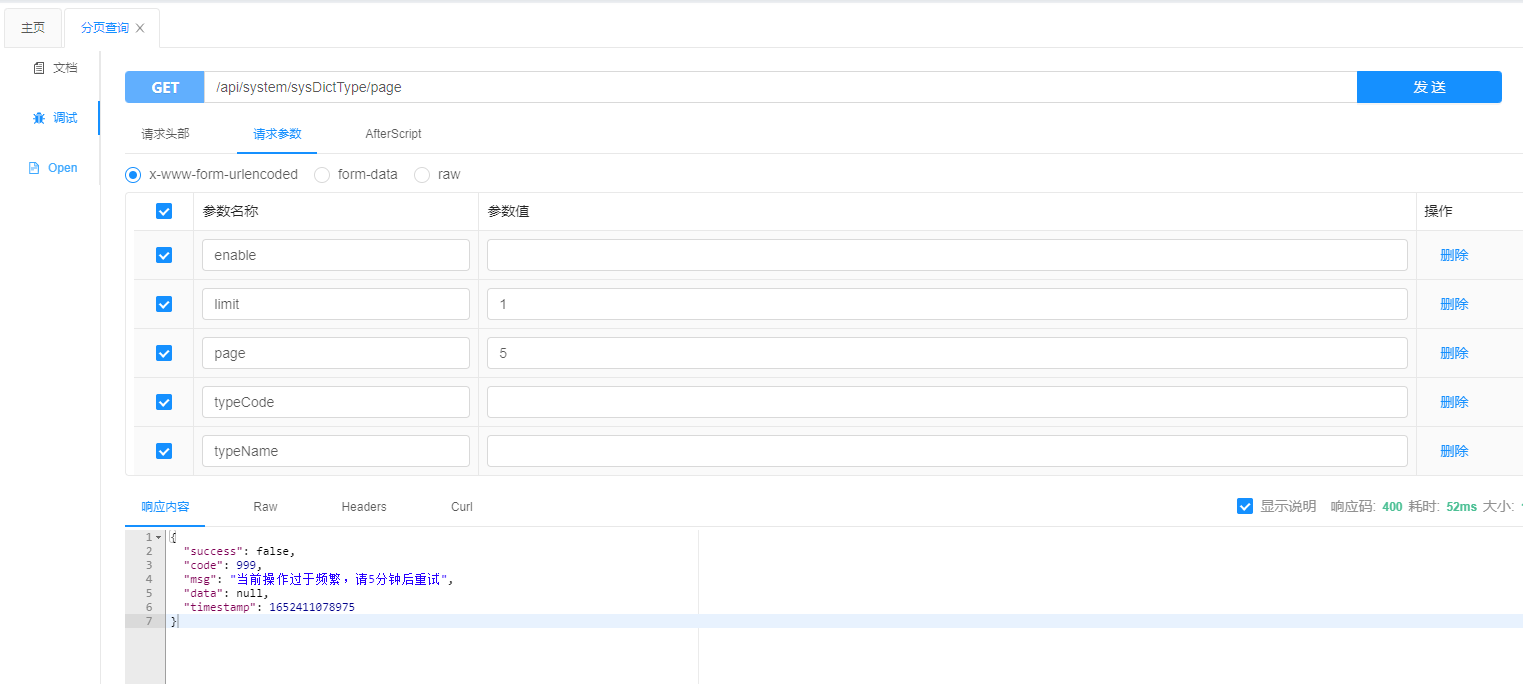
通过拦截器防止用户暴力请求连接,使用用户IP来限制访问次数 。达到多少次数禁止该IP访问。
8.2思路
记录用户IP访问次数,第一次访问时在redis中创建一个有效时长1秒的key,当第二次访问时key值+1,当值大于等于5时在redis中创建一个5分钟的key,当拦截器查询到reids中有当前IP的key值时返回false限制用户请求接口 。
8.3实现过程
第一步,创建一个拦截器,代码如下:
@Slf4j
public class IpUrlLimitInterceptor implements HandlerInterceptor {

    @Resource
    RedisUtils redisUtils;

    private static  final  String LOCK_IP_URL_KEY="lock_ip_";

    private static  final String IP_URL_REQ_TIME="ip_url_times_";
    //访问次数限制
    private static final long LIMIT_TIMES=5;

    //限制时间 秒为单位
    private static final int IP_LOCK_TIME=300;

    @Override
    public boolean preHandle(HttpServletRequest request, HttpServletResponse response, Object handler) throws Exception {
        log.info("request请求地址uri={},ip={}",request.getRequestURI(), IpUtils.getRequestIP(request));
        if(ipIsLock(IpUtils.getRequestIP(request))){
            log.info("ip访问被禁止={}",IpUtils.getRequestIP(request));
            throw  new Exception("当前操作过于频繁,请5分钟后重试");
        }
        if (!addRequestTime(IpUtils.getRequestIP(request),request.getRequestURI())){
            log.info("当前{}操作过于频繁,请5分钟后重试",IpUtils.getRequestIP(request));
            throw  new Exception("当前操作过于频繁,请5分钟后重试");
        }
        return true;
    }

    private boolean addRequestTime(String ip, String uri) {
        String key = IP_URL_REQ_TIME+ip+uri;
        if(redisUtils.hasKey(key)){
            long time=redisUtils.incr(key,(long)1);
            if(time >=LIMIT_TIMES){
                redisUtils.set(LOCK_IP_URL_KEY+ip,IP_LOCK_TIME);
                return false;
            }
        }else {
             boolean set = redisUtils.set(key, (long) 1, 1);
        }
        return  true;
    }

    private boolean ipIsLock(String ip) {
        if(redisUtils.hasKey(LOCK_IP_URL_KEY+ip)){
            return true;
        }
        return false;
    }

    @Override
    public void postHandle(HttpServletRequest request, HttpServletResponse response, Object handler, ModelAndView modelAndView) throws Exception {
        HandlerInterceptor.super.postHandle(request, response, handler, modelAndView);
    }

    @Override
    public void afterCompletion(HttpServletRequest request, HttpServletResponse response, Object handler, Exception ex) throws Exception {
        HandlerInterceptor.super.afterCompletion(request, response, handler, ex);
    }
}
第二步,定义一个获取IP的工具类,代码如下:
@Slf4j
public class IpUtils {


    public  static  String getRequestIP(HttpServletRequest request){
        String ip = request.getHeader("x-forwarded-for");
        if(ip != null && ip.length() !=0 && "unknown".equalsIgnoreCase(ip)){
            // 多次反向代理后会有多个ip值,第一个ip才是真实ip
            if( ip.indexOf(",")!=-1 ){
                ip = ip.split(",")[0];
            }
        }
        if (ip == null || ip.length() == 0 || "unknown".equalsIgnoreCase(ip)){
            ip = request.getHeader("Proxy-Client-IP");
            log.info("Proxy-Client-IP ip: " + ip);
        }
        if (ip == null || ip.length() == 0 || "unknown".equalsIgnoreCase(ip)) {
            ip = request.getHeader("HTTP_CLIENT_IP");
            log.info("HTTP_CLIENT_IP ip: " + ip);
        }
        if (ip == null || ip.length() == 0 || "unknown".equalsIgnoreCase(ip)) {
            ip = request.getHeader("HTTP_X_FORWARDED_FOR");
            log.info("HTTP_X_FORWARDED_FOR ip: " + ip);
        }
        if (ip == null || ip.length() == 0 || "unknown".equalsIgnoreCase(ip)) {
            ip = request.getHeader("X-Real-IP");
            log.info("X-Real-IP ip: " + ip);
        }
        if (ip == null || ip.length() == 0 || "unknown".equalsIgnoreCase(ip)) {
            ip = request.getRemoteAddr();
            log.info("getRemoteAddr ip: " + ip);
        }
        return  ip;
    }
}
第二步,在Spring Boot中配置这个拦截器,代码如下:
@Configuration
public class WebConfig implements WebMvcConfigurer {


    @Bean
    IpUrlLimitInterceptor getIpUrlLimitInterceptor(){
        return  new IpUrlLimitInterceptor();
    };
    @Override
    public void addInterceptors(InterceptorRegistry registry) {

        registry.addInterceptor(getIpUrlLimitInterceptor()).addPathPatterns("/**");

    }
}
8.4效果体验

9.总结
该拦截器是全局生效的,可能有些场景某个接口不需要限制,这样我们可以把这个拦截器改造成注解方式应用。某些接口需要则加上注解即可。
加载全部内容