Vue3动态路由和动态侧边菜单栏
倾颜 人气:2前言
在做Vue管理系统的时候,都会遇到的一个需求:每个用户的权限是不一样的,那么他可以访问的页面(路由),可以操作的菜单选项是不一样的,如果由后端控制,我们前端需要去实现动态路由,动态渲染侧边菜单栏。
动态路由
- 在本示例管理系统中,由于每个用户的权限不一样,拥有的可以访问的路由页面也不一样,用户能访问的路由页面都是后端根据权限动态配置的
- 我们前端需要根据后端接口返回的路由表去动态增删路由,从而生成这个用户所拥有的路由。
重点:实现动态路由api
- router.addRoute() //应用程序已经运行的时候添加路由
- router.removeRoute() // 应用程序已经运行的时候删除路由
定义共用的页面路由(无论哪个用户都会有的)
如无论什么用户都可访问登录页login,错误页面404。
import { createRouter, createWebHashHistory } from 'vue-router'

const publicRoutes = [
  {
    path: '/',
    redirect: { path: '/login' }
  },
  {
    path: '/login',
    name: 'login',
    component: () => import('../views/login')
  },
  {
    path: '/404',
    name: '404',
    component: () => import('../views/404')
  },
  {
    path: '/home',
    name: 'home',
    component: () => import('../views/home'),
    redirect: '/welcome',
    children: [
      {
        path: '/:pathMatch(.*)*',    // 捕获所有路由或 404 Not found 路由
        component: () => import('../views/welcome')
      }
    ]
  }
]

const router = createRouter({
  history: createWebHashHistory(),
  routes: publicRoutes
})

export default router
接口数据:这里模拟接口的路由数据(这里进行数据精简,便于演示,实际情况可能要进行数据结构格式的转换)
navigationList : [
     {
        id: 1,
        icon: 'icon-jurassic_user',
        name: '用户管理',
        url: '/user'
    },
     {
        id: 2,
        icon: 'icon-jurassic_user',
        name: '角色管理',
        url: '/role'
     },
     {
        id: 3,
        icon: 'icon-shebei',
        name: '设备管理',
        url: '/device'
      }
]
添加动态路由进去的时机(router.beforeEach)
利用全局前置守卫router.beforeEach,在跳转路由前先判断是否已经添加过动态路由了,如果没有,则先获取数据进行添加路由。(router.beforeEach也会做登录等拦截,这里省略)
import store from '@/store'
//这里我用vuex的一个变量 asyncRoutestMark 来标识是否拼接过路由
router.beforeEach((to, from, next) => {
    if (!store.state.asyncRoutestMark) {
        // navigationList 是上面模拟接口返回的数据
        // 这里将新的路由都作为 home 的子路由(实际开发根据情况)
        // meta 是存储一些信息,可以用于权限校验或其他
        navigationList.forEach( navigation => {
          router.addRoute('home', {
            path: navigation.url,
            meta: { name: navigation.name, isAsync: true, icon: navigation.icon },
            name: menu.url,
            component: () => import(`../views/${menu.url}`)
          })
        })
        console.log(router.getRoutes(), '查看现有路由')
        store.commit('setAsyncRoutestMark', true) // 添加路由后更改标识为true
        next({ ...to, replace: true })     //路由进行重定向放行
    } else {
      next()
    }
})
利用router.getRoutes()方法查看现有路由,我们将会看到根据新的路由添加进去了。
这样我们就实现了动态路由啦!
动态侧边菜单栏
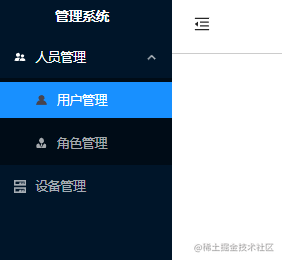
- 这是我们要实现的效果,根据接口数据动态渲染,不论层级多少都可以自动渲染,一级菜单,二级菜单,三级甚至更多(不过一般最多只到三级哈哈)。
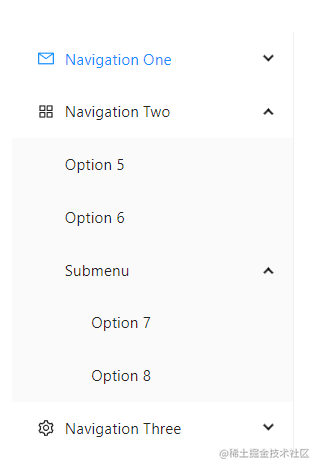
很多组件库都可以实现这个功能,这里我们将使用 Ant Design of Vue 组件库的内嵌菜单组件(如下图)去实现,有父菜单,子菜单,父级菜单的是用 a-sub-menu 包裹,子菜单的是直接使用 a-menu-item,大家可以去看文档看一下组件的使用。
接口数据:这里模拟接口的菜单数据(实际情况可能要进行数据结构格式的转换)
menuList :[
  {
    url: '',
    name: '人员管理',
    icon: 'icon-renyuan',
    menuId: 1,
    children: [
      {
        url: '/user',
        name: '用户管理',
        icon: 'icon-jurassic_user',
        menuId: 1001,
        children: []
      },
      {
        url: '/role',
        name: '角色管理',
        icon: 'icon-jiaose',
        menuId: 1002,
        children: []
      }
    ]
  },
  {
    url: '/device',
    name: '设备管理',
    icon: 'icon-shebei',
    menuId: 2
  }
]
重点:组件递归
使用v-for循环菜单数据数组,渲染组件库 ant design of vue的菜单组件,这时分两种情况,
- 如果有children,那么渲染a-sub-menu(父级菜单),并包裹自身组件,把children数据传递给调用的自身组件,也就是递归调用组件自身,那么调用的自身组件就会重复上面逻辑的判断,直到没有children,也就是遇到了第二种情况,结束递归调用。
- 如果没有children,那么直接显示 a-menu-item (子菜单)
下面为菜单组件,组件名为MenuList,递归调用的时候要用到组件名,以达到根据不同数据渲染菜单的情况
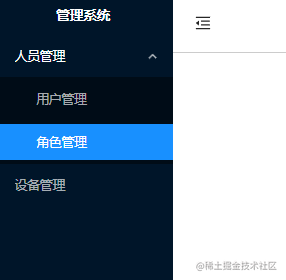
没有图标版本
<template>
  <template v-for="menu in menuList" :key="menu.menuId">
    <a-sub-menu v-if="menu.children && menu.children.length" :key="menu.menuId">
      <template #title>{{ menu.name }}</template>
      <MenuList :menuList="menu.children" />
    </a-sub-menu>
    <a-menu-item :key="menu.menuId" v-else>
      <span>{{ menu.name }}</span>
    </a-menu-item>
  </template>
</template>
<script setup>
import { defineProps } from 'vue'
defineProps({
  menuList: {
    type: Array,
    default: () => []
  }
})
</script>
效果如下
有图标版本
图标是根据接口数据的icon去匹配的,有多种方法,例如使用iconFont、svg、png,主要是去对应图标的名字,这里使用组件库提供的使用icon的iconFont方法。
<template>
  <template v-for="menu in menuList" :key="menu.menuId">
    <a-sub-menu v-if="menu.children && menu.children.length" :key="menu.menuId">
      <template #icon>
        <icon-font :type="menu.icon" />
      </template>
      <template #title>{{ menu.name }}</template>
      <MenuList :menuList="menu.children" />
    </a-sub-menu>
    <a-menu-item :key="menu.menuId" v-else>
      <template #icon>
        <icon-font :type="menu.icon" />
      </template>
      <span>{{ menu.name }}</span>
    </a-menu-item>
  </template>
</template>
<script setup>
import { defineProps } from 'vue'
import { createFromIconfontCN } from '@ant-design/icons-vue'
const IconFont = createFromIconfontCN({
  scriptUrl: '//at.alicdn.com/t/font_2572336_4hg62uu7hxd.js'
})
defineProps({
  menuList: {
    type: Array,
    default: () => []
  }
})
</script>
效果如下:

这样我们就实现了动态侧边菜单栏啦!
总结
加载全部内容