C++ Opencv 膨胀腐蚀 C++ Opencv自写函数实现膨胀腐蚀处理技巧
秋沐霖 人气:0想了解C++ Opencv自写函数实现膨胀腐蚀处理技巧的相关内容吗,秋沐霖在本文为您仔细讲解C++ Opencv 膨胀腐蚀的相关知识和一些Code实例,欢迎阅读和指正,我们先划重点:C++,Opencv,膨胀腐蚀,C++,Opencv,膨胀,下面大家一起来学习吧。
一、膨胀腐蚀学习笔记

二、代码及结果分享
#include <opencv2/opencv.hpp>
#include <iostream>

using namespace std;
using namespace cv;

//定义腐蚀函数
void myErode(Mat Src, Mat Tem, Mat Dst)
{
	int m = (Tem.rows - 1) / 2;
	int n = (Tem.cols - 1) / 2;
	for (int i = m; i < Src.rows - m; i++)//i、j的范围保证结构元始终在扩展后的图像内部
	{
		for (int j = n; j < Src.cols - n; j++)
		{
			Mat SrcROI = Src(Rect(j - m, i - n, Tem.cols, Tem.rows));
			double sum = 0;
			sum = SrcROI.dot(Tem);//矩阵对应位置相乘后求和
			if (sum == 9)//结构元的9个元素均为1,和为9才能保证结构元完全包含于相应集合
				Dst.at<uchar>(i, j) = 255;
			else
				Dst.at<uchar>(i, j) = 0;
		}
	}
}

//定义膨胀函数
void myDilate(Mat Src, Mat Tem, Mat Dst)
{
	int m = (Tem.rows - 1) / 2;
	int n = (Tem.cols - 1) / 2;
	for (int i = m; i < Src.rows - m; i++)//i、j的范围保证结构元始终在扩展后的图像内部
	{
		for (int j = n; j < Src.cols - n; j++)
		{
			Mat SrcROI = Src(Rect(j - m, i - n, Tem.cols, Tem.rows));
			double sum = 0;
			sum = SrcROI.dot(Tem);//矩阵对应位置相乘后求和
			if (sum != 0)//结构元的9个元素均为1,只要和不为0,就能说明结构元与相应集合有交集
				Dst.at<uchar>(i, j) = 255;
			else
				Dst.at<uchar>(i, j) = 0;
		}
	}
}

int main()
{
	Mat mImage = imread("dada.jpg", 0);
	if (mImage.data == 0)
	{
		cerr << "Image reading error !" << endl;
		system("pause");
		return -1;
	}
	namedWindow("The original image", WINDOW_NORMAL);
	imshow("The original image", mImage);

	//设置阈值将图像二值化
	const int binThreshold = 80;
	for (int i = 0; i < mImage.rows; i++)
	{
		uchar* pImage = mImage.ptr<uchar>(i);
		for (int j = 0; j < mImage.cols; j++)
		{
			if (pImage[j] > binThreshold)//事实上应将灰度值大于阈值的赋值为255,但为了方便后续膨胀腐蚀的计算,在这里将其赋值为1
				pImage[j]= 1;
			else
				pImage[j] = 0;
		}
	}

	//定义并初始化结构元
	Mat mTemplate(3, 3, CV_8UC1, Scalar(1));
	if (mTemplate.rows * mTemplate.cols % 2 == 0)
	{
		cerr << "The size doesn't meet the requirement !" << endl;
		system("pause");
		return -1;
	}

	//扩展图像边界
	copyMakeBorder(mImage, mImage, mTemplate.rows, mTemplate.rows, mTemplate.cols, mTemplate.cols, BORDER_CONSTANT, Scalar(0));

	//进行图像腐蚀
	Mat mEResult = mImage.clone();
	myErode(mImage, mTemplate, mEResult);

	//进行图像膨胀
	Mat mDResult = mImage.clone();
	myDilate(mImage, mTemplate, mDResult);

	//进行显示
	namedWindow("The eroding image", WINDOW_NORMAL);
	imshow("The eroding image", mEResult);
	namedWindow("The dilating image", WINDOW_NORMAL);
	imshow("The dilating image", mDResult);
	waitKey();
	destroyAllWindows();

	return 0;
}

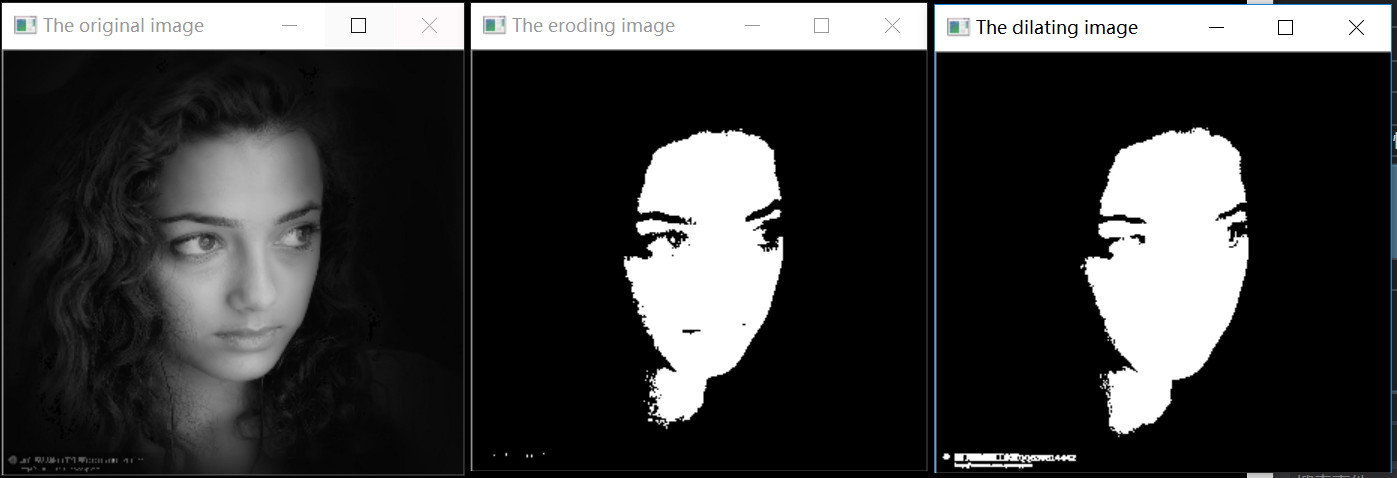
膨胀(dilate)和腐蚀(erode)均是对白色区域而言。由结果可明显看出,膨胀后的白色面积要比腐蚀后的大。由图像左下角的水印变化也可直观看出两种操作对图像的不同影响。
三、注意事项
在本次编程实现过程中,为了确定结构元是否包含于集合(或与集合是否有交集),需要让结构元中各元素与图像中对应位置像素值相乘后求和。Mat类型中有几种不同类型的乘法,在这里加以总结。
Mat A, B ;
3.1A.dot(B)
A、B对应位置元素相乘,之后将所有乘积相加求和,返回值是double型数字。要求A、B size必须相同。
#include <opencv2/opencv.hpp>
#include <iostream>

using namespace std;
using namespace cv;

int main()
{
	uchar A[3][3] = { {1,2,3},{4,5,6},{7,8,9} };
	uchar B[3][3] = { { 1,1,1 },{ 1,1,1 },{ 1,1,1 } };
	Mat Src(3, 3, CV_8UC1, A);
	Mat Dst(3, 3, CV_8UC1, B);
	double Result = Src.dot(Dst);
	cout << "Src:" << Src << endl;
	cout << "Dst:" << Dst << endl;
	cout << "Result:" << Result << endl;
	system("pause");
	return 0;
}

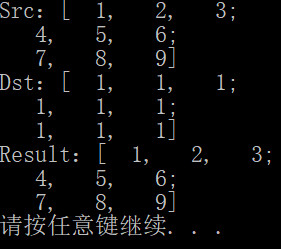
3.2A.mul(B)
A、B对应位置元素相乘,返回值是和A、B等大小,同类型的Mat型矩阵。要求A、B size必须相同。若计算结果溢出,则溢出值自动变为当前数据类型下允许的的最大值。
#include <opencv2/opencv.hpp>
#include <iostream>

using namespace std;
using namespace cv;

int main()
{
	uchar A[3][3] = { {1,2,3},{4,5,6},{7,8,9} };
	uchar B[3][3] = { { 1,1,1 },{ 1,1,1 },{ 1,1,1 } };
	Mat Src(3, 3, CV_8UC1, A);
	Mat Dst(3, 3, CV_8UC1, B);
	Mat Result = Src.mul(Dst);
	cout << "Src:" << Src << endl;
	cout << "Dst:" << Dst << endl;
	cout << "Result:" << Result << endl;
	system("pause");
	return 0;
}

加载全部内容